


The MISC subsection combines the following miscellaneous settings:
- Station Options
- Journal Settings
- Fuel Loyalty
- Merchandise Loyalty
- Check-in Options
- QwickServe Settings
- Station Tax Comments
- Docflow DPS Support
- LPA Settings
- Cash Registers and Fuel Pumps mapping
- Price Pole Settings
- Schedule
- Royalty Fee
- Mobile Assistant Settings
- Working Hours
This option is permission-based. Before editing the MISC form settings, make sure the Allow users to set up MISC permission is granted to your user in CStoreOffice®. Otherwise, the MISC form is available only in the view mode. For details, see Granting Role Permissions to Roles and Users.
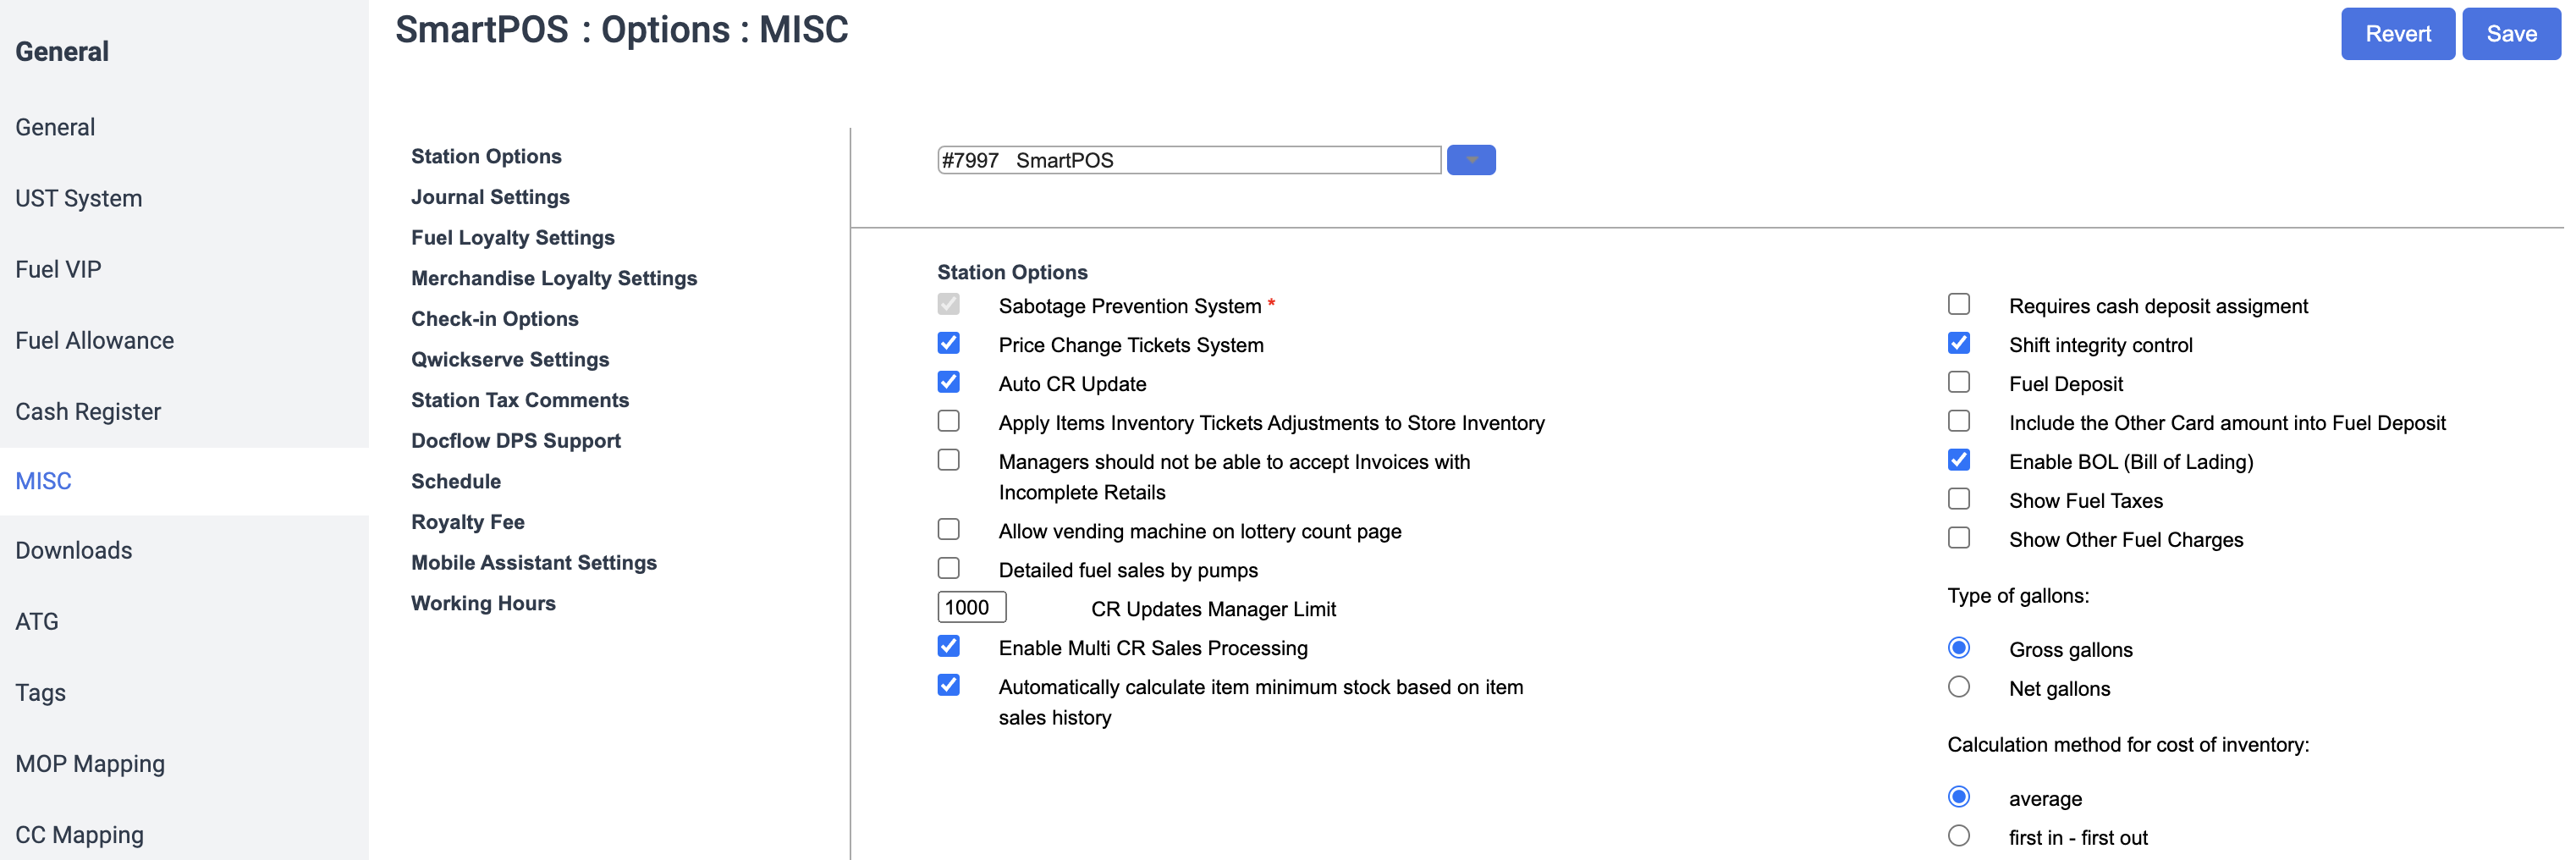
MISC > Station Options
- Sabotage Prevention System: This option lets you validate if the sequence of shifts being loaded is correct. In particular, this option helps you check if any shift has been skipped from the shift sequence.
- Price Change Tickets System: This option lets you enable the Price Change Ticket system in CStoreOffice®. With this system enabled, when you accept changes in the Cash Register Updates Manager, CStoreOffice® displays a link to a price change ticket listing the updated items. You can print out this ticket and physically count the updated items at the location. After that, you need to enter the exact item count to the system using Daily Manager's Workflow. As a result, you will have an accurate book value of the updated items. For details, see Checking and Processing Price Changes.
- Auto CR Update: Deprecated option for previous versions of POS connectors.
- Apply Items Inventory Tickets Adjustments to Store Inventory: Enable this option, if you need to adjust the category and ticket inventory. It might be needed in case if you perform full inventory rarely, but still need to get reconciled data in different inventory reports, such as the Category Inventory Level, Itemized Inventory, and Itemized Inventory by Tags reports.
- Managers should not be able to accept Invoices with Incomplete Retails
- Allow vending machine on lottery count page
- Detailed fuel sales by pumps: This option enables fuel sales for pumps.
- CR Updates Manager Limit: This option allows you to specify the number of updated items that can be sent to the cash register at a time.
- Enable Multi CR Sales Processing: This option enables the new mechanism of loading data for locations with several cash registers. Data from cash registers are compiled into a single array and loaded. For details, see Multi Cash Regsiter Sales Processing.
- Automatically calculate item minimum stock based on item sales history
- Requires cash deposits assignment: This option allows you to enable the reconcile deposits functionality for the location. If this option is not enabled, the Reconcile Deposits form in CStoreOffice® will not be accessible. For more details, see Enabling the Reconcile Deposits Functionality.
- Shift integrity control: This option lets you validate the integrity of loaded shifts. If the integrity control is enabled, the system will not allow you to load an incorrect or incomplete shift.
- Fuel Deposit: If this option is selected and the Fuel Deposit method of payment is set up, the difference between fuel sales and credit card amount will be added to the Fuel Deposit MOP in the Cash Reconciliation form of the Daily Data section. For more information, see Adding a Custom MOP and Daily Data Information > Custom Payments.
- Include the Other Card amount into Fuel Deposit
- Enable BOL (Bill of Lading): This option enables you to create specialized BOL documents in the Vendors module. For more information, see Creating a New BOL in Fuel Central.
- Show Fuel Taxes: This option enables the corresponding section to be displayed on the form of fuel invoices registration.
- Show Other Fuel Charges: This option enables the corresponding section to be displayed on the form of fuel invoices registration.
- Type of gallons: This option allows you to define the method of quantitative accounting of purchased fuel:
- Gross gallons
- Net gallons
- Change fuel delivery in SIR reports to: Specify what purchase values to use for the station's Consolidated Fuel Inventory Report, Statistical Inventory Reconciliation (SIR) fuel reports and Fuel Inventory.
- Gross gallons: Always use gross volume purchase.
- Default value: Use original values.
- Calculation method for cost of inventory: This group of options allows you to define the method of fuel costs write-off in sales. You can select one of the following options:
- average: Select this option, if you need to calculate the cost of fuel inventory using average method.
- first in - first out: Select this option, if you need to calculate the cost of fuel inventory using FIFO method.
- Use Tank Blending on Fuel Invoice Form: Not used at present.
- Process House Account Details: This option allows the cash register to send house accounts data to the back-office. House accounts data become available in sales transaction and customer reports.
- Use Paidout Control System: This option enables the Paidout Control System, which helps to consider all paid outs entered to the system by the station manager while accepting the shifts. With the Paidout Control System in place, the manager will have to create payout records in the shift report for pending invoices. Without payout records, invoices will not be accepted.
- Track Lottery Cash by Individual MOP: With this option enabled, lottery cash data is displayed in reports. If this option is not enabled, the lottery cash data will be displayed as part of the total cash amount in reports.
- Pending invoice should have old prices for items until the Price Change ticket is accepted: With this option enabled, pending invoices will have old prices for items until the Price Change ticket is accepted.
Depending on the Apply Items Inventory Tickets Adjustments to Store Inventory option state, the Retail and Total Book Inventory values differ in the Category Inventory Level and Itemized Inventory by Tags reports correspondingly:
- If this option is selected, the non-itemized adjustments are deducted from the Retail and Total Book Inventory values.
- If this option is unselected, the Retail and Total Book Inventory columns display their values disregarding the non-itemized adjustments.
Selected option is used for billing and results in calculation differences for Fuel Invoices. For more details, see Entering New Fuel Invoice.
For more information about the differences in the paid outs calculation, see b) Common Report, Sales Summary Report.
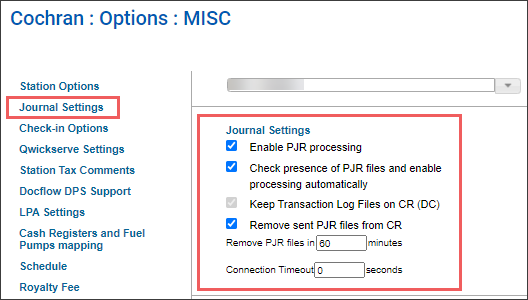
MISC > Journal Settings
- Enable PJR processing: With this option enabled, cash register transaction logs (PJR files) are sent to back office every 5 minutes.
- Check presence of PJR files and enable processing automatically: With this option enabled, the system checks if there are PJR files available on the cash register, and enables or disables the Enable PJR processing option, depending on the presence or absence of the PJR files.
- Keep Transaction Log Files on CR (DC): By default, PJR files are deleted from the cash register after they are sent to back office. With this option enabled, PJR files are not removed from the cash register. This option can be enabled only if the Enable PJR Processing option is enabled.
- Remove sent PJR files from CR: This option allows removing sent PJR files from the cash register.
- Remove PJR files in <N> minutes: This option allows specifying the time range after which the PJR files are removed.
- Connection Timeout <N> seconds

For SmartPOS cash register this option is enabled by default after the station is created.
Please note that the Enable PJR processing option is turned off automatically in CStoreOffice® if the PJR file processing is disabled at your cash register.
MISC > Fuel loyalty settings
- Enable Fuel Loyalty: Turn fuel loyalty calculations on or off. When enabled, the system will display fuel loyalty values as a separate payment method named according to the value of Fuel Loyalty Stored to MOP field.
- Fuel Loyalty Stored to MOP: The name of the payment method in which fuel loyalty is displayed within the system.
This value is pre-configured and is only shown for informational purposes. - Fuel loyalty calculation method: Specify how fuel loyalty will affect the final fuel sales amount in the shift report:
- No calculation: Fuel loyalty does not affect the fuel sales amount.
- Include loyalty into fuel sales: Fuel loyalty is added to the fuel sales amount.
- Exclude loyalty from fuel sales: Fuel loyalty is subtracted from the fuel sales amount.
If the Enable Fuel Loyalty option is on, you will need to enter or correct the Fuel Loyalty values in the shift report each time before accepting the shift. As a result, loyalty data that came from CR will be overwritten by manually edited data. If you want to receive the Fuel Loyalty values and save them in CStoreOffice® as they come from the cash register, do not select the Enable Fuel Loyalty option in the station settings.
Verifone fuel loyalty settings
The following settings are specific for Verifone cash registers:
- Enable Fuel Loyalty: Turn fuel loyalty calculations on or off. When enabled, the system will display fuel loyalty values as a separate payment method named according to the value of Fuel Loyalty Stored to MOP field.
- Fuel Loyalty Stored to MOP: The name of the payment method in which fuel loyalty is displayed within the system.
This value is pre-configured and is only shown for informational purposes. - Fuel Loyalty program name: Fuel loyalty program(s). You can choose one or more values depending on the selected fuel loyalty calculation method.
Must be the same as in the cash register. - Fuel loyalty calculation method: Specify how fuel loyalty will affect the final fuel sales amount in the shift report:
- Apply: Apply all fuel loyalty programs selected in Fuel Loyalty program name setting. The shift report will include separate entries for each fuel program and fuel product.
This is the recommended calculation method. - Apply totals: Total fuel loyalty amount is applied.
- Apply ticket discount as loyalty: Only ticket loyalty is applied.
- Apply PPG discount as loyalty: Only Price per Gallon discount is applied.
- Apply line discount as loyalty: Only line discount is applied.
- Apply ticket+PPG discount as loyalty: Ticket and Price per Gallon discounts are applied.
- Apply ticket+line discount as loyalty: Ticket and line discounts are applied.
- Apply PPG+line discount as loyalty: Price per Gallon and line discounts are applied.
- Apply ticket+PPG+line discount as loyalty: Ticket, Price per Gallon and line discounts are applied.
- Apply fuel discounts from department sales: Departments fuel discount is applied.
- Ignore: Fuel loyalty is ignored.
- Fuel Loyalty Product Mapping: Fuel product types for which fuel loyalty amount is calculated.
- Include fuel loyalty discounts into fuel sales: Select this option to include the fuel loyalty amount from the fuel sales total in shift reports.
This setting applies to the amount by all loyalty programs. To configure granular settings for each loyalty program separately, use Verifone Loyalty Mapping settings. - Verifone Loyalty Mapping: Use this table to map loyalty programs set up at the cash register to the names of CStoreOffice® loyalty programs. For details about loyalty programs data, see Verifone Loyalty Report.
Using this table, you can also specify if you want to subtract fuel discounts from the fuel amounts separately for every program. To do this, in the Include Into Fuel Sales column, select the check box next to the necessary program. - Use POP pre-dispensed discount: Select this option to add POP PRE fuel discount data to the fuel product sales total.
- Use POP post-dispensed discount: Select this option to add POP POST fuel discount data to the fuel product sales total.
After parsing or reprocessing a shift, it requires about 15–20 minutes for the shift to be enriched with fuel loyalty data.
If you change the Fuel loyalty calculation method, the new method is applied starting from the next shift. To update data in previous shifts, you need to reprocess these shifts. Fuel loyalty values in shift reports are displayed in the fuel sales section, in the Fuel Loyalty columns. For details, see Understanding Shift Reports.
MISC > Merchandise Loyalty Settings
- Enable Merchandise Loyalty: Include the Discount Amount values coming from the cash register into the shift reports in CStoreOffice®. The Discount Amount values from the CR, if enabled, are displayed in the Department Sales table.
- Merchandise Loyalty Stored to MOP: The name of the payment method in which loyalty is displayed within the system.
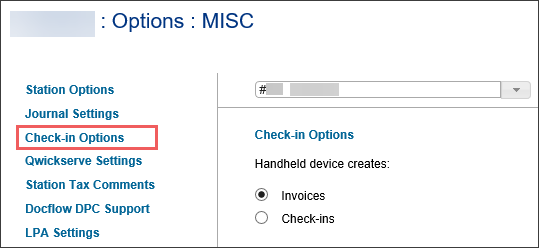
MISC > Check-in Options
- Handheld device creates: This option allows switching between the modes of handheld device work:
- Invoices: This option is selected by default as the handheld device creates regular invoices by default.
- Check-ins: Select this option if you need your handheld device will create check-in counts instead of invoices.
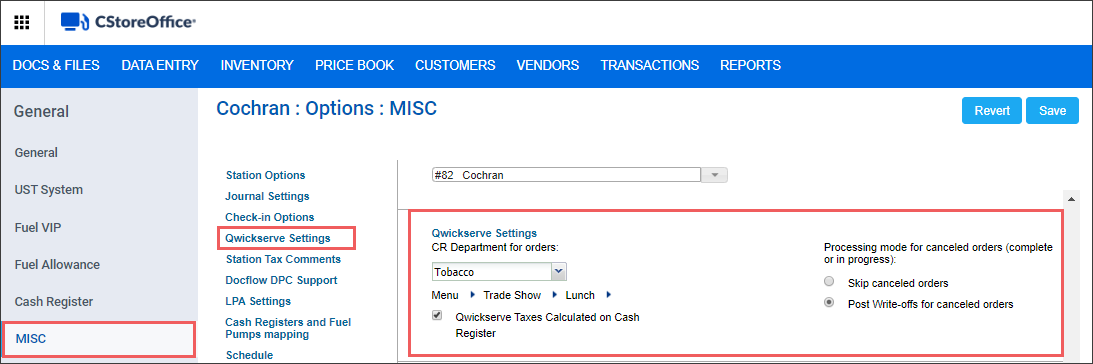
MISC > QwickServe Settings
- CR Department for orders: Select a CR department that must be used for QwickServe items.
- Menu: Select a menu that you want to use at the location. If you want to restrict the menu categories, click the arrow icon on the right of the menu and select one or more categories that must be available in the menu.
- QwickServe Taxes Calculated on Cash Register: Select this check box, if you want the taxes for QwickServe menu items to be calculated at the cash register. If you work with QwickServe departments and need the taxes for these departments to be displayed properly in CStoreOffice® reports, select this option. For example, in the Consolidated Tax Sales report.
- Processing mode for canceled orders: Specify how orders canceled at the QwickServe Order Manager must be handled.
- Select Skip canceled orders to ignore canceled orders. In this case, you will have to enter spoilage manually.
- Select Post Write-offs for canceled orders to post canceled orders to spoilage.
A canceled order is an unpaid order that had been completed or was in progress at the moment when it was canceled.
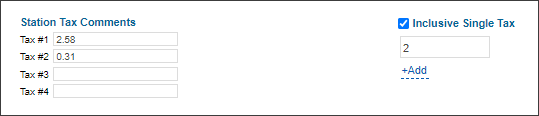
MISC > Station Tax Comments
In the Station Tax Comments section, you can specify the following settings:
- Tax #1
- Tax #2
- Tax #3
- Tax #4
- Inclusive Single Tax: Select this option and in the field below enter the number of tax which you need to exclude from the Total Revenue value in the Shift Report.
In the example below, the Tax #2 value will be excluded from the Total Revenue value in the Shift Report. For details, see b) Common Report.
MISC > Docflow DPS Support
In this subsection, you can activate the full service for invoice processing by DPS operators.
Only system users can edit the Docflow DPS Support settings.
To activate the DPS support option for your station:
- Select the Enabled option.
- In the Start Date, select the starting date of the DPS support.
- In the End Date, select the end date of the DPS support.
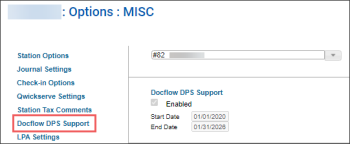
Your station will appear among the DPS operator's stations at the end of the start day the DPS support is activated.
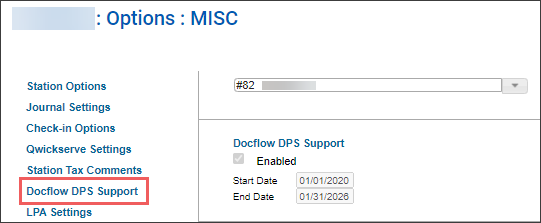
For more information on how to work with the DPS Module in CStoreOffice®, go to Docs Scanner.
MISC > LPA Settings
In this subsection, you can configure the following Loss Prevention Analytics settings while installing DC-400 series device at the station:
- Router IP: The publicly accessible IP address of the router to which the DC Box is connected.
- DC LAN IP: Local IP address of the DC Box device in the location's local network.
- Recording interval (in seconds): The duration of recorded videos, in seconds. The recommended video duration is 5 minutes (300 seconds).
- Video offset: Specify how many seconds before an actual transaction time the recorded video should start. For example, if you set the offset to 15 seconds and a sales transaction occurs at 10:30:15 AM, the recorded video will begin at 10:30:00 AM.
- Cash Register: Select the cash register to configure it for working with Loss Prevention Analytics. To add and configure more cash registers, click Add Register.
- Camera 1-4: To add and configure video cameras, click Add Camera and configure the following settings:
- Login: Specify the user name to connect to the camera.
- Password: Specify the password to connect to the camera.
- IP address: Specify the IP address of the camera.
- Main Stream URL Path: Specify the path to the main video stream relative to the camera's URL. The path should always start with the slash (/). If the main stream is broadcast at the root of the camera's URL, enter
/.
This setting is optional. Loss Prevention Analytics will attempt to automatically determine the optimal configuration based on the camera's model. - Sub Stream URL Path: Specify the path to the sub video stream relative to the camera's URL. The path should always start with the slash (/). If the sub stream is broadcast at the root of the camera's URL, enter
/.
This setting is optional. Loss Prevention Analytics will attempt to automatically determine the optimal configuration based on the camera's model. -
Example
Hikvision cameras broadcast the sub (real-time) video stream at the URLrtsp://<login>:<password>@<IP>/Streaming/Channels/2. Therefore, you should use/Streaming/Channels/2as the Sub Stream Path.
Example
Hikvision cameras broadcast the main (high-quality) video stream at the URL rtsp://<login>:<password>@<IP>. Therefore, you should use / as the Main Stream Path.
Click the Upload to Device button to upload LPA Settings to the DC Box / SmartPOS device.
For more information on how to work with the Loss Prevention Analytics module in CStoreOffice®, refer to Loss Prevention Analytics.
MISC > Cash Registers and Fuel Pumps mapping
In this subsection, you can configure the cash registers and fuel pumps mapping to display them correctly in the Loss Prevention Analytics reports.
MISC > Price Pole Settings
In this subsection, you can configure price pole devices that you can remotely manage from the Retail 360 Mobile app.
Refer to Registering price pole article for details.
MISC > Schedule
This section is under construction.
MISC > Royalty Fee
In this subsection, you can configure the royalty calculation method that will apply different royalty fees value depending on the volume of sales.
For each sales volume level, you can configure the following settings in the Royalty Fee table:
- Low Level: Enter the lowest volume of sales in dollars.
- High Level: Enter the highest volume of sales in dollars.
- Fee: Enter the percent of royalty fees.
- AdvFee: Enter the percent of additional loyalty fees for advertising.
- Royalty Min: Enter the minimum amount for the royalty fees in dollars.
To add a new level, at the top right of the table, click the Add New button.
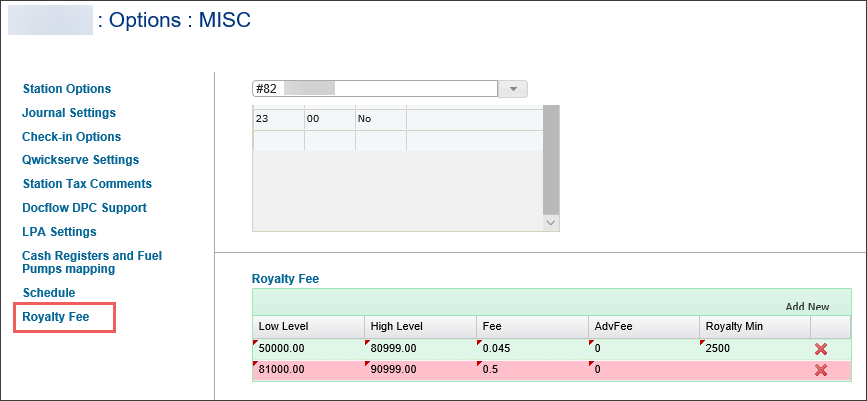
For more information about calculating royalty, go to Royalty Calculator.
MISC > Mobile Assistant Settings
- Price Book setup via inventory: This option allows adding new items to the Price Book during the inventory process.
- Allow to add new items: This option allows adding new Price Book items.
- Allow to change existing items: This option allows editing existing Price Book items.
- Allow to change descriptions: This option allows changing item descriptions.
It is recommended to turn off this option while uploading items from the Mobile Assistant application to CStoreOffice®.
MISC > Working Hours
Start and end time of working hours for the station per every week day.


