


Itemized Inventory by Tags Report
This section describes the specifics of accessing and interpreting the Itemized Inventory by Tags Report.
Opening the Report
You can find the report at Reports > Store > Inventory > Volume and state > Itemized Inventory by Tags.
The Itemized Inventory by Tags report can be opened at all levels:
- Account
- Company
- Division
- Location (Station)
For more information, see Viewing Reports.
Viewing the Report
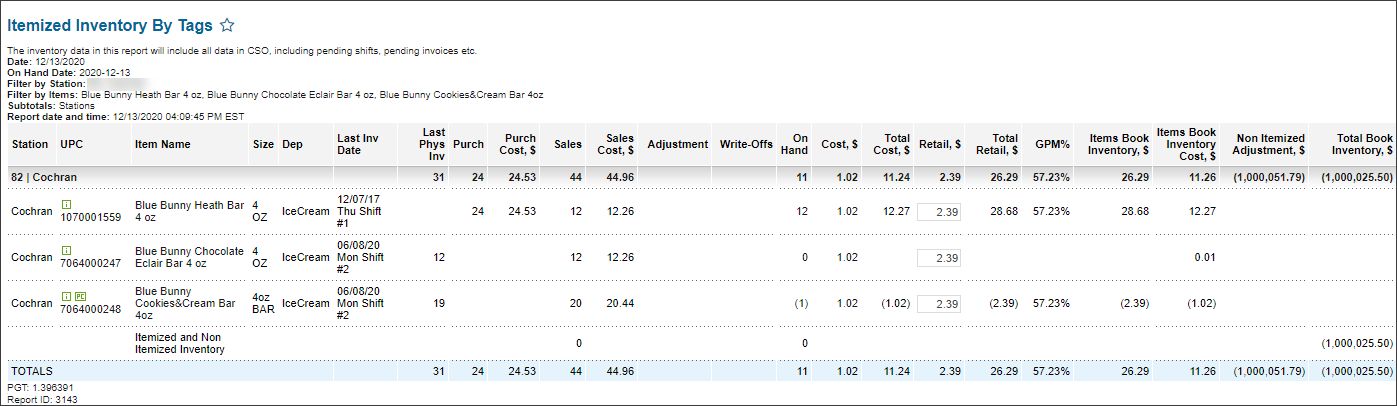
The Itemized Inventory by Tags Report provides the detailed information on book and physical inventory matching selected report criteria.
To view this report, filter by Item Tags or Items and use subtotals.
The report contains the following information:
- Station: The name of the station (location).
- UPC: The item's UPC code.
- Item Name: The item name.
- Size: The item's size.
- Department: The item's department.
- Last Inventory Date: The date of the last inventory.
- Last Physical Inventory: The physical availability for the data of the last inventory.
- Purchase: The amount of the items purchased after the last inventory.
- Purchase Cost: The total cost from the from the Book Inventory item level.
- Sales: The amount of items sold after the last inventory from the Book Inventory item level.
- Sales Cost: The amount of sales from the Book Inventory item level.
- Adjustment: This field is deprecated. It is planned to be removed during next releases.
- Write-Offs: The write-offs amount made after the last inventory.
- On Hand: The number of items available calculated as of current date considering pending data. If you need to correct this value, you can do it in the pending inventory ticket. For more information, see Working with Pending Cycle Count Tickets.
- Cost: The last item cost recorded into the system. Calculated depending on the inventory accounting method applied to the current account:
- If the FIFO method is not set up in the account settings, the item cost value is taken from the last invoice on the station.
- If the FIFO method is set up in the account settings, the item cost value is calculated based on the FIFO method.
- Total Cost: The total cost of the items available. Calculation formula: Total Cost = Cost * On Hand.
- Retail: Current item's retail.
- Total Retail: The total items retail. Calculation formula: Total Retail = Retail * On Hand.
- GPM%: Gross profit margin calculated in percentage according to the calculation formula: GPM = (Retail - Cost) / Retail * 100.
- Items Book Inventory: The retail book inventory calculated at the item level.
- Items Book Inventory Cost: The cost value with which the last item's inventory has been performed. This value is calculated using the following formula:
Items Book Inventory Cost = Last Physical Inventory Cost + Purchase Cost - Sales Cost - Write-Offs Cost.
The example of the Items Book Inventory Cost value calculation is displayed in the image below. - Non-Itemized Adjustments: Calculated by the formula: Non-Itemized Adjustments = Total Book Inventory (by Category) – Items Book Inventory. The Non-Itemized Adjustments values are displayed in the report if the Full Inventory option has been selected during inventory while not all items are included into inventory. To exclude the Non-Itemized Adjustments values from the report, make sure the Full Inventory option is not selected during the inventory. For details, see Track Item Movement.
- Total Book Inventory: The total book inventory value calculated only for the categories and at the category level.
Please note that inactive items are also displayed in the report as long as they have item movements until next inventory period. For more information, see Why are inactive items displayed in inventory reports and forms?
For more information on calculating the item cost, see Item Cost Calculation.
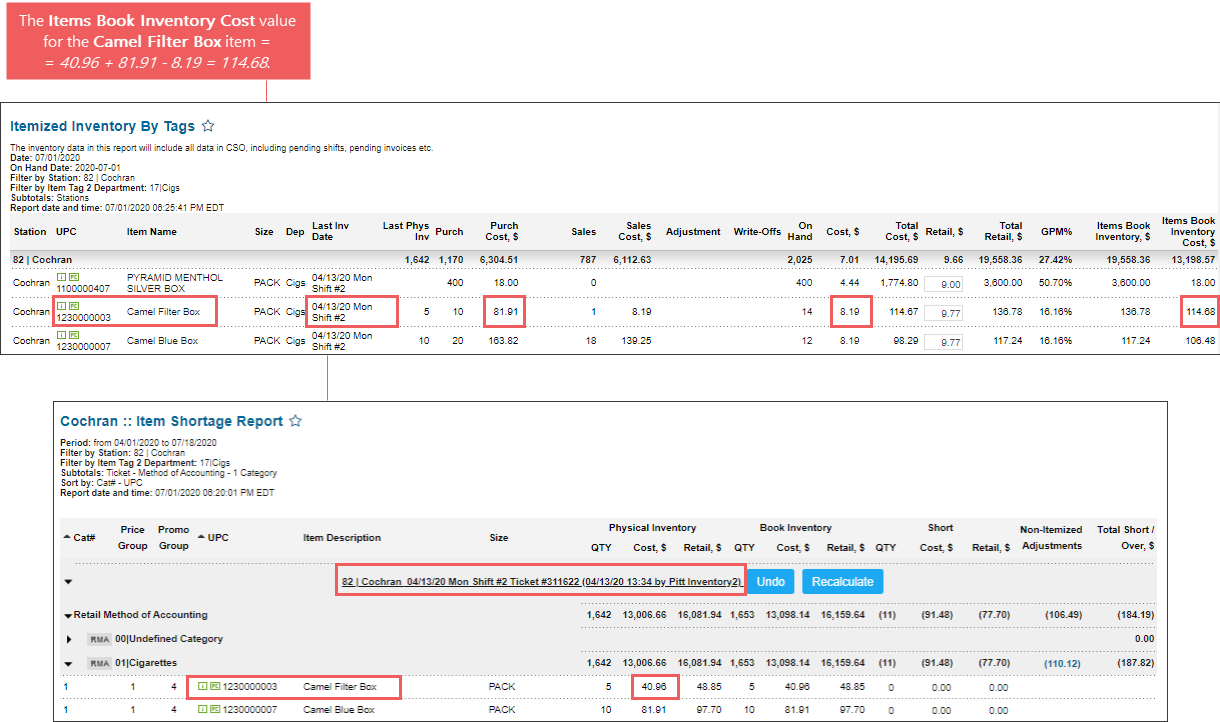
The Last Physical Inventory Cost value can be checked in the Item Shortage report generated for the period which includes the last inventory date for the item. For details, see Item Shortage Report.
If the Total Book Inventory value is displayed disregarding the non-itemized adjustments and you need them to be deducted from retail, make sure the Apply Items Inventory Tickets Adjustments to Store Inventory option is selected in the station options. For details, see MISC > Station Options.
Filtering and Sorting the Report Data
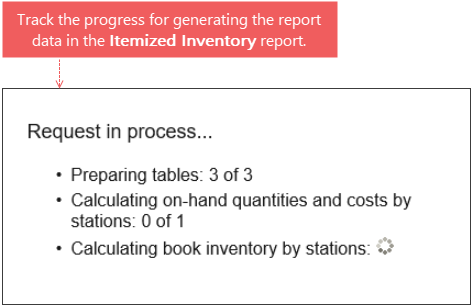
To get the exact information needed, filters can be applied to the report. To set up a filter, select one or more filtering options. Once the filter is set up, at the bottom of the filter section, click the Refresh button to display the report data by the filter criteria.
Once the Refresh button is clicked, the process of generating the report data is launched. You can track the data upload status in a separate window which displays how many stations and their data are processed.
The report provides the following filtering and sorting options:
- Date: Specify the period you are interested in manually using the calendar.
- Advanced: Click the advanced button, select one several filtering options you want, and then click Refresh: These are the available advanced filtering options:
- Subtotal By: Select one or several filtering options - by Common, Station Tags, Item Tags - for the further breakdown of the results.
- Station Included: Select the desired report for viewing.
- Filter by Station Tags: Use this option to filter the report data by tags assigned to stations. The generated report will contain data only for those stations to which the selected tags are assigned.
To select tags by which the report data must be filtered, expand the tags tree and select the check boxes next to the necessary tags.
The report data can be filtered by root tags and tags of the lower level in the tags hierarchy. A combined filter can also be created by selecting different root and child tags. - Filter by Item Tags: Use this option to filter the report data by tags assigned to items. The generated report will contain data only for those items to which the selected tags are assigned. To select tags by which the report data must be filtered, expand the tags tree and select the check boxes next to the necessary tags.
The report data can be filtered by root tags and tags of the lower level in the tags hierarchy. A combined filter can also be created by selecting different root and child tags. - Filter by Items: Select this option and use the search tool to find the particular items to be filtered.
- Filter by Vendor/Manufacturer: Select this option to filter the report results by specific vendor or manufacturer.
- Sort by: Select the order of the desired report columns. Select the Ascending or Descending option for the corresponding type of filtering.
Press CTRL, to select several items at a time.
Select the Show Only option to view only the information for the selected items and Show All Except to view the information for all the items except the selected ones.
Additional Actions
To export the report results to an XLS file with expanded subtotals, expand at least one row manually and then click the Export Raw Data button.
To open the Item Movement report for a certain item, click the name of the item you need in the Item Name column.
For more information on additional report features, see Reports.


