Common Issues
Problem: I cannot log into the QwickServe device using the default PIN.
Solution: The default PIN used for logging into the QwickServe devices is 1111. If it does not work anymore, you can regenerate it in CStoreOffice®. To regenerate the QwickServe user PIN:
- Log into CStoreOffice®.
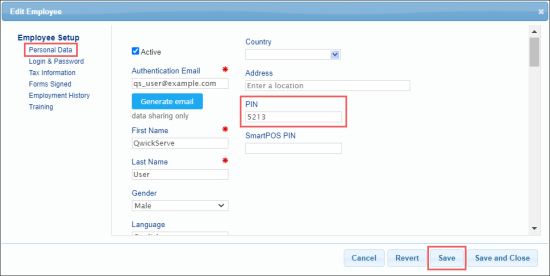
- Go to Settings > General > Employees.
- In the Employee list report, select your user.
- In the Edit Employee form, go to the Personal Data section.
- In the PIN field, enter a new PIN for your QwickServe user.
- Click Save.
For more information, see Managing QwickServe Users.
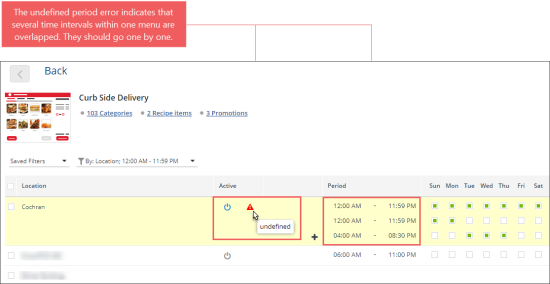
Problem: Several time intervals are configured for the QwickServe menu activated at the location. However, the red exclamation mark with the undefined prompt is displayed in the Active column.
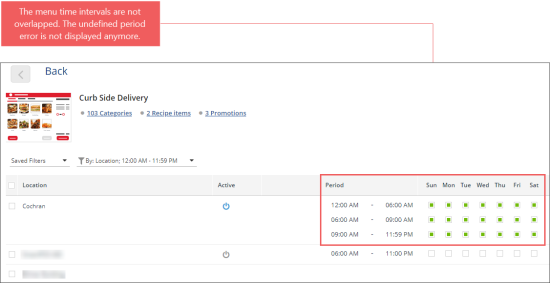
Solution: To troubleshoot the undefined period error for the QwickServe menu, reconfigure the time intervals within the menu in such a way that they go one by one.
For more information, see Configuring Time Targeting Menus for Stations.
Problem: Kitchen tickets are displayed not in sequence on the QwickServe Order Manager.
Solution: This may happen in case you have several QwickServe Order Manager devices installed and some of them work offline for some period of time.
For more information about processing orders on the QwickServe Order Manager device, see Working with Orders.
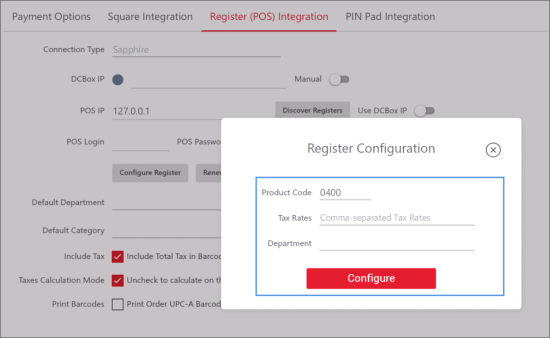
Make sure the cash register is configured properly on your QwickServe device:
- Switch to the administrator's interface. For more information, see QwickServe Order Manager Administrator's Interface.
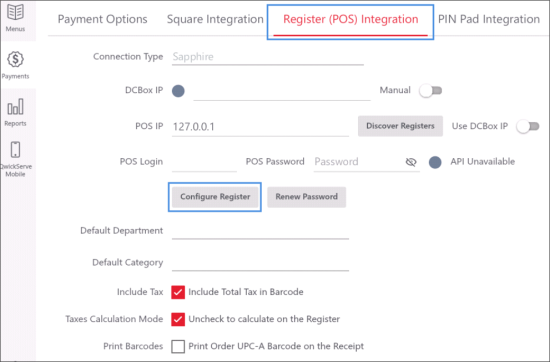
- Go to the Register (POS) Integration section.
- Tap the Configure Register button.
- In the Register Configuration window, make sure the following fields are filled in:
- Product Code
- Tax Rates
- Department
To learn more about configuring the cash register on the QwickServe device, go to QwickServe Device Register (POS) Integration.
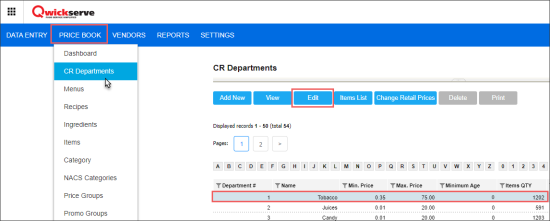
Age restriction is configured at the department level. All items inside the department where the age limitation is configured, will be marked as age-restricted as well. For example, all items from the Tobacco CR departments will be age-restricted.
To set up age restriction for a CR department in QwickServe:
- From the main QwickServe menu, go to Price Book > CR Departments.
- Find a department for which you need to set up age restriction and click it.
- At the top of the CR Departments list, click Edit.
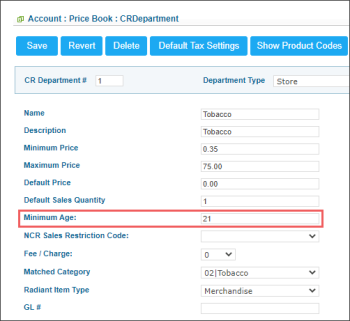
- In the CR Department form > Minimum Age field, enter the minimum age value, below which it is prohibited to sell the items from this department.
- At the top left of the CR Department form, click Save.
For more information on how to work with the age-restricted items, see Completing Order, Marking Order as Completed.
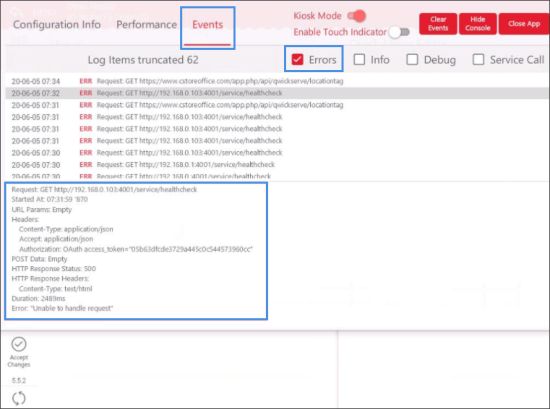
Once you received an error on your QwickServe device:
- Remember the error date, time, and title.
- On the QwickServe device, tap five times the top red menu line.
Result: The configuration menu opens. - In the configuration menu:
- Tap the Events section.
- Tap the Errors check-box, to select it.
- In the list of errors, find your error and tap it.
- Take a screen shot with the full error description and provide it to the Petrosoft Support.
You can find the error by its title, date, and time.
Result: The error full description opens.
QwickServe Curbside
One of the possible reasons is that the CR shift was accepted and edited manually before the QwickServe Curbside shift was received in CStoreOffice®.
To resolve this issue:
- Undo the shift received from the cash register.
- Accept both shifts: from the cash register and from QwickServe Curbside.
- Do manual changes, if needed.
When you work with the QwickServe Curbside solution, two shifts are sent to CStoreOffice®:
- From the cash register
- From QwickServe Curbside
When both shifts have the same shift number and date, they are merged automatically by CStoreOffice® and accepted successfully.
For preventing the loss of manual changes, manually edited shifts cannot be merged with other shifts in CStoreOffice®.
In case the CR shift is edited manually in CStoreOffice®, the corresponding QwickServe Curbside shifts cannot be merged with such CR shift automatically and, therefore, cannot be accepted in CStoreOffice®. That is why when you work with the QwickServe Curbside solution, all manual changes to the shifts should be performed in CStoreOffice® after both shifts are accepted.
For more information about accepting shifts in CStoreOffice®, see Reviewing and Accepting Shifts.
Reports
Question: Why are QwickServe orders displayed in the shift report instead of items in the Items row of the QwickServe department?
Answer: When the shift was accepted before the QwickServe orders were loaded into CStoreOffice®, the items sold in QwickServe are displayed as the QwickServe orders in the shift report > c) PLU Sales Report > Department Sales section. To troubleshoot this issue, reaccept all shifts where you see QwickServe orders instead of items.
For more information on how to reaccept the shift, see Undoing Incorrectly Accepted Shifts.
If you use the Verifone Ruby 2 cash register, mind that you can only see your inventory in CStoreOffice®, but not on POS.
While in CStoreOffice®, you can use the following inventory forms and reports:
If you noticed that your sales data is tracked improperly in shift reports, for example, some sales data is missing or have data and/or time mismatch, make sure the date and time on your cash register match the date and time on the QwickServe devices.
Linking Ingredients to Price Book items
The FIFA (first in – first out) principle works in this case. The items from the first vendor are used until they are available. If the item is no longer available, system starts using items of the second vendor.
They must have the same type of measure – weight, volume or unit/piece.
You cannot edit the unit of measurement of an ingredient until it has PB items linked to it, because the measure type must stay the same.
