
Go to Home Page > Items Updates > and then open the Updates Manager for your station (location) you've just imported items in.
With the Import Tool, you can perform the following operations with the items data:
To copy Price Book items between accounts, follow the steps:
There are item attributes configured on the station (location) level. For example, Current Retail, On Hand and so on. So, when you are importing items from the Account Price Book, the station (location) item attributes are not imported.
To view the whole list of the station (location) item attributes, see Items > Items Setup > Station Item Attributes.
To import items to a station (location), follow the steps:
For more information on how to import Price Book items from the CSV file, see Importing Data From File.
In the Import Tool, Price Book items taxonomy is determined by the following Price Book elements:
During exporting Price Book items from the draft to one or several locations, taxonomy settings of the exported items are mapped automatically with those of the items that already exist on the location or account.
You can also monitor and adjust items taxonomy settings when importing item tags, promotions or vendors, in case they contain items. For details, see the following sections:
To view the automatic mapping results, in the draft table, select the items you want to export and then click the Save To button.
For more information on how to export items from draft to location, see Exporting Draft Data to Location.
Under the draft table, you can view the automatic mapping statuses and mapping table.

On the left of each taxonomy element, you can view a special icon, indicating the following mapping statuses:
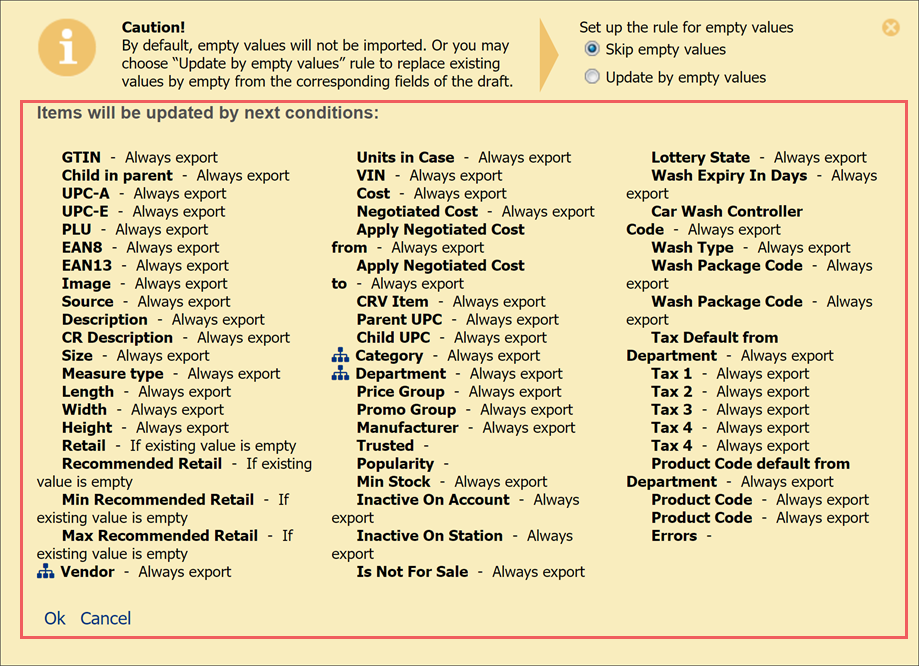
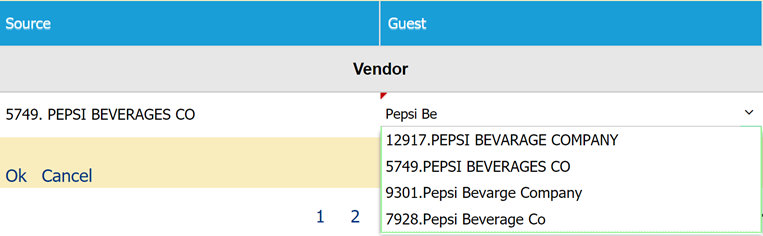
In the mapping table, you can adjust the taxonomy settings with yellow and red icons. For each element in the Source column, select the corresponding element in the account column from the list of available elements.
To export the Price Book items to the CSV file, follow the steps:
You can manage the account items in the draft and then save this draft to any location to apply changes to the whole account. For more information on how to manage items in the draft, see Editing Draft Manually.
In case you need to update only some attributes of the items, before exporting, make sure the columns of the draft's table with these attributes only are selected. For details, see Editing Draft Manually > Adding or Removing Columns for Exporting.
You can use CSV files to import data about Price Book items and work with them in the Import Tool. In a CSV file, you must provide data for all items whose data you want to import. Each line in the CSV file contains data for a separate Price Book item. Each entry in the line corresponds to a specific item field, and each comma indicates where one entry ends and another entry begins.
The CSV file that you use for import of items data must have the following structure (non-mandatory fields can be omitted):
| Field Name | Mandatory (Yes/No) | Description | Level |
|---|---|---|---|
| SKU | Yes | Item
code in one of supported formats: - PLU - UPCA - UPCE - EAN8 - EAN13 - GTIN |
Core Data |
| SKU Type | Yes | SKU
code type for the SKU code in the previous column, must be one of following
numbers:
- 0 = UPCA - 1 = UPCE - 2 = EAN8 - 3 = EAN13 - 4 = PLU - 5 = GTIN |
Core Data |
| Cash Register Name | Yes | Item name as it appears at the cash register and in customer receipts. Must be no longer than 20 symbols. Longer values will be cropped. | Core Data |
| Size | No | Item size and units of measurements, for example, 20 oz. | Core Data |
| Measure Type | No | Type of measurement units. Provided for Qwickserve. Possible
values:
- piece - weight - volume |
Core Data |
| Length | No | Length of the item pack. | Core Data |
| Width | No | Width of the item pack. | Core Data |
| Height | No | Height of the item pack. | Core Data |
| Current Retail | No | Retail price for the item. | Site Data |
| Name | Yes | Item name as it appears in the C-Store Office Price Book. | Core Data |
| Vendor ID | No | Vendor identifier in C-Store Office. | Site Data |
| VIN | No | Item code assigned by the vendor. | Site Data |
| Units in Case | No | How many item units are presented in a case. Is used for invoices. | Core Data |
| Standard Cost | No | Negotiated item cost for the Vendor ID, may be configured as postpone cost change if combined with the next two fields. | Site Data |
| Negotiated Cost Apply From Date | No | Date
when the postpone negotiated cost will be applied, for example, 2017-12-23. The date format is YYYY-mm-dd. |
Site Data |
| Negotiated Cost Apply To Date | No | Date when the negotiated cost will be removed. The date format is YYYY-mm-dd. | Site Data |
| Vendor | No | Vendor name for the passed Vendor ID. | Site Data |
| Category ID | Yes | Category ID in C-Store Office. | Core Data |
| Category | No | Category name for the passed number in the Category ID. | Core Data |
| Department ID | Yes | Department ID in C-Store Office. | Core Data |
| Department | No | Department name for the passed number in the Department ID. | Core Data |
| Manufacturer ID | No | Manufacturer ID in C-Store Office. | Core Data |
| Manufacturer | No | Manufacturer name for the passed Manufacturer ID. | Core Data |
| Price Group ID | No | Price Group ID in C-Store Office. | Core Data |
| Promo Group ID | No | Promo Group number in C-Store Office. | Core Data |
| Is Recipe Item | No | Flag
to mark the item as a Qwickserve Recipe. Possible values: - 1 – Yes - 0 - No |
Core Data |
| Is Ingredient Item | No | Flag
to mark the item as a Qwickserve Ingredient. Possible values: - 1 – Yes - 0 – No |
Core Data |
| Minimum Stock | No | Minimum quantity of items in stock. | Site Data |
| Inactive | No | Indicates
if the item is inactive for the account
. Possible values - 1 – Yes - 0 – No |
Core Data |
| Is Not For Sale | No | Indicates
if the item is inactive for the station. Possible values: - 1 – Yes - 0 – No |
Core Data |
Use the following recommendations to fill a CSV file with items data:
A CSV file for parent-child items has the same format as the one used for regular items import. The CSV file of such type allows you to:
If items already exit on the account and it is needed to import only links between them, you can use only the next fields for the CSV file:
The Child in parent, Parent SKU and Child SKU columns are not available in the standard CSV template. To get the extended template with these columns, go to the draft containing items with parent-child relations, select these items and then click the save to CSV button.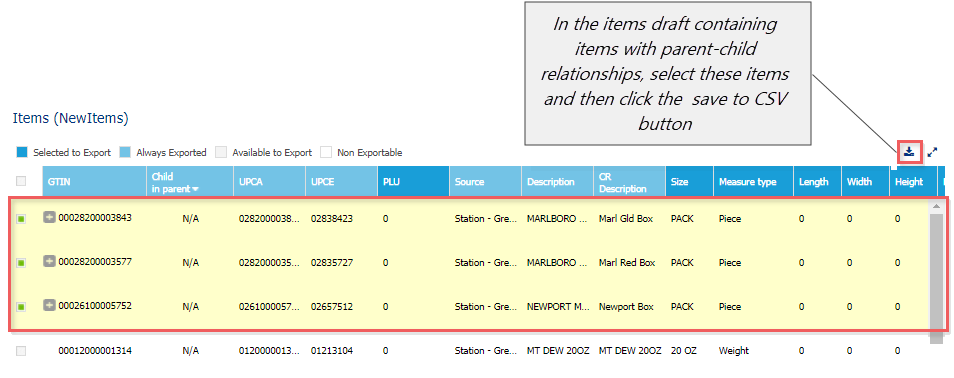
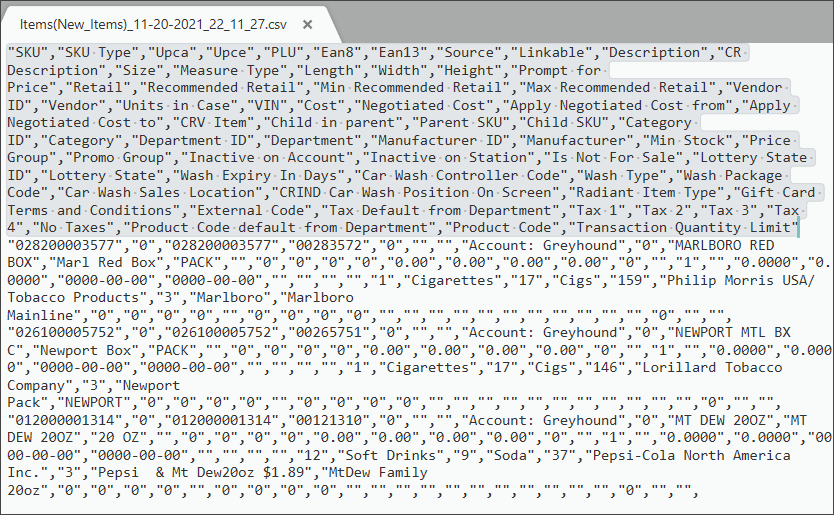
The example of CSV file with parent-child relations between items is shown below.
| SKU | Name | Child in parent | Parent SKU | Child SKU |
|---|---|---|---|---|
| 7172030508 | Item A | 7172000007 | ||
| 7172000007 | Item B | 10 | 7172030508 | 1000012677 |
| 1000012677 | Item C | 3 | 7172000007 | 1000012667 |
| 1000012667 | Item D | 15 | 1000012677 | |
| 7172030509 | Item E | 7172000007 | ||
| 7172000007 | Item B | 2 | 7172030509 | 1000012663 |
| 1000012663 | Item F | 5 | 7172000007 |
In this example, items have the following parent-child relations:
A CVS file for linked items has the same format as the one used for regular items import. The CSV file of such type allows to:
If items already exist on the account and it is needed to import only links between them, one can use only next fields for the CSV file:
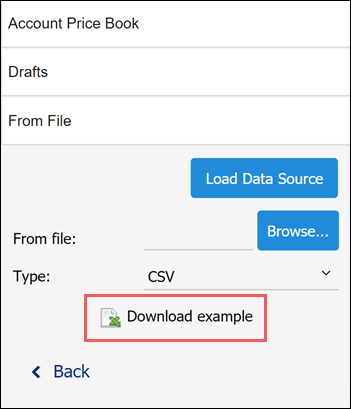
To construct a CSV file for import, you can use a template provided by Petrosoft. To get the template and prepare the CSV file, follow the steps:
Last updated: Tuesday, November 6, 2018
Copyright © Petrosoft, LLC
![]()
Confidentiality level – Public use
Petrosoft, LLC
290 Bilmar Drive, Pittsburgh, PA 15205
Phone: 412-306-0640
Fax: 412-202-5487
 Feedback