


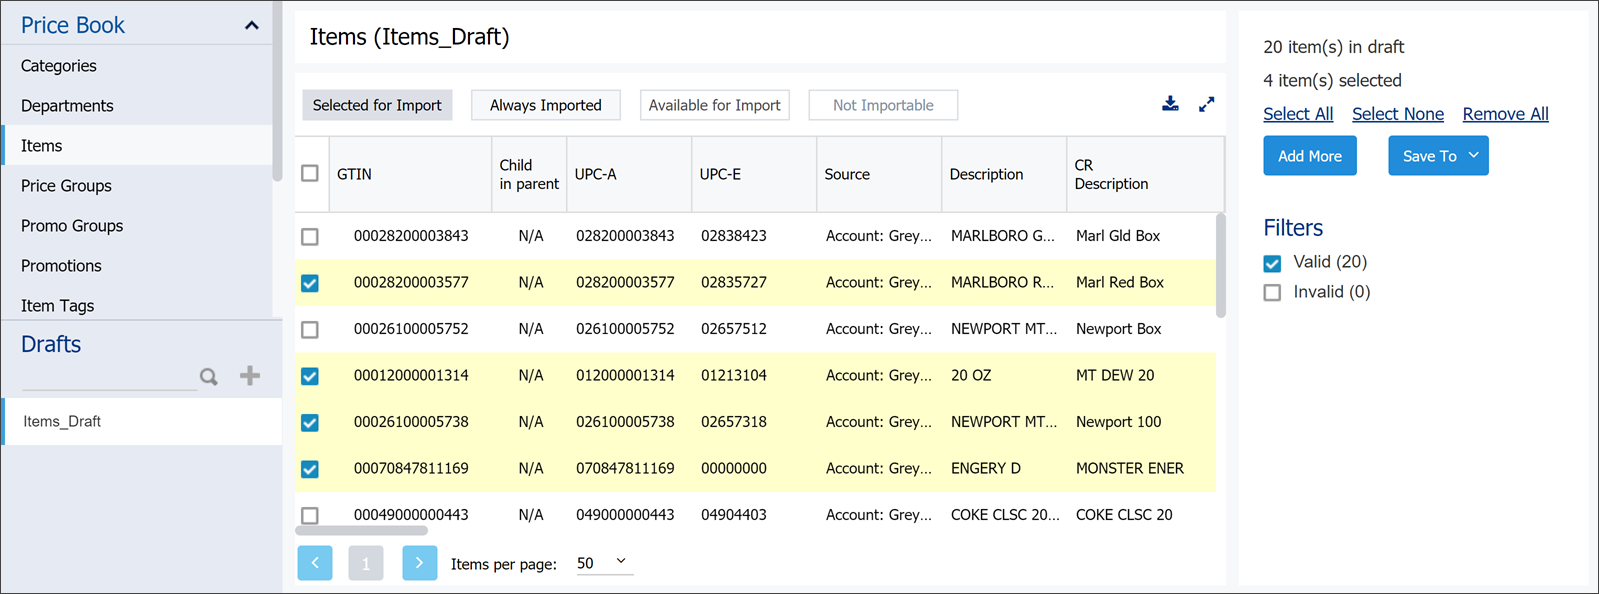
You can perform the following actions with a draft in the Working Area:
Editing the Draft Manually
You can edit a draft manually in the Working Area in the following cases:
- A new draft is created.
- The saved (preconfigured) draft is selected.
The newly created or selected draft appears in the Working Area as a table.
The columns in the table are marked with different colors depending on the data import conditions set for these columns. The Import Tool uses the following conditions for data import:
- Always Imported: Columns imported always by default.
- Selected for Import: Columns selected for data import.
- Available for Import: Columns available for data import.
- Not Importable: Columns whose data is not imported.
You can perform the following operations with the draft table:
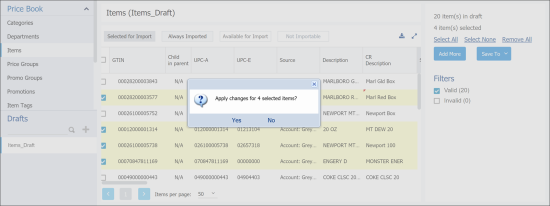
- In the draft's table, select one or several data rows.
- In any column you need, change one of the selected rows and then click any other place in the table.
- In the confirmation window, click Yes.

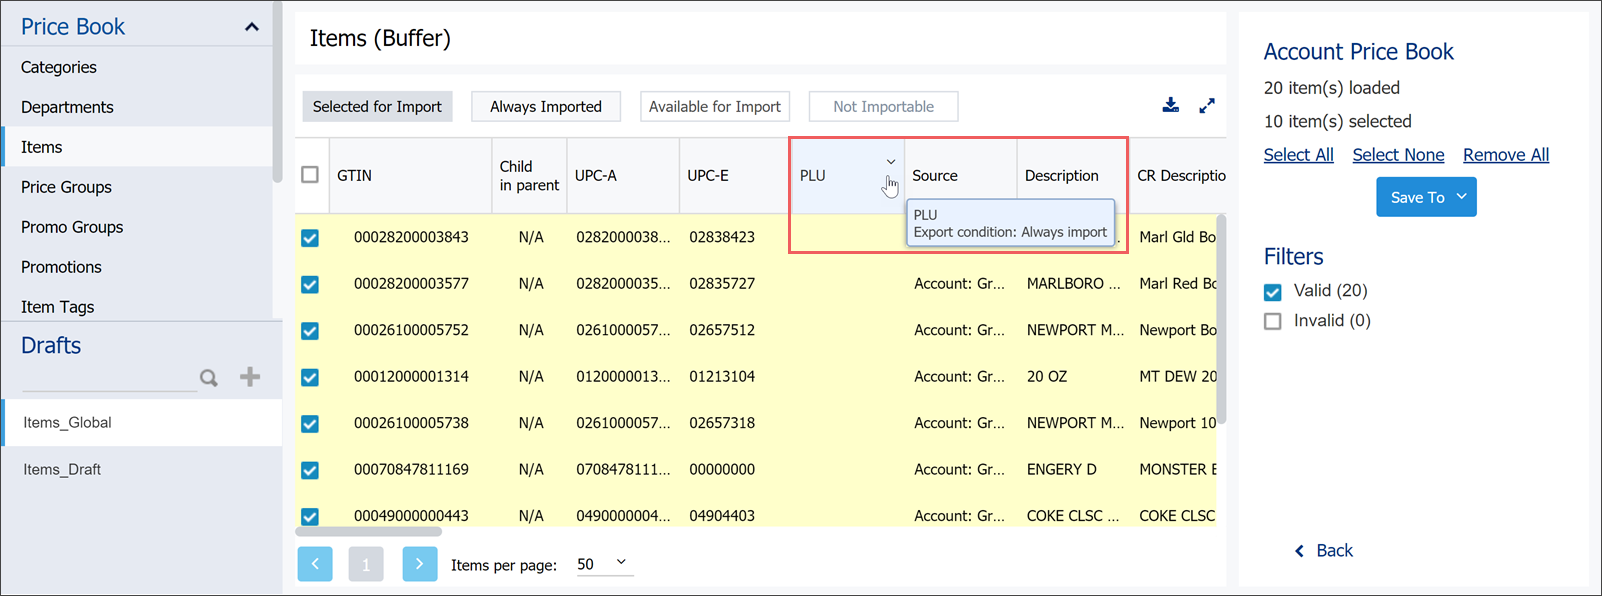
By default, the Import Tool exports only data from the columns that are marked with the Selected for Import and Always Imported conditions. If necessary, you can select the columns from which data must be exported.
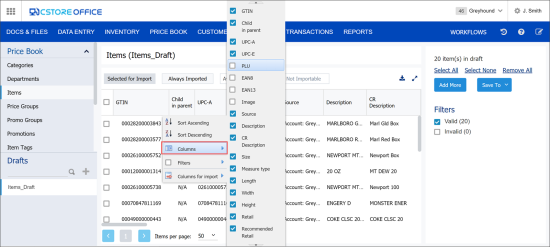
- To the right of any column, click the drop-down arrow.
- Hover the cursor over the Columns for import menu and then select or clear check boxes next to the columns from which you want to export data. You can select or deselect all columns at once by clicking the Select All or Select None buttons at the top of the menu.

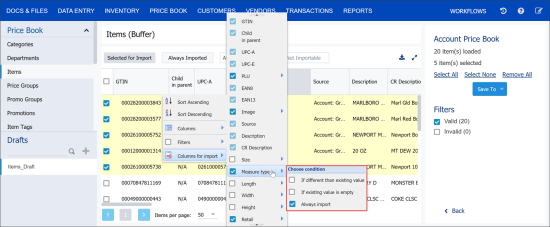
- For each selected column, select one of the following exporting conditions:
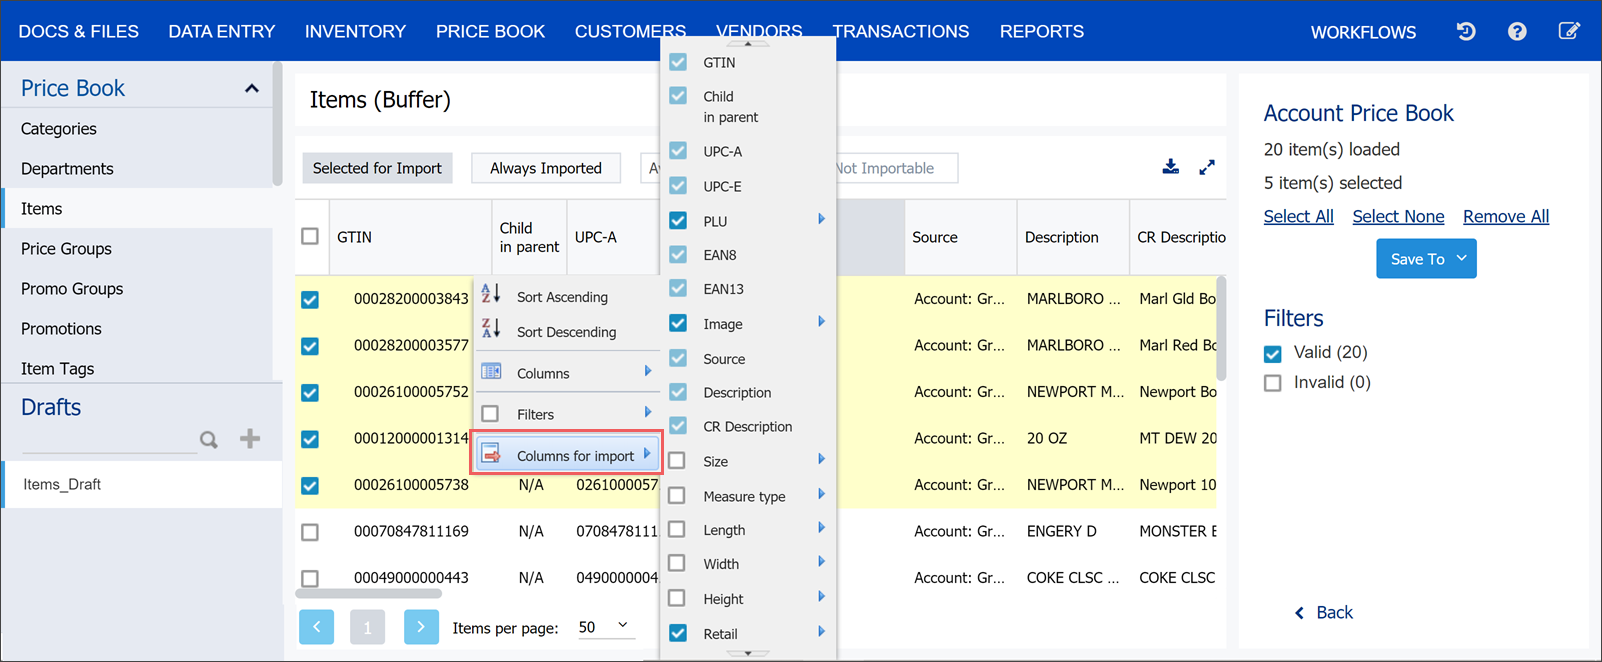
- If greater than existing value (for the Retail column only)
- If lower than existing value (for the Retail column only)
- If different than existing value: Select this option, if the column data must be exported only if values in the draft are different from values set up in the system.
- If existing value is empty: Select this option, if the column data must be exported only if values are not set up in the system at all.
- Always import: Select this option, if the column data must be exported in any case, no matter which values are set up in the system.

Mind the following:
- Some columns are mandatory and are always exported: GTIN, UPCA, UPCE, EAN8, EAN13, Child in parent, Description, CR Description. Mandatory columns are marked with the light green filter icon in the Columns for import menu.
You cannot specify exporting conditions for mandatory columns except Description and CR Description columns. - Some columns are linked with each other. For example, if you select the Age Restriction column for departments, the Check H.ID column will be automatically selected as well.
- To the right of any column, click the drop down arrow.
- Hover the cursor over the Columns menu and then select or clear check boxes next to columns you want to show or hide in the draft's table.

To display elements that match a specific criterion, you can apply a simple filter or a range filter to the elements list.
In a simple filter, you define a single value by which elements must be filtered. This can be, for example, a numeric ID, some word or phrase.
To apply a simple filter:
- Choose the column whose values you want to use as the filter conditions.
- On the right of this column, click the drop down arrow.
- Select the Filter menu and then enter the filter condition's value.
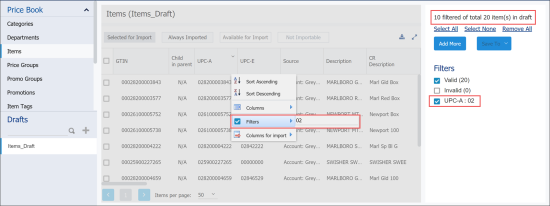

The number of filtered elements and filter conditions are displayed to the right of the data source panel.
The range filter can be applied to columns that contain numeric data. In a range filter, you define the starting and end values by which elements must be filtered. This can be, for example, a price range for the Retail column.
To apply a range filter:
- Choose the column whose values you want to use as the filter conditions.
- On the right of this column, click the drop down arrow.
- Select the Filter menu and then use the From and To fields to enter the range by which elements must be filtered. You can also enter either of the values, the starting or the end one. For example, to display items with the price less than $10, in the To field, enter 10 and leave the From field empty.


The number of filtered elements and filter conditions are displayed to the right of the data source panel. To discard the filter, clear the check box next to the necessary filter condition.

- In the draft's table, select one or several data rows.
- In the last table column, click the Remove icon.
- In the confirmation window, click Yes.


- In the draft's table, select the rows you want to export.
- At the top right of the draft's table, click the export icon.

At the top right of the draft's table, click the full screen mode button.

To close the full screen mode, click the full screen mode button again.
Importing Data to the Draft
To import data from other sources to a draft, you need to perform the following activities:
The price book data can be also imported to the draft automatically. For more information, see Automatic Price Book Import from the Cash Register.
Importing Data to the Buffer
To import the data to a buffer from other sources:
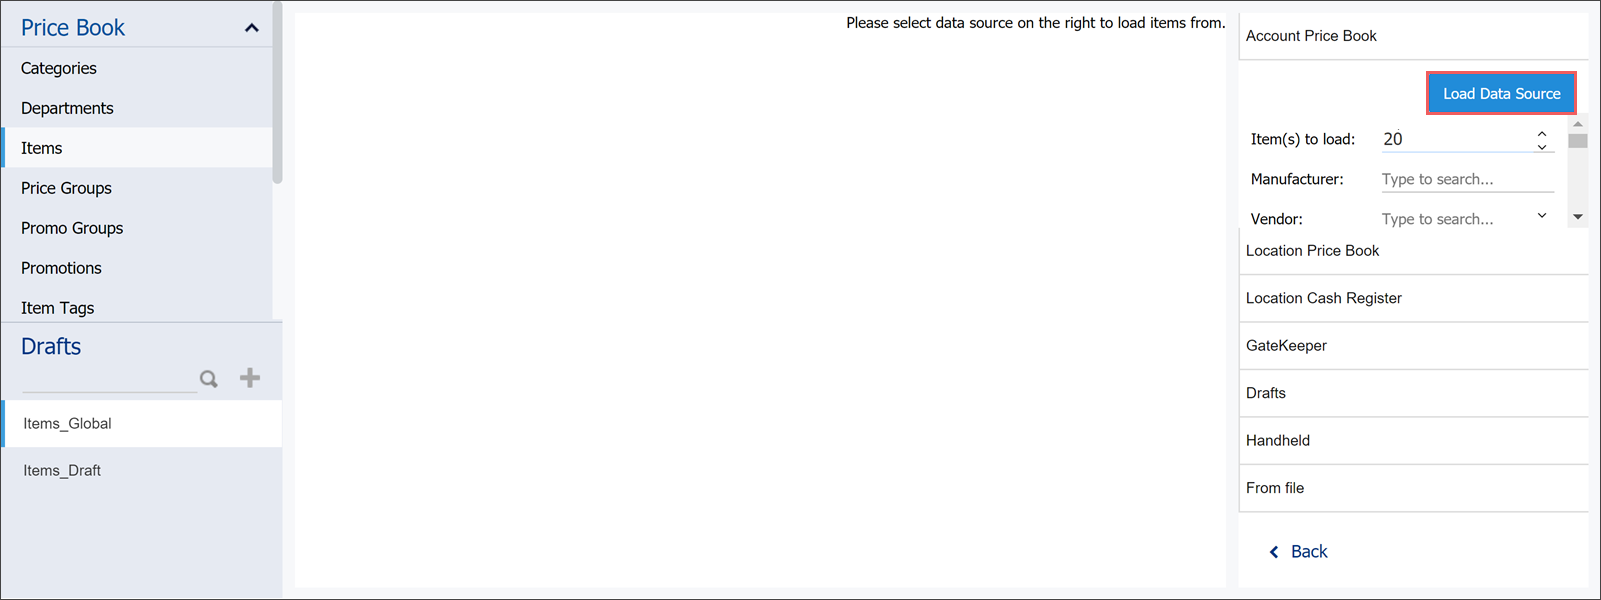
- Go to Data Source panel and then click the Add More button.
- Select the type of the data source.
- (Optional) Depending on the selected data source, specify the criteria for items importing.
- Click the Load Data Source button.

The number of available data sources depends on the Price Book tool.
Editing Data in the Buffer
After the data have been imported to the draft from the other data source, they are placed in the buffer table for temporary storage.
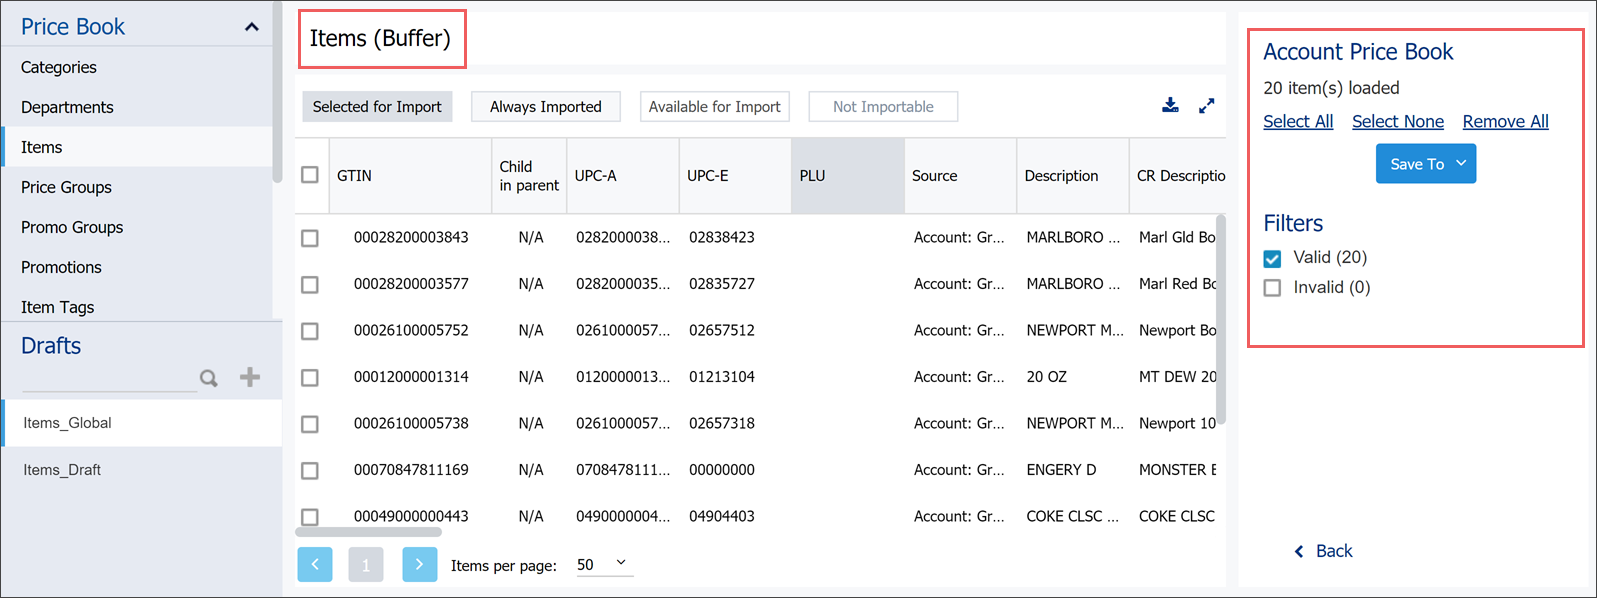
To the right of the buffer table, the following information about the imported data is displayed:
- The number of imported items
- The number of valid and invalid items in the buffer table
In case the imported data is not valid or not fully relevant to your search criteria, you can clear the buffer table by clicking Remove All on the right of the table and import the data again.
You can save the data you need from buffer to a file by selecting the rows in the buffer table and clicking the export icon on the top right of the table.
Saving Data from Buffer to Draft
To save the data from the buffer table to the draft:
- In the buffer table, select the rows with the data you want to save in the draft.
- In the Data Sources panel, click the Save To button.

- Wait until the items are saved. By default, items are saved to the current draft.
You can select another draft by clicking the drop down list located to the right of the Save To button.

Exporting Draft Data
You can export the draft data to one of the following destinations:
Exporting Draft Data to a File
You can export data from the draft to a file in the CSV format.
By default, the Import Tool exports only data from the columns that are marked with the Selected for Import and Always Imported conditions. If you need to export other data, select the necessary columns using the Columns for Import option. For details, see Setting Up Exporting Columns and Conditions.
To export the data from a draft to a file:
- Go to Operational Menu > DRAFTS and then select the draft with the previously saved items data.
- Make sure the draft's table contains the data you need.
- In the draft's table, select the rows you want to export.
- At the top right of the draft's table, click the export icon.
Please note that promotions data cannot be exported from the draft. Thus, the export icon in the Promotions draft is not available.
- In the Save As window that opened, select the destination folder and then click Save.

Exporting Draft Data to a Location
You can export the price book data from the draft to one or several locations.
By default, the Import Tool exports only data from the columns that are marked with the Selected for Import and Always Imported conditions. If you need to export other data, select the necessary columns using the Columns for Import option. For details, see Setting Up Exporting Columns and Conditions.
To export the data from a draft to a location:
- Go to Operational Menu > DRAFTS and then select the draft with the previously saved items data.
- Make sure the draft's table contains the data you need.
- In the draft's table, select the rows you want to export.
- (Optional) For each exporting column, specify exporting conditions, if needed. For example, the exporting items may already exist on the location and you need to define if the new values will overwrite the current values or not.
To view the column's current export condition, hover over the column name.
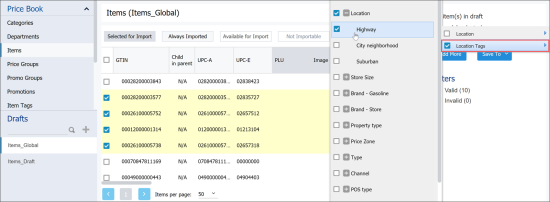
- Go to Data Sources panel and then to the right of the Save To button, click the drop down list.
- Depending on what price book data you are exporting, do the following:
- In the Location list, select one or several locations you want to export draft data to.
- In the Location Tags list, select one or several location tags for the location you wan to export draft data to.
- Click the Save To button.
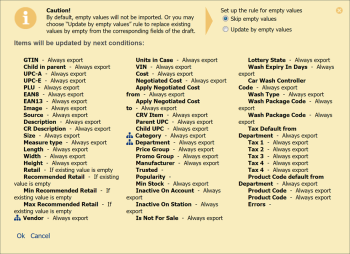
- Make sure all exporting conditions are specified correctly.
- Check automatic mapping results.
- If the draft contains fields with empty values, at the top of the mapping results form, select the rule by which empty values must be exported:
- Skip empty values: Select this option if you do not want to export empty values to the destination. This option is selected by default.
- Update by empty values: Select this option if you want to replace existing values in the destination with empty values exported from the source.
- (Optional) In the mapping table, adjust taxonomy settings, if needed. For more details, see Monitoring and Adjusting Taxonomy Settings.
- Click OK.
- Select one or several locations you want to export draft data to.
- Click the Save To button.


