With the Import Tool, you can perform the following operations with the item tags:
- Import item tags to a location from the following data sources:
- Account Price Book
- Drafts
- File (for more details, see Preparing a File for Data Import)
- (Optional) Monitor and adjust the taxonomy settings of the imported items within item tags, if any.
- Manage the item tags
- Prepare file with item tags for importing
Importing Item Tags to Station (Location)
To import the item tags to a station (location), follow the steps:
- Go to Operational Menu > Price Book and then click Item Tags.
- Go to DRAFTS and create a new draft. For details, see Working with Drafts List.
- Import item tags to the draft from any of the available data sources:
For more information on importing data to the draft, see Importing Data to Draft.
- Account Price Book
- Drafts
- From File
- Copy the draft's data to any of the current account's locations. For details, see Exporting Draft Data.
- Make sure the item tags are copied successfully.
Go to CStoreOffice® main menu and then click Price Book > Item Tags.
For more information on working with the data sources, see Importing Data from Different Sources.
Monitoring and Adjusting Items Taxonomy when Importing Item Tags
If the importing item tags contain items, you can monitor and adjust the following items taxonomy settings during the item tags import:
- Categories
- Departments
Items taxonomy settings can be monitored and adjusted during the item tags import, in case the following conditions are met:
- The item tag has just been added to the draft.
- The item tag contains items with undefined category or/and department.
- The Import Items List check box is selected in the draft table for the imported tag.
Monitoring Items Taxonomy Settings when Importing Item Tags
You can monitor the items taxonomy settings in the mapping table, which appears above the item tags draft, when you are saving item tags from the draft to one or several locations under the above conditions.
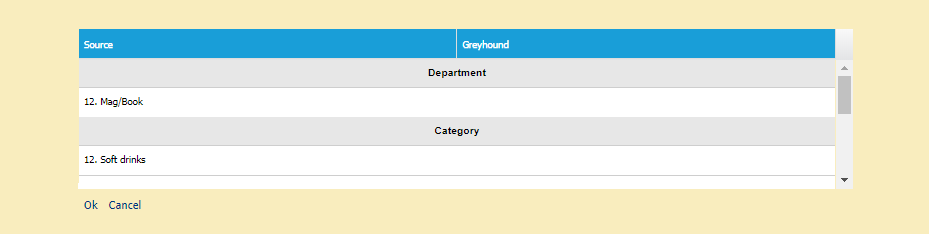
Adjusting Items Taxonomy Settings when Importing Item Tags
For each element in the Source column, select the corresponding element in the account column from the list of available elements.
Managing Item Tags
You can manage the item tags in the draft and then save this draft to any location on the current account. For more information on how to update the item tags in the draft, see Editing Draft Manually.
Preparing a File for Data Import
You can use CSV or XLSX files to import data about item tags and work with them in the Import Tool. In the file, you must provide data for all item tags whose data you want to import. Each line in the file contains data for a separate item tag. Each entry in the line corresponds to a specific item tag field, and each comma indicates where one entry ends and another entry begins.
Use the Item Tags file to import information about tags to the system. If you need to establish links between items and item tags, you can use the Taxonomy Assignment template. For details, see Item Taxonomy Assignment.
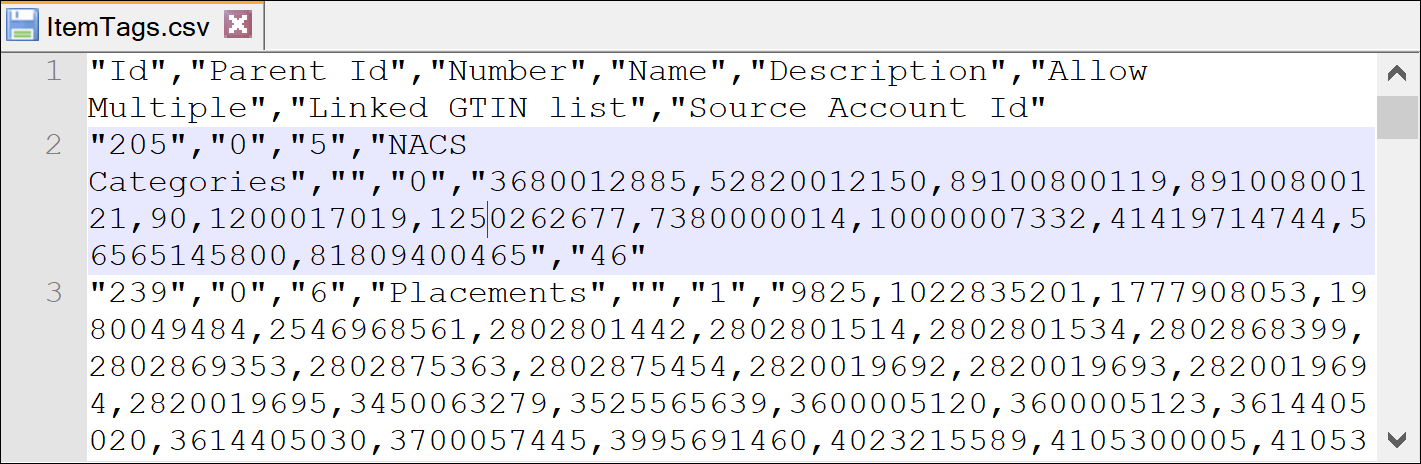
The file that you use for import of item tags data must have the following structure. Non-mandatory fields can be omitted.
| Field Name | Mandatory (Yes/No) | Description |
|---|---|---|
| Id | Yes | Unique tag ID. |
| Parent Id | Yes/No |
Unique parent tag ID if it exists. Mandatory for child tags. If the Parent Id value is not provided, the tag will be recognized as a root tag. |
| Number | Yes | Customer tag number. |
| Name | Yes | Tag name. |
| Description | No | Tag description. |
| Allow Multiple | No | Flag that allows a user to apply
multiple tags from one parent. Possible values: - 0: No - 1: Yes |
| Source Account Id | No | Reserved field, must be left empty. |
Data for parent tags referenced in the file (by corresponding IDs) must also be provided in the same file, even if such tags already exist in the destination account. Otherwise, all tags that refer to a certain parent tag without a record for the parent tag will be recognized as root tags.
Downloading File Template
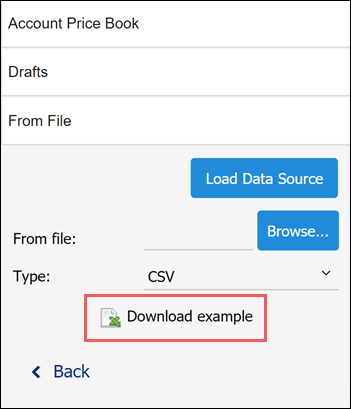
To construct a file for import, you can use a template provided by Petrosoft. To get the template and prepare the file, follow the steps:
- In the Import Tool, on the Data Sources panel, select From file.
- Click the Download example link.

- The downloaded file is provided in the XLSX format:
- On the Fields Description tab, get information about every entry that must be filled in the file.
- On the csvItemtagsDatasourceTemplate tab, fill data for the item tags that you want to import.
- Once the file is ready, switch to the csvItemtagsDatasourceTemplate tab and save the file in the CSV or XLSX format.
Result: You can use the saved file for import.
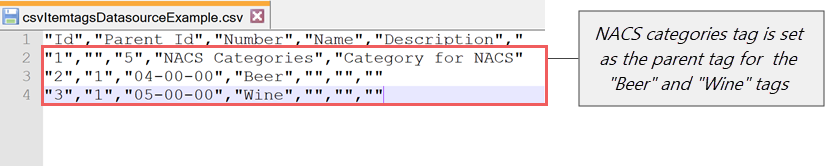
Importing Item Tags Parent-Child Relations
If you need to import tags with parent-child relations, use the Parent Id column. See the example below.