


The Item Taxonomy Assignment module allows you to assign existing item tags to items in the Account Price Book. With this module, you can quickly categorize items in bulk. Instead of assigning tags to items manually, you can prepare a file defining to which tag this or that item relates, and import this information to the Price Book in CStoreOffice® at once.
Before You Begin
Before starting to assign the item tags to items, make sure the following conditions are met:
- You have prepared a file with the item taxonomy data in the correct format. For details, see Preparing File with Item Taxonomy Data.
- Items to which you are going to assign item tags exist on your account. You can check the items UPCs on your account in CStoreOffice® by using the Find and Replace Tool. For details, see Searching for Price Book Elements.
- Item tags that you are going to assign to items exist on your account. You can check the item tags existing on your account by clicking Price Book > Item Tags.
Preparing a File with the Item Taxonomy Data
To import the item taxonomy from a file, fill in this file with the item taxonomy data based on the template below.
The file must have the following data structure.
| Field Name | Mandatory (Yes/No) | Description |
|---|---|---|
| SKU | Yes | Item code in one of supported formats: - UPCA - UPCE - EAN8 - EAN13 - PLU |
| SKU Type | Yes | Сode type for the SKU code in the previous column. Must be one of following numbers:
- UPCA = 0 - UPCE = 1 - EAN8 = 2 - EAN13 = 3 - PLU = 4 |
| Item Name | No | Item name as appears in the CStoreOffice® Price Book for viewing purpose only. This field will be ignored when importing (will not be updated for the item). |
| Item Tag | No | Root and item tag names. Root tag names must be provided in the header, and item tags in the column cells. The quantity of root tags and columns is not limited. Item tags assigned to a particular item must be provided in the corresponding item row in a column with the corresponding root tag as the header (to which the item tag belongs). For details, see the Data Example sheet in the sample file. |
For example, you want to assign two tags to items in the Price Book:
- Global Subcategories
- Price Zone
In this case, you must populate the file in the following way:
- In the SKU column, specify the items SKU numbers.
- In the SKU Type column, specify the type of the provided SKU numbers.
- In the Item Name column, specify the items names. This step is optional and can be omitted.
- In the header of the column to the right, specify the name of the root tag that you want to assign to items. In this example, Global Subcategories.
- In the column fields, specify the names of tags that you want to assign to specific items. In this example, the first item will have the Dry Grocery tag and the second item will have the General Merchandise tag. Both of these tags are child to the Global Subcategories root tag.
- Repeat steps 4-5 for the Price Zone root tag. In the header of the column to the right, specify Price Zone and in the column fields, provide the names of tags that you want to assign to specific items: Zone 1 and Zone 2.

Assigning Item Taxonomy
To assign item tags to items with the Import Tool:
- In the Import Tool, go to Operational Menu > Quick Operations > Item Taxonomy Assignment.
- In the Item Taxonomy Assignment form, click Browse and select the file with the item taxonomy.
For more information on how to fill in the file, see Preparing File with Item Taxonomy Data.
- In the All SKU in file have check digit list, select one of the following options:
- Autodetect: Select this option if you want the Import Tool to automatically detect the SKU format.
- Yes: Select this option if all SKUs in the file have the check digits. Note that if any SKUs in the file are specified without the check digit, the Import Tool will not be able to recognize and locate such items in the database.
- No: Select this option if at least one SKU in the file does not have the check digit. In this case, the Import Tool will ignore the check digits in SKUs.
- Click Next.

- Wait until the item taxonomy is uploaded from the file to the buffer table. In the buffer table, review the item taxonomy before importing it to the account.
At this step, the Import Tool validates the data loaded from the file. Items with errors are displayed in the invalid items list. To view the list of invalid items, in the right pane of the Item Taxonomy Assignment form, under Filters, select Invalid.
The Import Tool marks items as invalid in case the following errors occur:
- The item UPC is not found or the UPC is specified in the wrong format. To fix this error, correct the item UPC in the file used for data import and re-import the data to the Import Tool.
- The item tag does not exist under the root tag. To fix this error, in the buffer, click the necessary tag value and from the tags list, select the tag that you want to assign to the item.

The error description is specified in the Errors column. To see the error description, you can also hover the mouse cursor over an invalid item.
Taxonomy data for invalid items is not imported to the Price Book.
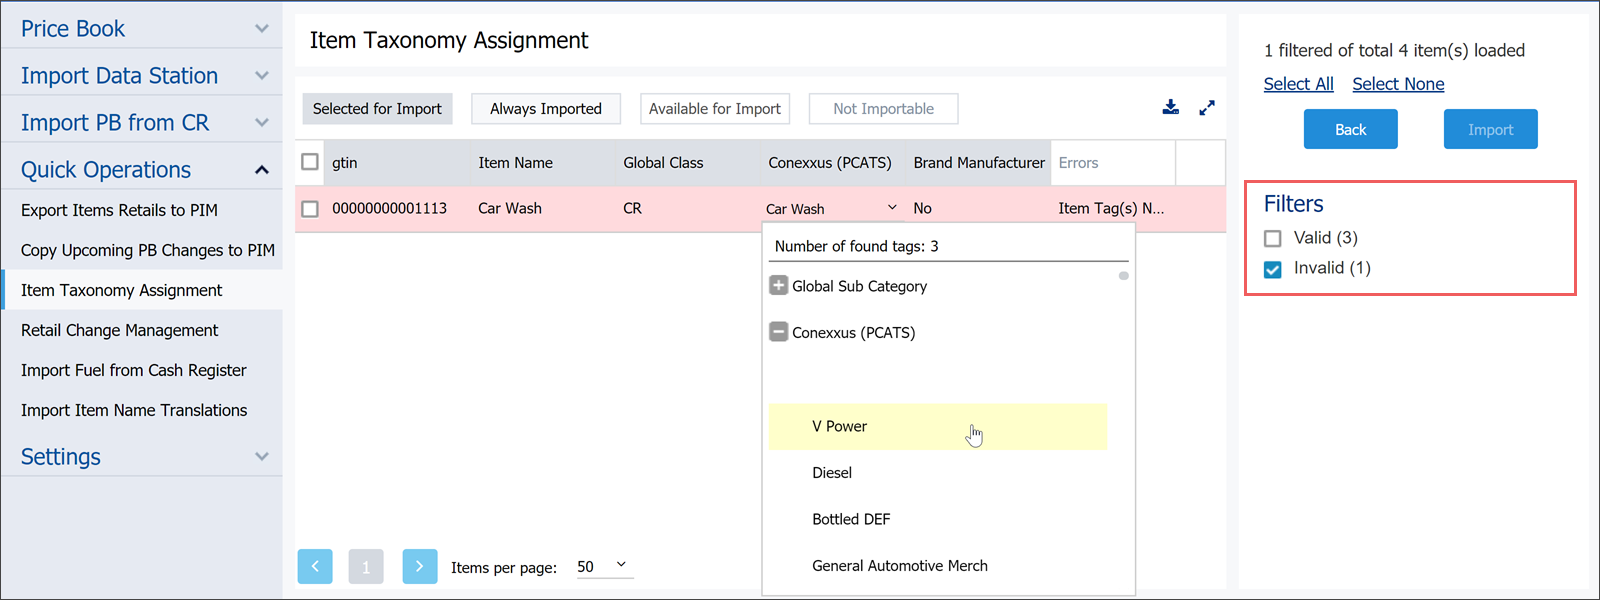
- If necessary, update item tags for the uploaded taxonomy. You can perform the following actions:
- Assign a new item tag to the item. In the tag column, click the item tag name and then in the tags tree, select a new item tag.
- Remove an item from the buffer table. Hover the mouse cursor over the item and then in the right column, click the Remove icon.
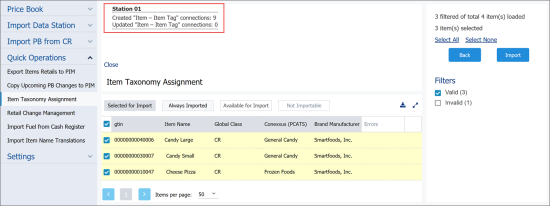
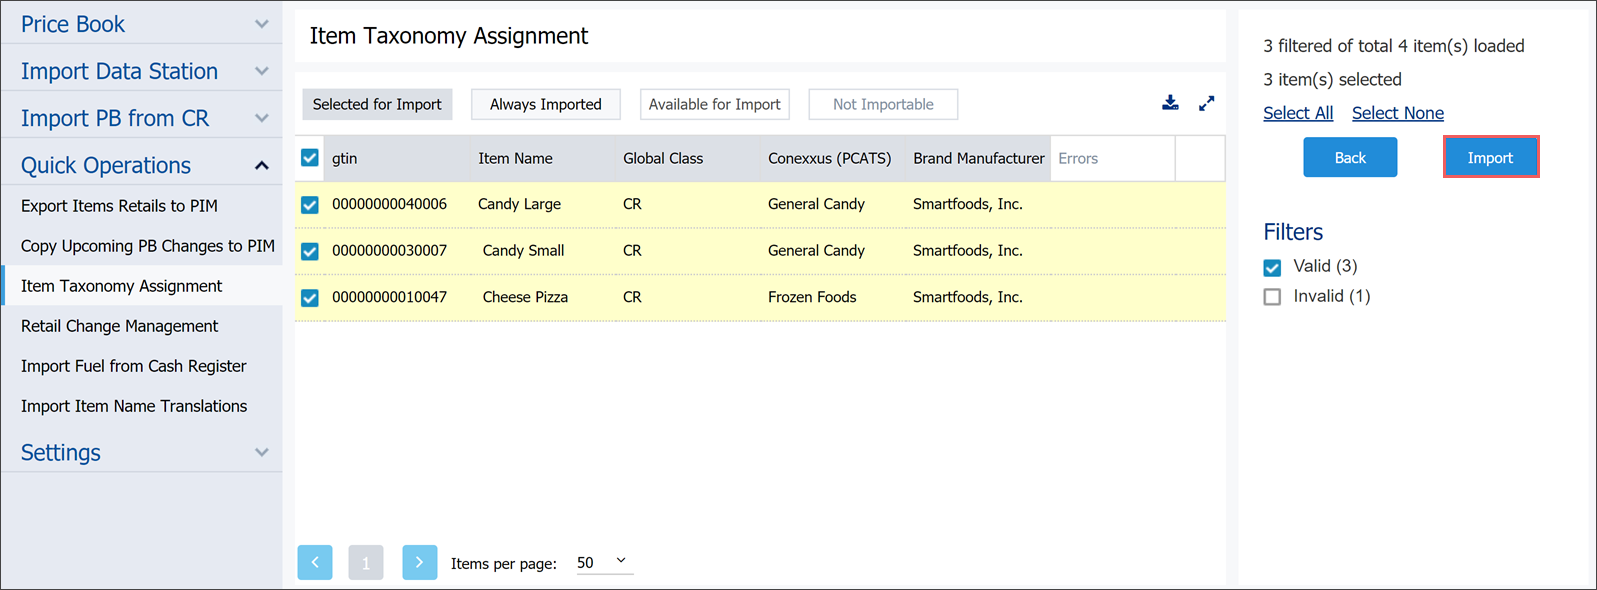
- Select the items whose taxonomy you want to import and then in the Data Sources panel, click Import.

- Wait until the item taxonomy is imported. The import status is displayed at the top of the table.

Exporting Items Data to a File
When working with the Import Tool, you can export items data to a file. For example, you can select all items that are marked by the Import Tool as invalid and export them to a file for correction.
For more details, see Exporting Draft Data to a File.


