You can configure the following item's attributes and other settings in PIM while creating or editing an item:
Global item attributes you can configure for the item during its creation are presented in the table below.
| Global Attribute Name | Global Attribute Description |
| PLU Number | An arbitrary identification number used to track sales of items without a UPC code such as fountain drinks, etc. |
| UPC-A |
11- or maximum 12-digit UPC code of an item. The item with undefined UPC-A cannot be pushed to a cash register and accepted by the cash register database. |
| UPC-E | The reduced UPC code type E. This is usually 7 digits. If you have an 8-digit code without the first 0, the first digit shall be dropped. The code can be also 6- digit, without the first and the last numerals. |
| Item Description | The detailed item's description. This field is required. |
| EAN-13 | The 13-digit EAN-13 barcode of the item. |
| EAN-8 | The 8-digit EAN-8 barcode of the item. |
| Bulloch Item Number | Defines the item number for Bulloch cash registers. Possible values: - 1-13: Enter the number of Bulloch POS machines installed on your account. - Empty: Leave this field blank, in case there are no Bulloch POS machines installed on your account. |
| Prompt for Price |
Ability to ask and assign any price on the cash register. Possible values: This field is displayed only if at there is at least one Bulloch cash register installed at your account. |
| Size | The item's size. |
| Measure Type | This list contains the following measure types you can assign to your item: Piece, Weight or Volume. |
| Measure Unit | This list is displayed if Weight or Volume is selected in the Measure Type field. In this list, you can select the units of measurement for your item. |
| Length | Enter the item's length. |
| Width | Enter the item's width. |
| Height | Enter the item's height. |
| GTIN | The global trade item number assigned automatically by the system for each newly created item. |
Account item attributes you can configure for the item are presented in the table below.
| Account Attribute Name | Account Attribute Description |
| Receipt CR Description |
This field contains the description that will appear on the receipt that the cash register prints.
The size of this field is limited to 24 symbols, including spaces. For more information about processing the item description, including special symbols, spaces and so on, see Processing Item Descriptions. The item with undefined receipt cash register description cannot be pushed to a cash register and accepted by the cash register database. |
| Price Group | In this list, you can select a price group to assign your item to it. For more information on working with price groups, see Price Groups. |
| Promo Group | In this list, you can select a promo group to assign your item to it. You need to assign your item to a promo group, in case the item participates in a promotion. For more information on working with promotions, see Discount Management. |
| Category | In this list, select a category to assign your item to it. For more information on working with categories, see Categories. The item with undefined category cannot be pushed to a cash register and accepted by the cash register database. |
| Manufacturer | This field allows you to append the manufacturer or producer to the item entry. If PIM knows the item code of the manufacturer, it will be chosen automatically upon saving the item. |
| CR Department |
In this list, select a cash register department to assign your item to it. For more information on working with cash register departments, see CR Departments. The item with undefined CR department cannot be pushed to a cash register and accepted by the cash register database. |
| Item Type | This option is active only for the Radiant cash registers. It allows specifying the item types according to the Radiant classification. |
| Gift Card Terms and Conditions | This option is active only for the Radiant cash registers. The default value is 0 or empty. To send the item to your cash register as a gift card, enter 1. To configure the gift cards terms and conditions for your item, make sure this option is turned on for your cash register in CStoreOffice®. For details, see the Station Options: Cash Register section. This option is displayed in the Account Item Attributes section in case at least one of the following conditions are met: - The Item Type option for the item has one of the following values: SVC Activation or SVC Reload. or - The Item Type option for the item is empty, but the item belongs to the CR Department which has the Radiant Item Type option with SVC Activation or SVC Reload value. |
| Inactive | Select this option to mark the item as inactive. For details, see Marking Items as Inactive. |
| Make this item Linkable |
Select this check box, if you want to associate or link your item with another item. For more information on working with linked items, see Linked Items. Linkable item cannot have linked items, so when this option is selected for the item, the Linked Items section is unavailable. |
The Tags section contains all tags available for the item.
For more information on managing item tags, see Item Tags.
In the Tags section, you can do the following:
- Specify values for all item tags from the Tags list.
- Switch to the Item Tags setup form by clicking the Item Tags Setup button.
Sales and retail settings you can configure for the item are presented in the table below:
| Retail Type | Retail Type Description |
| Recommended Retail | The purchase price recommended by the head office account owner. |
| Apply Recommended Retail | Select this option if you want to forbid the recommended retail price change. |
| Min Retail | The least possible retail price value. |
| Max Retail | The greatest possible retail price value. |
| Negotiated Cost | The originally agreed price with the vendor. |
| Status | The item status: active or delisted. |
To easily set up sales and retail prices for items, you can filter the list of locations by location tags. To do this, click the Filter Locations button and select check boxes next to locations that you want to display. You can also use the search field to find the necessary location tag. To discard the filter, click the Clear Selection icon on the right of the search field.
Sales and retail settings you can view and configure for the item are presented in the table below:
| Retail Type | Retail Type Description | ||||||||||||||||||
| Last Sales Retails | The last retail price go for the item from the cash register for particular location. This field is not editable. | ||||||||||||||||||
| Last Sales Date | The date of the last item sale for the particular location. This field is not editable. | ||||||||||||||||||
| Current Retail | The current retail for this item for the particular location. | ||||||||||||||||||
| Fix Current Retail | Select this option in case you don't want to allow your cashiers changing item retail on the register. | ||||||||||||||||||
| Children Retail Summary | The value in this field displays the summary retail price for all children of the parent item if buying child items separately. This field is not editable. | ||||||||||||||||||
| Retail Source |
The source of retail price from which it is obtained.
|
||||||||||||||||||
| Recommended Retail | The purchase price recommended by the head office account owner. | ||||||||||||||||||
| Recommended Retail Range | Minimum and maximum retail values for the item. | ||||||||||||||||||
| Profit |
Current profit value. Calculating Formula: Profit = Item Cost - Item Retail. This field is recalculated each time the Current Retail is changed. |
||||||||||||||||||
| GPM |
Current profit in percent calculated using Current Retails and Cost.
This field is recalculated each time the Current Retail is changed. |
||||||||||||||||||
| Min Stock | The minimum number of items remaining in stock before they are automatically reordered. | ||||||||||||||||||
| Promotion Retail | A promotion retail price for the item. | ||||||||||||||||||
| For The Period | A period during which the promotion retail is active. | ||||||||||||||||||
| Remove from CR Database | This field displays the date of the item removal from the cash register. | ||||||||||||||||||
| Status | The item status: active or delisted. |
To easily set up sales and retail prices for items, you can filter the list of locations by location tags. To do this, click the Filter Locations button and select check boxes next to locations that you want to display. You can also use the search field to find the necessary location tag. To discard the filter, click the Clear Selection icon on the right of the search field.
The Vendors section contains a list of vendors supplying the item. For each vendor, you can specify the following information:
| Vendor Attribute Name | Attribute Description |
| Vendor | The name of the supplier's company. |
| VIN (Vendor Item Number) | Vendor Item Number is an item number in the items catalog of the vendor. |
| Unit in Case | The quantity of the item in the packing. |
The Vendors section is permission-based. It is available only to the users who have the Allow to edit Item's Vendor Information permission granted in CStoreOffice®. For more information on how to grant a permission to the user, see Roles and Permissions Management.
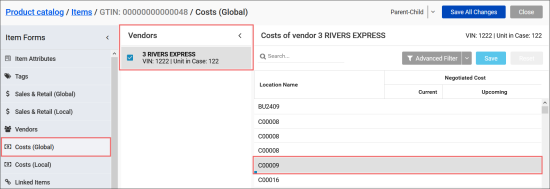
The Costs (Global) section allows you to set up the item cost for vendors in different locations at the global level. In this section, you can configure the following item settings:
| Cost Attribute | Attribute Description |
| Vendor | The name of the supplier's company. |
| Location Name | The name of the location for which you want to set up the vendor cost. |
| Current Negotiated Cost | The current negotiated cost for the item in the selected location. |
| Upcoming Negotiated Cost | The upcoming negotiated cost for the item in the selected location. |
| Promotion Unit Cost | The promotional cost which is set for the item regardless the item's participation in any active promotion. |
| Primary Vendor | The option defining if the vendor is primary for the location. |
The Costs (Global) section is permission-based. It is available only to the users who have the Allow to edit Item's Vendor Information permission granted in CStoreOffice®. For more information on how to grant a permission to the user, see Roles Management Permissions.
To set up costs for the item at the global level:
- From the main PIM menu, go to Product Catalog > Items.
- Find the item you need, select it and click the Edit button.
- In the Item Attributes form, click Costs (Global).
- In the list of available vendors, select the item's vendor for which you will set up the global costs.
- In the Costs of vendor section, select the location for which you want to set up the global costs and double-click it.
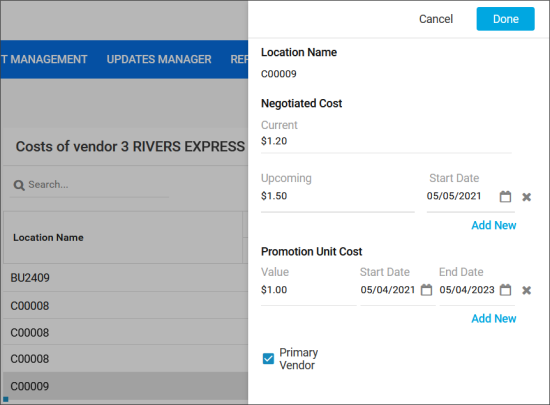
- In the right menu:
- In the Negotiated Cost section, set the following values, if needed:
- Current
- Upcoming
- Start Date
- In the Promotion Unit Cost section, set the following values, if needed:
- Value
- Start Date
- End Date
Please note that the Promotion Unit Cost settings configured in this section are applied to the item only if the corresponding option is activated in the CStoreOffice® account settings. For more information, see Setting Up the Promotion Cost.
The Costs (Local) section allows you to set up the item cost for vendors in different locations at the local level. In this section, you can configure the following item settings:
| Cost Attribute | Attribute Description |
| Vendor | The name of the supplier's company. |
| Location Name | The name of the location for which you want to set up the vendor cost. |
| Current Negotiated Cost | The current negotiated cost for the item in the selected location. |
| Upcoming Negotiated Cost | The upcoming negotiated cost for the item in the selected location. |
| Primary Vendor | The option defining if the vendor is primary for the location. |
The Costs (Local) section is permission-based. It is available only to the users who have the Allow to edit Item's Vendor Information permission granted in CStoreOffice®. For more information on how to grant a permission to the user, see Roles Management Permissions.
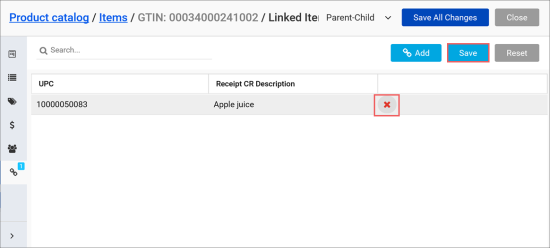
The Linked Items section displays the list of items linked to your item. You can view the following data on each linked item in the list:
- UPC: linked item UPC code.
- Receipt CR Description: linked item description that will appear on the receipt that the cash register prints.
You can perform the following actions in the Linked Items section:
To add a new item to the Linked Items list:
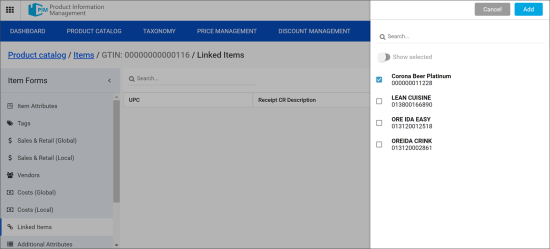
- At the top right of the Linked Items list, click Add.
- Select a linked item by UPC or receipt CR description:
- To select an item by UPC, in the search field, enter the UPC code or a part of it and select the necessary item in the list. Note that PIM automatically adds the check digit to the entered UPC code.
- To select an item by receipt CR description, in the search field, enter the item description printed on the receipt, or a part of the item description, and select the necessary item in the list.
In case the Add New button is not active, you have no linkable items available.
To make the item linkable, go to this item's editing form > Item Attributes section > Account Item Attributes subsection > select Make this item Linkable.
In the Additional Attributes section, you can specify values for all attributes added additionally from the global item attributes to the account item attributes.
For more information on managing additional item attributes, see Additional Item Attributes.
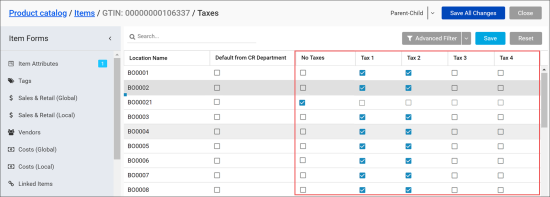
In the Taxes section, for each location, you can apply taxes to items depending on the local taxation.
You can also set up taxes for items in bulk. For details, see Setting Up Taxes and Product Codes.
To set up taxes for a location in the Taxes section:
- If you want to save the taxes settings from the item's CR Department:
- Select the Default from CR Department option for your location.
- At the top right of the table, click Save.
- If you want to set up your own taxes strategy for an item for this particular location:
- Clear the Default from CR Department option for this location.
- Select the necessary check boxes in the No Taxes, Tax 1, Tax 2, Tax 3, Tax 4 columns.
- At the top right of the form, click Save.
Make sure the taxes settings are configured properly in CStoreOffice®. For details, see the Setting Up Item Taxes section.
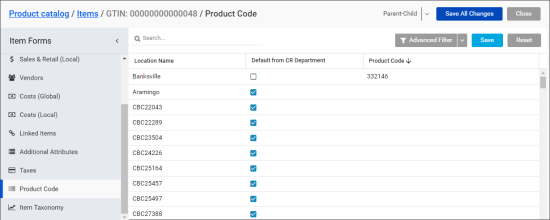
In the Product Code section, for each location, you can apply product codes to the items.
You can also set up product codes for your items in bulk. For details, see Setting Up Taxes and Product Codes.
To set up product codes for a location in the Product Code section:
- If you want to save the product code settings from the item's CR Department:
- Select the Default from CR Department option for your location.
- At the top right of the table, click Save.
- If you want to set up your own product code for an item for this particular location:
- Clear the Default from CR Department option for this location.
- In the Product Code field for this location, enter the item product code. Only numeric values are supported.
- At the top right of the table, click Save.
Make sure the product codes settings are configured properly in CStoreOffice®. For details, see the Setting Up Item Product Codes section at CStoreOffice® > Price Book > Items in the Petrosoft Cloud Help.
This section is displayed in the Items form only for the car wash items.
In the Car Wash Settings section, you can set up the settings for your car wash item.
For details, see Working with Car Wash Items.
The operations with the item car wash settings are permission-based:
- To view the Car Wash Settings tab in the Items form, make sure the Allow users to view item CarWash tab on local level permission is granted to your user.
- To edit the item car wash settings in the Items form, make sure the Allow users to edit item CarWash tab on local level permission is granted to your user.
- To view edit car wash settings, make sure the Allow user to setup CarWash settings permission is granted to your user.
In the Item Taxonomy section, you can set up the association between the items and the following categories:
- NACS Category
- GPC (Global Product Classification) Category
To assign above categories to your item in the Item Taxonomy section, for each category, select the category and Sub category from the lists.
NACS and GPC categories and sub categories values are taken from CStoreOffice® relevant categories.
