All the items Price Book categories is the way of item classification used for the report creation.
Categories might seem similar to the departments, except for the departments are used for the cash register.
Example
Grocery taxable and Grocery non-taxable pertain to different CR departments, but fall into the same category - Groceries.
There are two different methods of accounting used for the categories in the PIM:
- Retail Method of Accounting. This method calculates a store's total inventory value by taking the total retail value of the items that were originally in inventory, subtracting the total sales, then multiplying that dollar amount by the cost-to-retail ratio (the percentage by which goods are marked up from their wholesale purchase price to their retail sales price).
- Cost Method of Accounting. This method is used for the items containing of several ingredients which were bought separately, and are combined and sold all together. A cheeseburger, for example. Under this method merchandise additions are made at cost value and no retail value. They will not be extended to a retail value as are other store products. Retail value is added to the retail book inventory via a price change after the item is sold. The retail value will be determined by the related department sales found on the closing register tape.
Only users with appropriate permissions can create, edit, and delete the categories.
On the main toolbar, click Taxonomy > Category.
Select the category you are interested in form the list, and then click the View button.
Select the category you are interested in form the list, and then click the Items List button.
For more information, see Items.
- Do one of the following:
- If you want to reassign the items from the specific category, select the category, and then click Items List.
- If you want to assign the item or the group of items from different categories, click Item,and find the item or items you are interested in using the find and replace tool. For more information on using the find and replace tool, see Find and Replace Tool.
- Do one of the following:
- To assign one item at a time, select the item Edit or View for the specific item, and then select the category you want from the corresponding list. Click Save.
- To assign items to the category in bulk, select these items by clicking them, and then click Add to Tag. In the Item Tags list, select the category you need. To save the changes, click Add to Tag .
- Select the category you are interested in form the list, and then click the Delete button.
- Confirm the deletion.
Once deleted, the category can be restored only by the technical support.
To view the list of categories in the printer friendly view, click the Print button.
CStoreOffice® loads the list of categories created in CStoreOffice® to a file of the PDF format and saves this file to the default downloads folder on your computer. To open the file, locate the downloaded file on your computer and double-click it.
Adding New Category
- Click the Add New button.
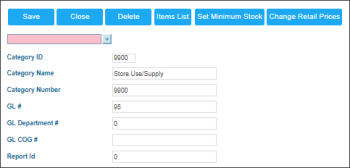
Result: The category adding form opens in a separate page. - In the category adding form, do the following:
- Enter the following category basic information:
- In the Category ID field, change the category identifier, if needed. The default value is the next available category identifier in the system.
- In the Category Name field, enter the category name.
- In the Category Number field, enter the category number, which usually equals to the category identifier.
- In the GL # field, enter the general ledger number.
- In the GL Department # field, enter the general ledger department number, if any.
- In the GL COG # field, enter the general ledger cost of gods sold number, if any.
- In the Report ID field, enter the corresponding report identifier, if any.
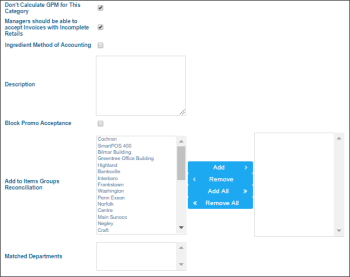
- Specify the following category parameters, if needed:
| Category Parameter | Description |
| Don't Calculate GPM for This Category check box | Select it, if you don't want the GPM (Gross Profit Margin) to be calculated for this category. |
| Managers should be able to accept Invoices with Incomplete Retails check box | Select it to allow managers to accept invoices with incomplete retails. |
| Ingredient Method of Accounting check box | Select it to mark your category as IMoA. |
| (For IMoA only) Exclude from "Full Inventory audits" check box | Select it to exclude the items from this category from the full audits list. |
| Description field | Enter the category description. |
| Block Promo Acceptance check box | Select it if this category participates in the promo action. |
| Add to Items Groups Reconciliation boxes | Use arrows to add stations you need to |
| Matched Departments box | This box displays the list of CR departments linked to this category. If you are just creating a new category, this box is empty. For more information on how to link a category with a CR department, see CR Departments > Matched Category option. |
- Click Save.
Editing Categories
To edit the category in PIM:
- Select the category you want to edit.
- Click the Edit button.
- Enter or edit the following information:
- Category ID
- Category Name
- Category Number
- GL # (General Ledger number)
- GL Department # (General Ledger department)
- GL COG # (General Ledger Cost of Gods Sold number)
- Report Id
- If you don’t want the GPM to be calculated for this category, select the corresponding option.
- To allow the managers accept invoices with incomplete retails, select the corresponding option.
- To mark the category as Ingredient Method of accounting, select the corresponding option.
- (For IMoA only) Select if you want the items from the category to appear in the full audits list.
- Enter the category description.
- Select the Block Promo Acceptance option if the category participates in the promo action.
- Add the category to Items Groups Reconciliationusing the arrow buttons.
- Enter the Matched Departments if they are present.
- Click Save.
Price book—correcting item's category and CR department
This video presents the information on correcting item's category and CR department.
Importing Categories
Besides creating the categories for your Price Book manually, you can import them in bulk in the .xls (Excel) format.
- On the main toolbar, click Product Catalog > Import Items.
- Click Categories.
- You have the following options:
- Use the template. Download the template, edit it adding the categories of your own and upload it back.
- Use your own document. Make sure your document meets the requirements, and then upload it.
The first line contains the column headers (Name and Description). Start entering your categories starting from the second line.
Changing Retail Prices
Besides changing the price for the specific item, you can change it for the whole item category as well. For more information, see Working with Retail Setup.
Viewing the GPM Range Management Report
You can view and edit the GPM ranges for various item categories.
For more information on the report, see GPM Range Management Report.
Price book 3—managing categories
This video presents the information on managing categories.

 icon and enter the letters or numbers the category attribute


