


General Issues
Make sure the SmartPOS PIN is configured for the employee. Otherwise, the employee created in CStoreOffice®, might not be sent to SmartPOS.
For more information, see Managing SmartPOS Users in CStoreOffice®.
To print only one receipt copy from SmartPOS, configure the following settings:
- For all payment types, except for cards:
- Go to Settings > POS > Receipt Settings.
- Clear the Automatically print customer copy receipt option.
- Tap Save.

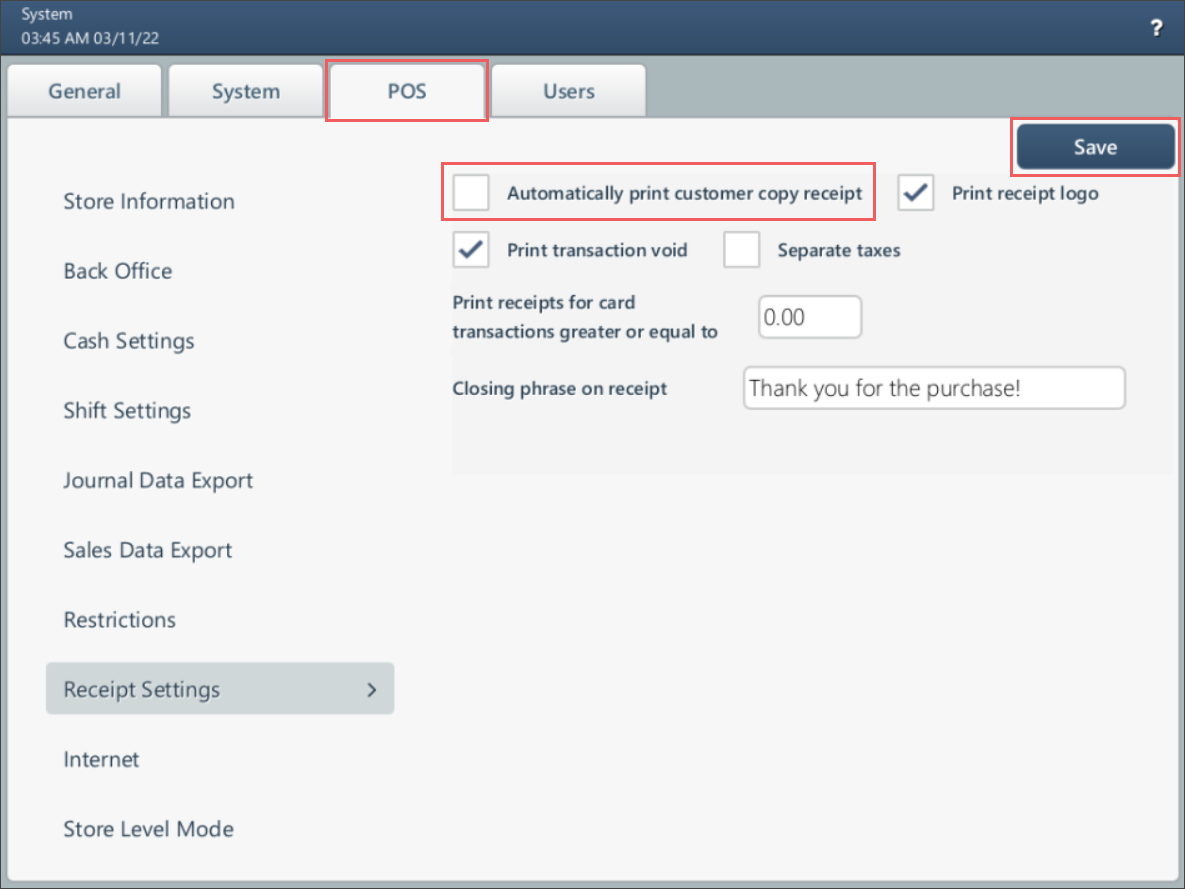
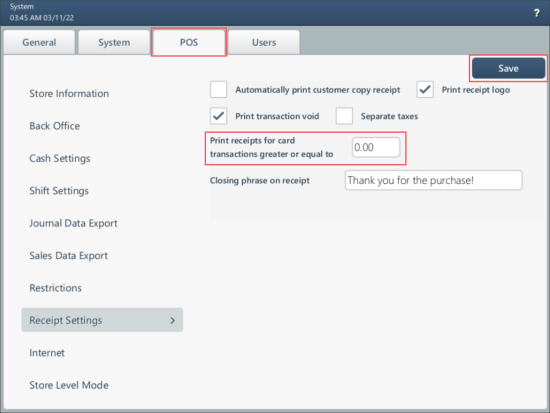
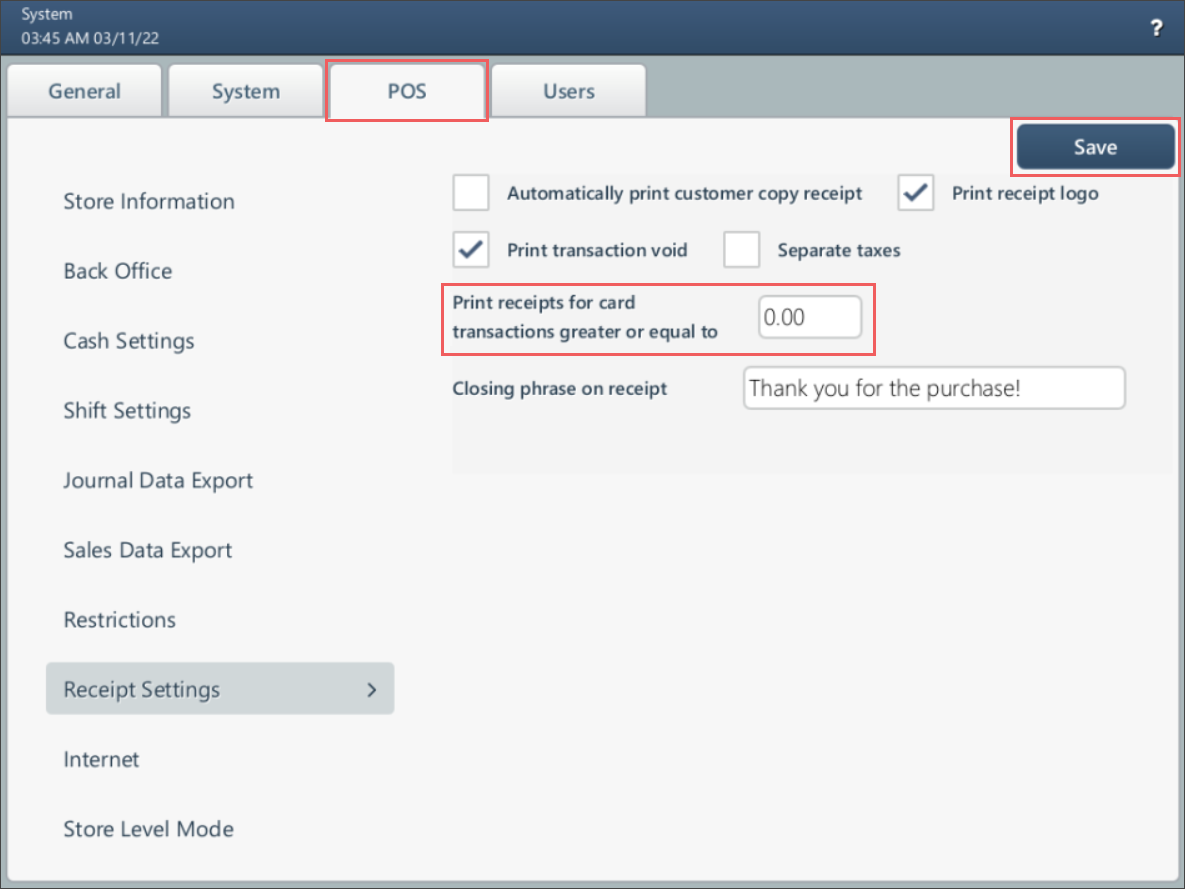
- For card payments only:
- Go to Settings > POS > Receipt Settings.
- In the Print receipts for card transactions greater or equal to field, enter 0.00 value.
- Tap Save.
For more information on configuring SmartPOS settings, see SmartPOS User Guide.
You can configure what item description to print on the receipts in the Cash Register form > SmartPOS section:
- For printing a full item description from the Item Description field, select the Send full item description in update option.
- For printing a short item description from the Receipt CR Description field, unselect the Send full item description in update option.
For more information, see Item Description Setup in CStoreOffice®.
Before opening pay point, you need first to clock in or log into the system:
- On the left panel, select your user name.
- Enter your PIN in the corresponding field.
Result: The Open Pay Point button is displayed. You may now open your pay point.
For more information on how to work with pay points in the SmartPOS, see the Managing Pay Points section in the SmartPOS User Guide.
You can have only one pay point open for the cash register, unless you have the double drawer option on or you user role is "Waiter" who does not occupy a cash drawer.
One of the possible reasons is that the PIN pad is overflowed with the POS transactions.
To eliminate this issue for the future, it is strongly recommended to change day on the POS on a regular basis.
For more information about how to change a day on the POS, see the Change Shift and Day section in the SmartPOS User Guide.
Devices Connection Issues
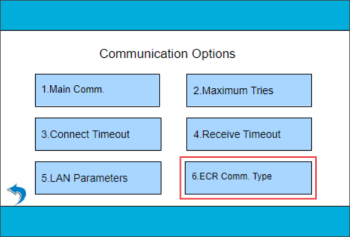
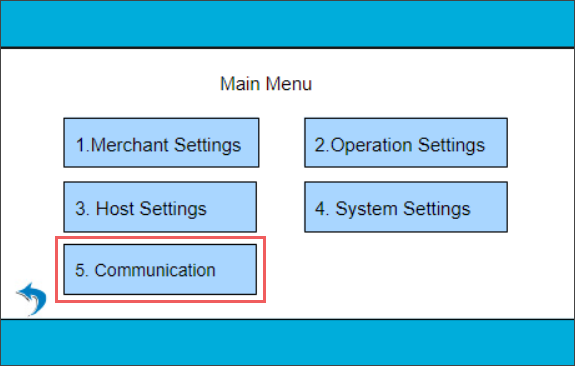
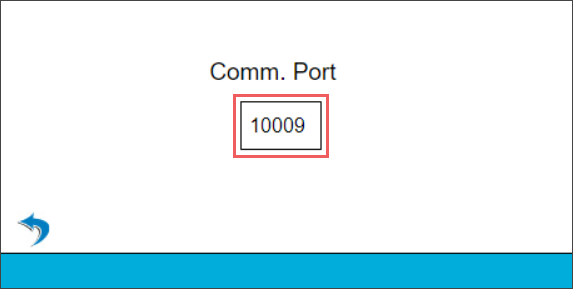
One of the possible reasons is incorrectly configured ECR Comm. Type field on the PIN Pad. To fix this issue:
- In the PIN Pad's Main Menu, press 5. Communication.
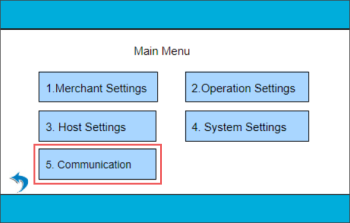
- Enter the password and press Enter. The default password is equal to 1.
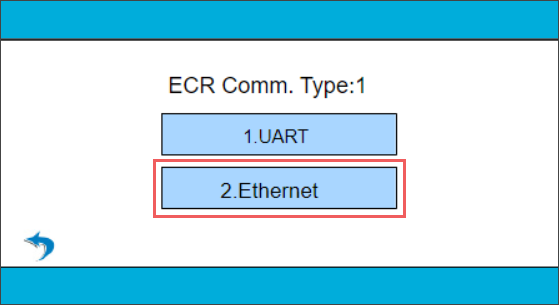
- In the Communication Options menu, press 6. ECR Comm. Type.
- In the ECR Comm. Type menu, press 2. Ethernet.
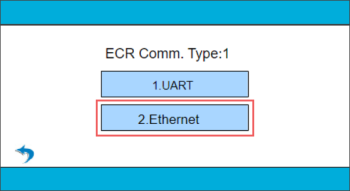
- In the Comm. Port field, type 10009 and press Enter.

- Press X, to exit the Main Menu.
- Make sure the payment operations are performed.

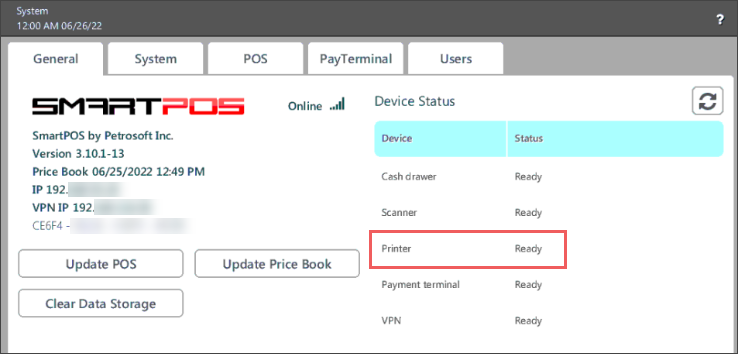
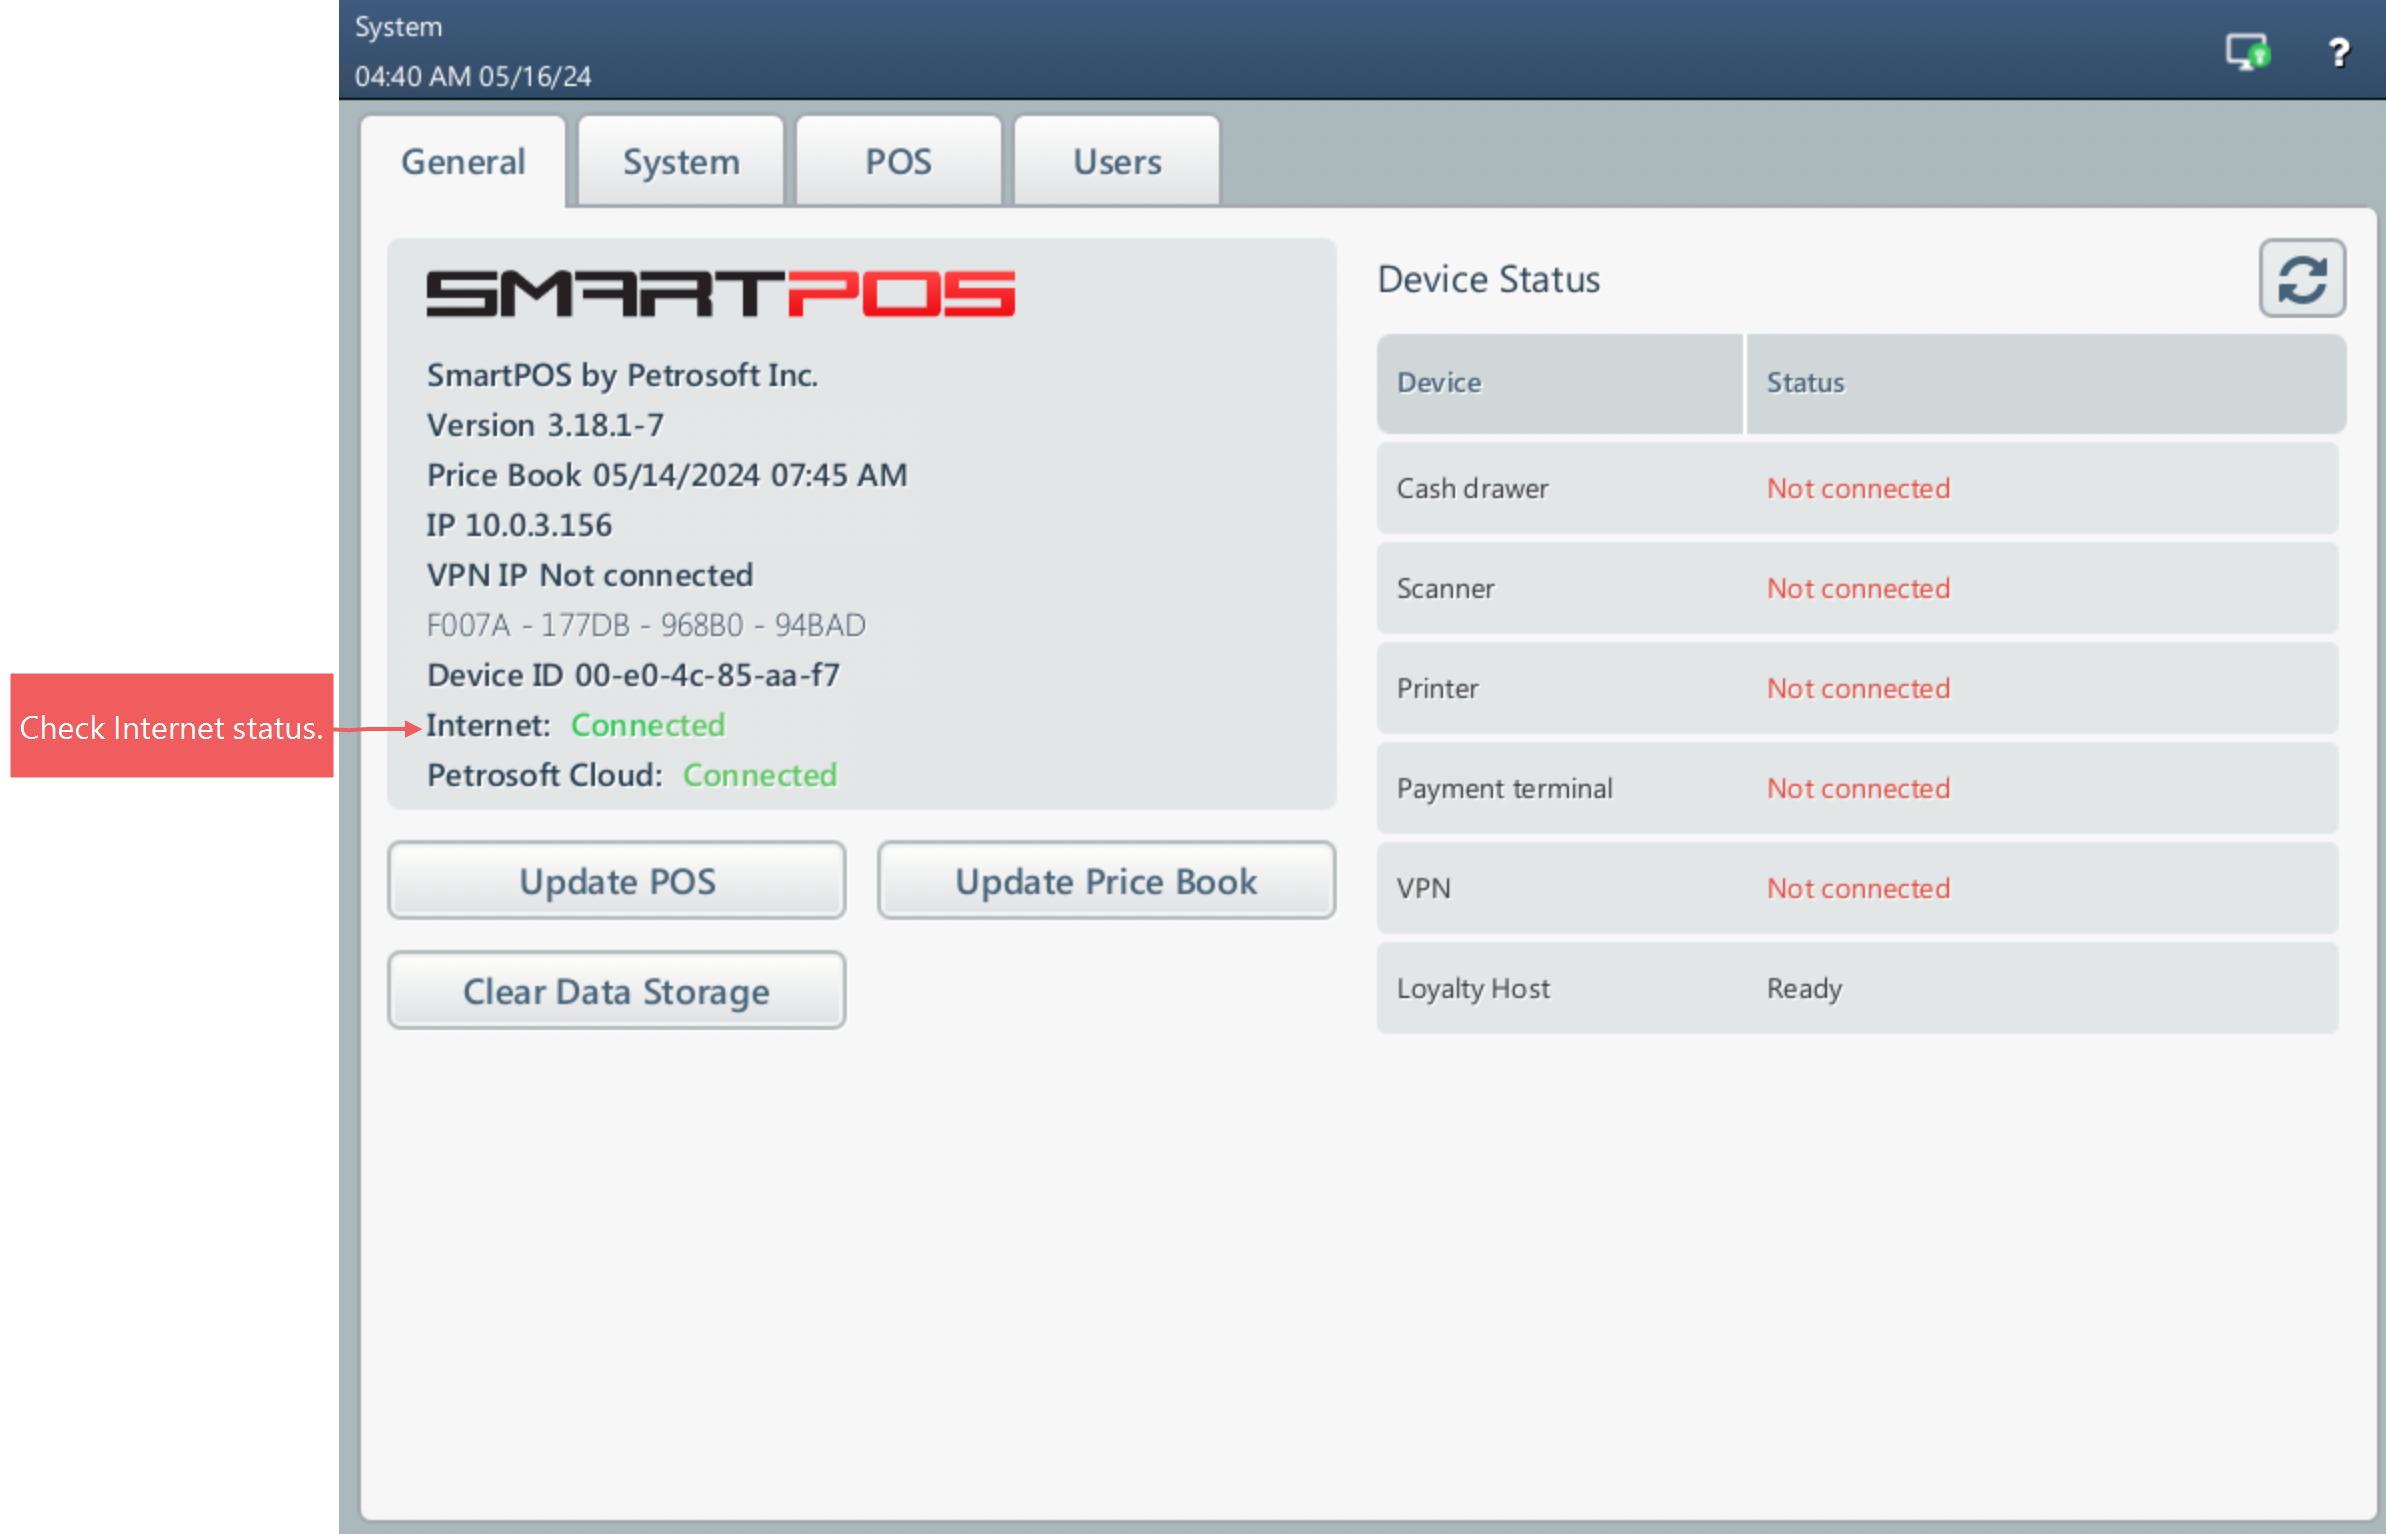
Problem: The Not connected status is displayed for the printer in the Device Status section.

Solution: Make sure the printer is connected to the network:
- Go to Settings > System.
- In the Devices section:
- Tap the refresh button.
- In the Printer list, select the printer with the IP address.
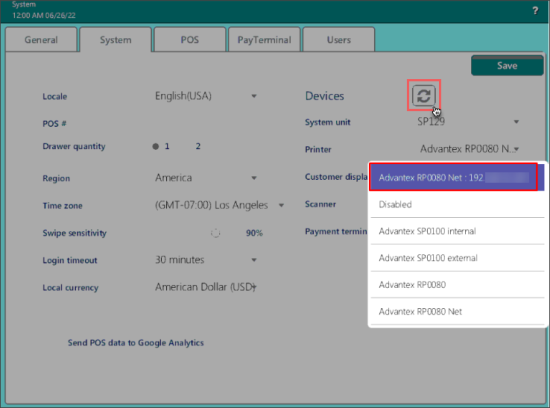
- Tap Save.
- Go back to the General tab and check the printer status. It must display Ready.


For more information on how to work with the system settings in the SmartPOS device, see System Settings.
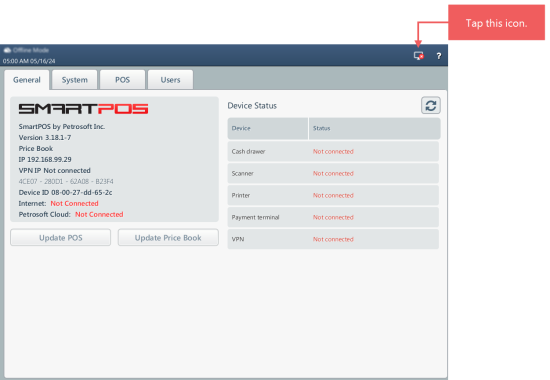
Problem: The POS connection status is Cash Register Communication interruption in the location where SmartPOS is used.
Solution: Make sure SmartPOS is experiencing no issues with the internet connection.
- Access the SmartPOS cash register.
- Clock in, then check in.
- Swipe to the Settings screen.
- On the General tab, check the Internet connection status in the left part of the screen.
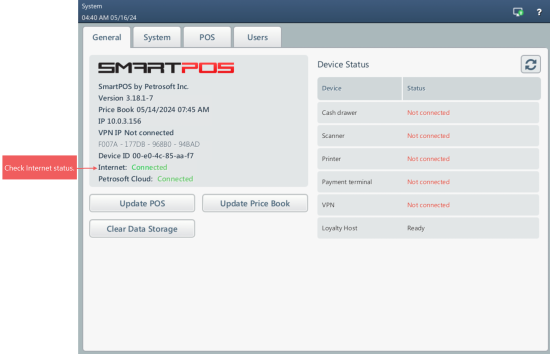
- If you see green Connected status, submit a ticket or contact Support.
- If you see red Not Connected status, tap the connection issue icon in the right part of the screen.
- Make sure the Ethernet connection settings are correct and change the settings, if required.
- You can learn more about the LAN settings in Internet Settings.
- Tap Save and test connection.

- If the connection icon in the upper right corner has not changed to green, submit a ticket or contact Support.

Help and Support
For more information on SmartPOS, go here and schedule a free demo.
Every SmartPOS customer gets a standard success plan that provides training, support and maintenance. Support representative will also provide best practices and help solving technical issues.
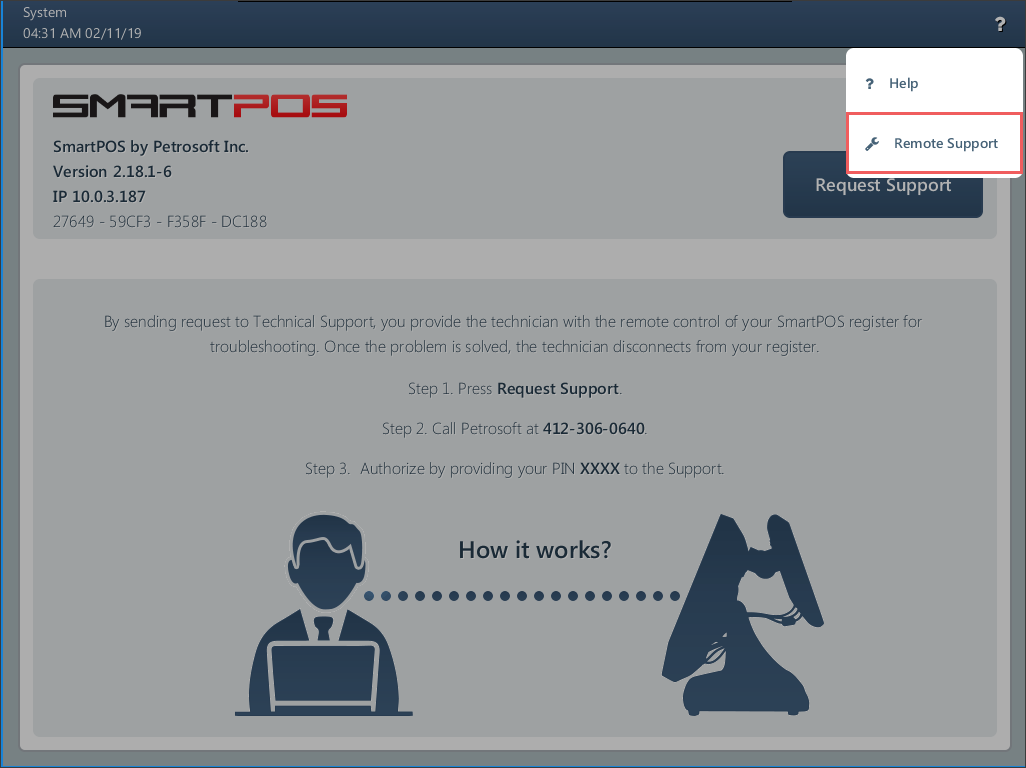
There is a remote support available directly from the register. To access remote support, at the top right corner of the cash register screen, tap the question mark icon and select Remote Support.
| Phone | (412)-306-0640 # 3 9 - 6 PM (Mon-Fri) |
| helpsmartpos@cstoreoffice.com | |
| Ticketing system | CStoreOffice® ticketing system |
| Remote Support | Request assistance through the register interface |
| Emergency | (412)-306-0640 # 3 Outside work hours |
Standard 1 year warranty with additional 2 years available for purchase. Rapid replacement is available for first 3 months of warranty.
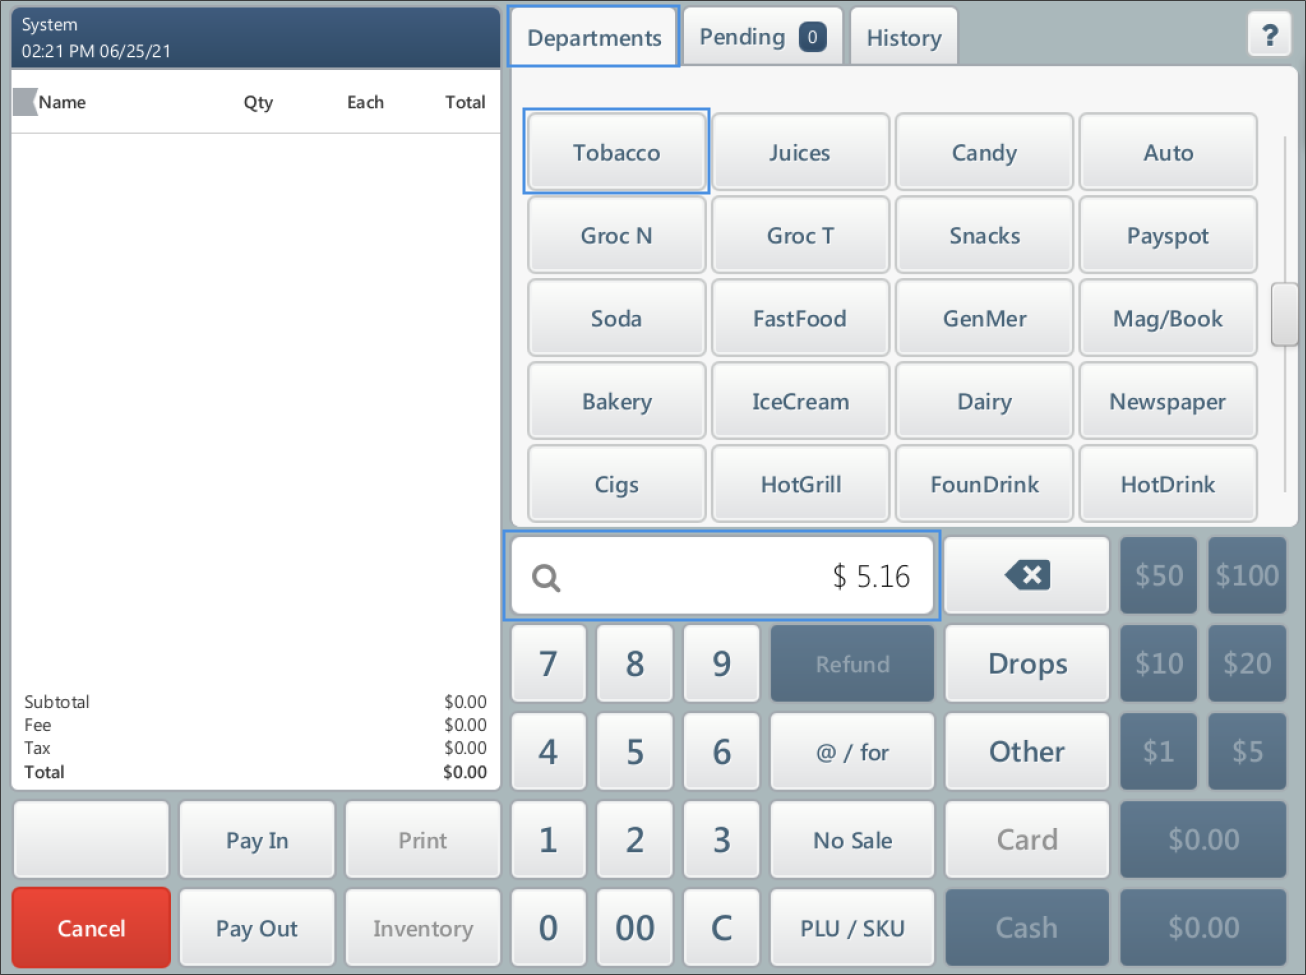
Refund
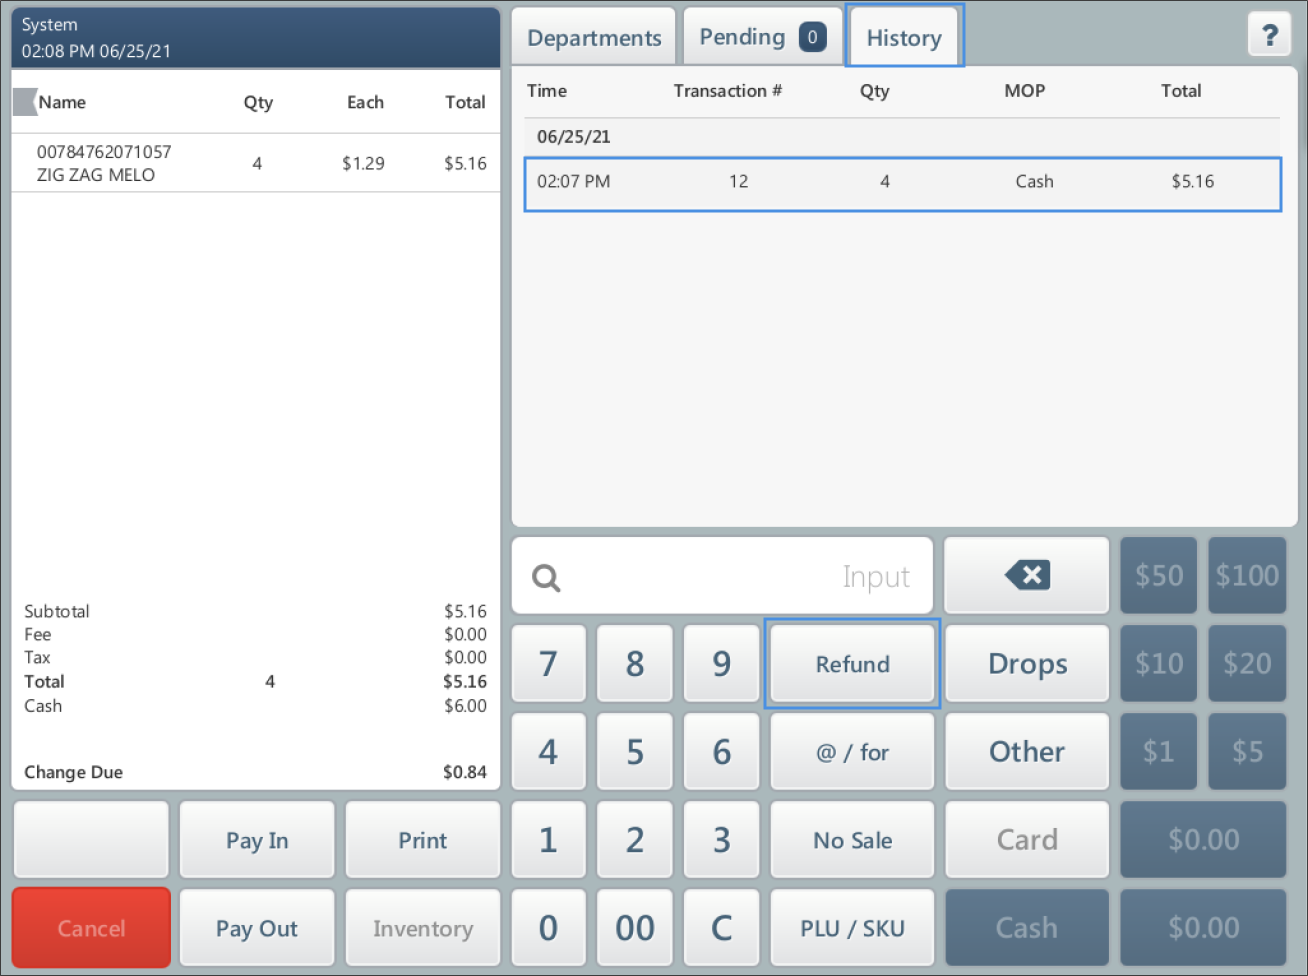
To refund the direct department sale, at the SmartPOS device from the cashier's screen:
- Tap the History tab.
- Tap the transaction you want to refund.
- Tap the Refund button.

- In the Input field, enter the transaction price to be refunded.
- In the Departments list, tap the department from which the item is purchased.

- Scan other items from the transaction, if any.
- Complete the refund operation.
For more information on how to work with the SmartPOS device, see SmartPOS User Guide.
It is not possible to select the Refund PLU Without Scanning option if the Refund permission is not assigned.
Yes, once the Allow Refund option is enabled for the MOP in the MOP settings.
- There was a 60 $ transaction. 40 $ were paid via the loyalty program, 20 $ - in cash. In case of refund, 20 $ cash are refunded. 40 $ of loyalty points are not refunded.
- If there were some loyalty points added during a transaction which later refunded, the loyalty points are not subtracted back.
If you are trying to refund an item which is a part of a price modified promotion, a modified price is returned.
If the item was sold as a part of a regular transaction, the regular price is returned correspondingly.
MOPS
Cash Back on
- Customer buys item "A" for $1.50.
- Customer has a coupon for item "A" with value of $2.
- System rings the sale with $0.50 due to the customer.
Cash Back off
- Customer buys item "A" for $1.50.
- Customer has a coupon for item "A" with value of $2.
- System only takes value of the item off.
- Total balance due = $0.00.
Permissions
If a user needs to perform an operation he/she doesn't have permission to perform, the user is offered a list of logged in managers who can authorize the operation by entering their PIN and confirming the operation.
QwickServe Integration
Make sure the QwickServe module is on for your POS at the back-office side.
Reports
Problem: The Payroll report in CStoreOffice® does not include some employee payroll data from SmartPOS.
Troubleshooting: Make sure the Clock In and Clock Out operations are performed regularly on the SmartPOS unit as these operations launch and stop the payroll timer correspondingly. Otherwise, employee payroll data is not included into the Payroll report in CStoreOffice®.
For more information, see Payroll Report and SmartPOS User Guide.
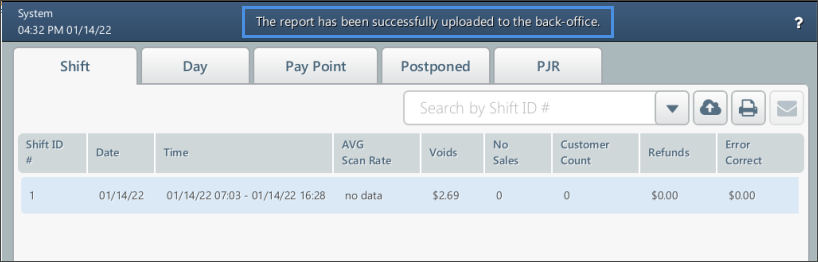
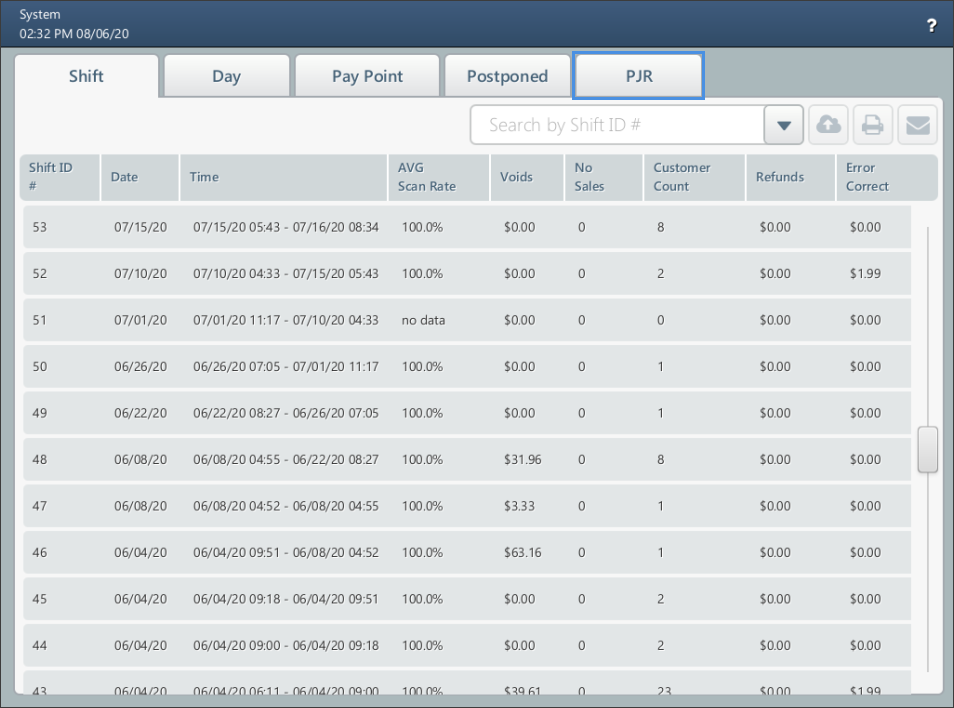
To upload missing shift from SmartPOS to CStoreOffice®:
- From the main cashier screen, swipe to the next screen.
- Press the Reports button.

- In the reports screen, tap the Shift tab.
- In the Shift tab:
- Select the shift you want to upload to CStoreOffice®.
- Tap the Upload icon.
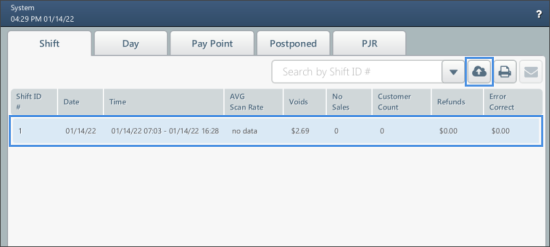

When the shift has been successfully uploaded to CStoreOffice®, the following message is displayed at the top of the screen: The report has been successfully uploaded to the back-office.
If this error message is displayed, it means that there are some unsent PJRs for a period before the current day.
To troubleshoot this error, resend missing PJRs manually:
- From the main cashier screen, swipe to the next screen.
- Press the Reports button.
- In the reports screen, press the PJR tab.

- In the PJR tab:
- Select the PJR you need to resend.
- Press the Upload icon.

- Make sure the transaction is uploaded to the CStoreOffice®. Check it in the Cash Register Journal report.
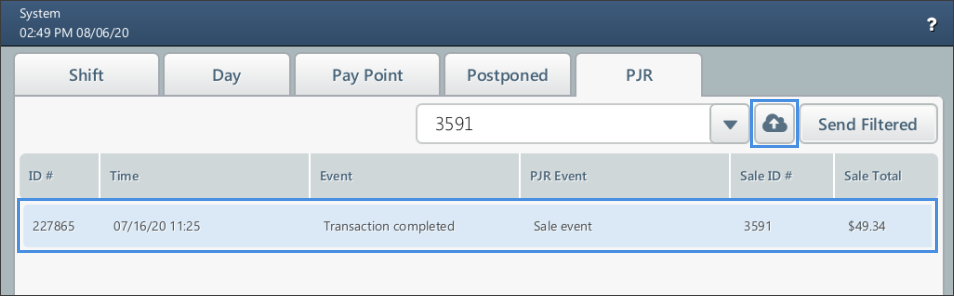
For more information on how to work with the Cash Register Journal report in CStoreOffice®, see Cash Register Journal Report.
To create/restore PJR to have your transaction uploaded to CStoreOffice®:
- From the main cashier screen, swipe to the next screen.
- Press the Reports button.
- In the reports screen, press the PJR tab.
- In the PJR tab:
- Search the PJR by the Sale ID #.
.
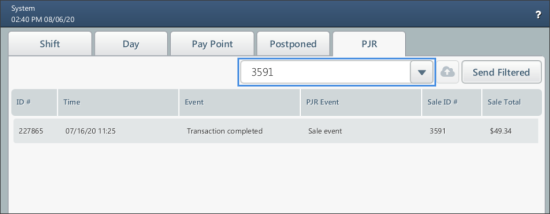
- Press the PJR you found, to select it.
- Press the Upload icon.
- Make sure the transaction is uploaded to the CStoreOffice®. Check it in the Cash Register Journal report.
For more information on how to work with the Cash Register Journal report in CStoreOffice®, see Cash Register Journal Report.
An empty day or shift report is sent to the back-office.
Please go to the Settings > Users tab and check if the Close Day Without Closing Batch permission is granted to your users. To close the batch automatically together with the shift, this permission should be turned off. Otherwise, you will need to close each batch manually.
Users
Yes, for example, a waiter does not have access to the cash drawer, so sale and safe drops operations are disabled for this user role.
To assign the role to a user, open the user and select the corresponding roles from the list of available roles.
The roles in the list are retrieved from CStoreOffice®.
To have the list of roles refreshed, on the General Info screen, press Update Price Book.
Backup
Once connected to back-office, the backup data is pushed to back-office 10 minutes after any changes were made to items, departments, taxes or MOPs.


