


This section describes the specifics of accessing and interpreting the Cash Register Journal Report.
Opening the Report
You can find the report at Reports > Store > Sales > Cash Register Journal. For more information, see Viewing Reports.
Viewing the Report
The Cash Register Journal report provides the transaction logs from the cash register.
To have the transactions data populated in the report, make sure PJR files are enabled in CStoreOffice® and the cash register. For more information, see Enabling PJR Files.
Cash Register Journal report:
- Data is available on the single transaction level
- Suspended and rolled back transactions are included
- Access to real-time data (the data is sent to CStoreOffice® every 15-30 minutes)
Shift report:
- Data is grouped
- Suspended and rolled back transactions are not included
- Data is available only when the shift is closed
The report contains the following information:
- Event: Cash register event type.
- Transaction ID: Cash register transaction numeric identifier.
- Approval Code: Authorization / approval code provided by the payment processor for each fleet transaction.
- Register ID: Cash register identifier.
- Employee: Employee who performed the operation.
- Station: Station where the register is located.
- Date/Time: Transaction date and time.
- Total Net Amount, $: Total amount sold.
- Total Tax Amount, $: Total tax amount.
- Total Fee Amount, $: Total fee amount.
- Total Gross Amount, $: Total amount sold - total tax amount.
Please note that the SaleEvent event type with two red asterisks indicates the rolled back transaction which is generated automatically for each completed prepaid fuel operation. This event type, when being displayed in the report, does not affect any calculation data and verifies that the fuel operation with prepay is completed successfully and tracked in the system properly.
To see further transaction details, click the transaction you want:
- Transaction Type: Transaction type (item, fuel, merchandise, error correction).
- GTIN: Global Trade Item Number.
- GTIN Type: Global Trade Item Number type.
- Item Description: Transaction cash register description.
- Department: Item department.
- Sales Quantity: Number of items sold.
- Actual Sales Price, $: Item price.
- Sales Amount, $: Total sale amount.
- Total Payments: The total amount received from the transaction.
- Method of Payment: Cash, credit card, and the like.
- Total Tax Net Amount: The total amount of tax collected from sales before any deductions or adjustments.
- Total Fee Net Amount: The total amount of any applicable fees deducted from sales.
- Rounding Amount: The adjustment applied to the cash transactions based on the selected rounding rule. A positive value indicates the amount added, and a negative value indicates the amount deducted to reach the rounded total.
- Change Amount: The total amount of change given to customers when they pay more than the required sale amount.
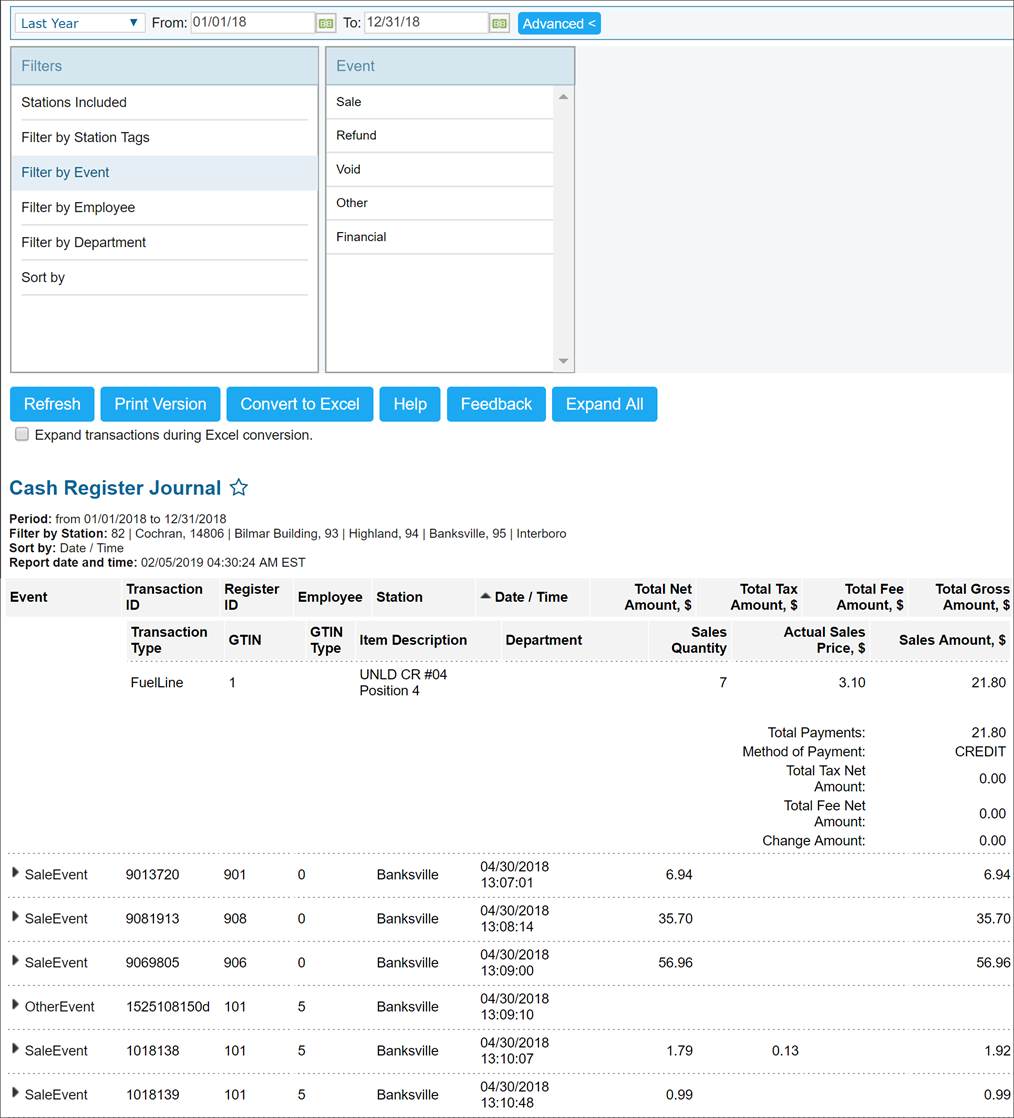
Suspended / hold transactions are marked with asterisk.
If you have any issues with viewing the data in the report, check the FAQs: Cash Register Journal Report section to search for the troubleshooting steps.
Filtering and Sorting the Report Data
To get the exact information you need, you can apply filters to the report. To set up a filter, select one or more filtering options. Once the filter is set up, at the bottom of the filter section, click the Refresh button to display the report data by the filter criteria.
The report provides the following filtering and sorting options:
- Date: Specify the period you are interested in and then click Refresh. You can select one of the following predefined periods:
- Yesterday
- Current Month
- Current Quarter
- Current Year
- Last Month
- Last Quarter
- Last Year
- Last 12 months
You can also select a custom period. To do this, to the right of the From and To fields, click the calendar icon and set up the necessary period.
- Time: Beside the dates, you can specify the exact time for filtering the report data. This option can be helpful, for example, if shifts in the store are longer than one day, and you need to filter out all transactions for such shifts.
To specify the time, click the calendar icon to the right of the To or From fields and in the Time section, set the necessary time interval. The time interval can be specified up to seconds. By default, the time in the To field is set to the beginning of the selected date (12:00:00 AM), and the time in the From field is set to the end of the selected date (11:59:59 PM).
- advanced: Click the advanced button, select one several filtering options you want, and then click Refresh. There are the following advanced filtering options available:
- Station Included: Select the stations you want to view the report for.
- Filter by Station Tags: Use this option to filter the report data by tags assigned to stations. The generated report will contain data only for those stations to which the selected tags are assigned.
To select tags by which the report data must be filtered, expand the tags tree and select the check boxes next to the necessary tags. You can filter the report data by root tags and tags of the lower level in the tags hierarchy. You can also create a combined filter by selecting different root and child tags. - Filter by Cash Registers: Select this option to filter the report results by child stations.
- Filter by Registers: Select this option to filter the report results by cash registers.
- Filter by Event: Select this option to filter the report results by the even type (sale, void, refund and so on).
- Filter by Employee: Select this option to filter the report results by employee (the cashier).
- Filter by Department: Select this option to filter the report results by cash register departments.
- Filter by MOP: Select this option, to filter the report results by the method of payment (MOP).
- Filter by UPC: Select this option to filter the report results by the Universal Product Code (UPC).
- Filter by Approval Code: Select this option to filter the report results by the authorization / approval code provided by the payment processor for each fleet transaction.
- Sort by: Select the order of the report columns you want. Select the Ascending or Descending option for the corresponding type of filtering.
If there is no data displayed in the report for any of the child stations, check the Use DC BOX PJR transfer option in the advanced CR options. It should be unselected. If not, unselect it and generate the report again. For more information on the advanced cash register options, see Advanced Options.
Press CTRL, to select several items at a time.
Select the Show Only option to view only the information for the selected items, and Show All Except to view the information for all the items except the selected ones.
FAQs: Cash Register Journal Report
To stop getting pay points data in the cash register reports and reconcile cash by shifts:
- Clear the Pay points for cash reconciliation option in the cash register settings for the location in CStoreOffice®.

- Wait for a new shift and check its data.
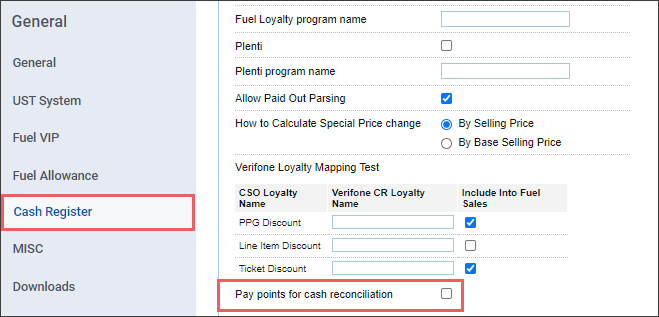
For more information on how to manage the cash register settings for the location in CStoreOffice®, see Cash Register Settings.
Drop the difference in cash at the POS terminal during shift changes. When you perform reconciliation at the POS terminal, the system registers the total cash amount you should deposit. This total is included in the safe drop, making it easier to manage cash at the end of the night. The system groups the cash difference into the total cash amount, even if it does not register separately.
To view the itemized sales for the Tobacco and Cigarettes items, make sure the Manufacturer coupon option is not selected for the corresponding CR departments in CStoreOffice®.
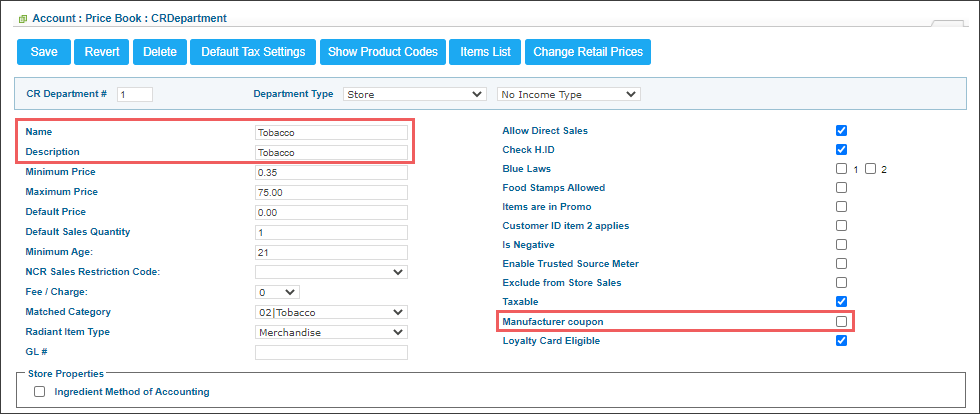
For more information on how to configure CR departments in CStoreOffice®, see CR Departments.
Additional Actions
To reload the form, click Refresh.
To print the report, click Print Version.
To open the report the Microsoft Excel document, click Convert to Excel.
To export the transaction details in expanded view, select Expand transaction during Excel conversion.
To open the Petrosoft University Portal, click Help.
To create a ticket, click Feedback.
To expand / collapse all report data, click Expand All and Collapse All.


