


Data entry: How to enter an invoice
This video presents information on how to enter an invoice.
The entering an invoice functionality is permission-based. To view the list of permissions for this form, go to Invoices Permissions.
- In CStoreOffice®, go to Inventory > Receiving.
- In the left menu, select Manual Invoice Entry.
- At the top right of the page, select the location for which you want to create an invoice.
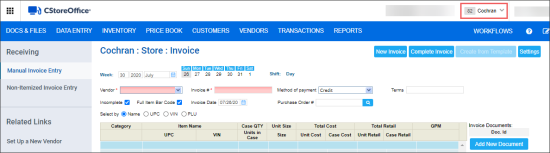
- At the top of the Store : Invoice form:
- In the Week and Shift fields, select the necessary date and shift.
- From the Vendor list, select the invoice vendor.
- In the Invoice # field, enter the invoice number.
Result: All items available for this vendor are loaded and can now be selected in the table.
Please note that inactive items are also available for selection as long as they have item movements until next inventory period. For more information, see Why are inactive items displayed in inventory reports and forms?
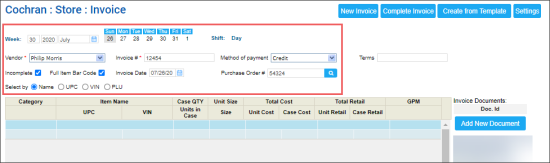
- From the Method of payment list, select the method of payment for the vendor.
- (Optional) In the Invoice Date field, enter the invoice date if needed.
- In the Purchase Order # field, enter the purchase order number.
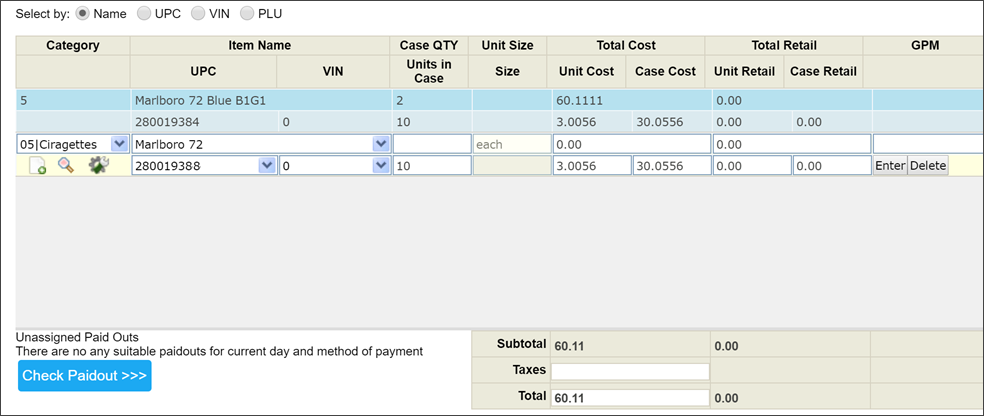
- In the table of the Store : Invoice form, for each item in the invoice, enter the following data:
- From the Category list, select the item category.
- From the Item Name or UPC lists, select the item by the item name or its UPC. You can add a new item, search it, or edit already selected item if needed. For details, see Managing Items while Creating Invoice.
- VIN
- Units in Case
- Unit Cost: By default the Unit Cost value is uploaded automatically and cannot be edited. For more information on how to work with the Unit Cost value in the Invoice form, see Defining the Item's Unit Cost in the Invoice.
- Case Cost
- Unit Retail
- Case Retail
- In the Case QTY field, enter how many cases you ordered.
Result: The values in the following columns are uploaded automatically:
- Total Cost
- Total Retail
- GPM
- To the right of the item line, click Enter.
Result: The Invoice form is updated in the following way:
- At the right bottom of the table, the values in the Subtotal, Taxes, Total fields are updated.
- At the bottom of the table, the Other Charges section is displayed.

- (Optional) In the Taxes field, enter or edit the taxes.


The Category list contains only categories whose items belong to the vendor selected above.
If the Full Item Bar Code option is selected, you may search an item by entering its entire UPC code. If you need to search an item by entering its UPC code without leading 0s or without the final digit, clear the Full Item Bar Code option and make a search.
You can select the item you need by typing any UPC code type, whether UPC-E or UPC-A. Found item will be displayed with UPC-A in any case.
Result: The values in the following columns are uploaded automatically:
If you enter a new unit cost or case cost in the invoice and accept the invoice, this information is updated in the Item Setup and Price Management forms for the item.
- (Optional) You can quickly re-organize items within the invoice alphabetically for easier navigation. Click the Item Name column to sort the items.
- Arrow up: from A to Z;
- Arrow down: from Z to A.
- Both up and down arrows: not sorted.
-
Regardless of the current order, new items will always be added to the bottom of the list. To rearrange all items, simply click the Item Name column again.
- (Optional) In the Other Charges section, enter other charges information. For details, see Working with Other Charges Section.
- When your invoice is completed, at the top of the Invoice form, clear the Incomplete check box.
- At top of the Invoice form, click Accept. When the invoice is accepted, you cannot select the Incomplete check box anymore.
- Click Complete Invoice.
The items are rearranged every time you click the Item Name column. The arrow next to the column name indicates the current sort order:

Result: The A/P Transaction and inventory movement operations are executed. For more details, see Accounts Payable and Inventory.
You can also accept your invoice in the Pending Invoices report. To open this report from the Store Invoice form, go to Related Links > Pending Invoices. For details, see Pending Invoices.


