


This section describes the specifics of accessing and interpreting the Purchases Export to IBM IS400 report.
With this report, you can set up the automatic export of the merchandise and fuel purchases data for each location on your account and sending this data to a separate folder at the scheduled time.
Opening the Report
You can find the report at Reports > Accounting > Export Data > Purchases export to IBM IS400.
The Purchases export to IBM IS400 report can be opened at all levels:
- Account
- Company
- Division
- Location (Station)
However, the report always displays the list of all locations (stations) configured on your account, from which you can select the locations for data export.
For more information, see Viewing Reports.
Setting Up the Data Export
To set up the export of purchases data with the Purchases export to IBM IS400 report:
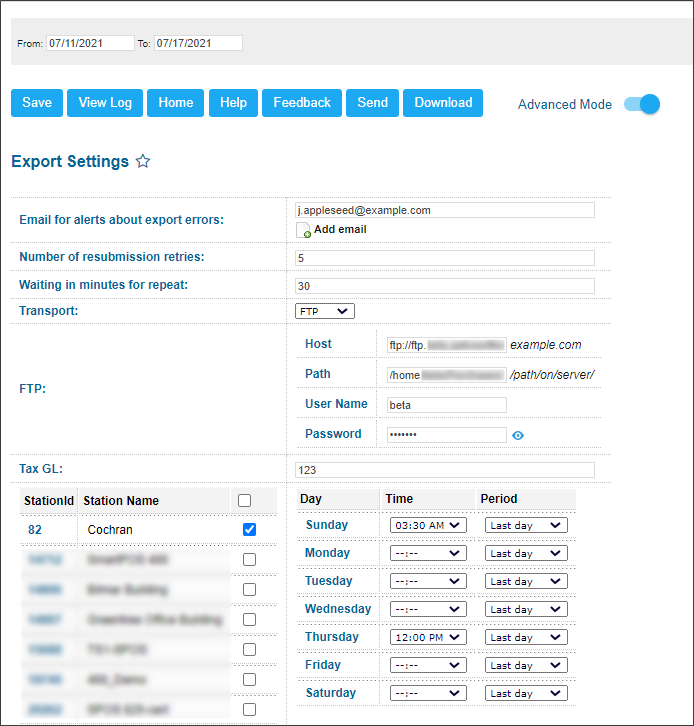
- At the top of the report form, use the date and time fields to define the period of time for which you want to export purchases data.
- In the Email for alerts about export errors field, enter your own email to receive notifications about the export errors.
- In the Number of resubmission retries field, specify the number of attempts that CStoreOffice® must make to send the report to the destination.
- In the Waiting in minutes for repeat field, specify the time interval between attempts to send the report to the destination.
- From the Transport list, select the method of data transferring — SFTP, FTP, or EMAIL:
The Number of resubmission retries and Waiting in minutes for repeat fields are displayed if the Advanced Mode toggle is set to the On position. You can leave the default values in these fields.
- If you have selected SFTP or FTP, specify the following parameters of the SFTP or FTP server on which you want to store exported data:
- In the Host field, specify the host name of the SFTP or FTP server.
- In the Path field, specify a path to the folder in which the exported data must be stored.
- In the User Name and Password fields, specify credentials that must be used to access the SFTP or FTP server.
- If you have selected Email, in the Email field, enter an email address at which you want to send exported data.
To specify additional email addresses, click Add email and enter the necessary addresses in the fields below.
- In the Tax GL field, enter the number of the GL account, if any.
- In the table on the left, select check boxes next to stations whose data you want to export.
- In the table on the right, specify a schedule for report generation per every week day:
The Tax GL field is displayed if the Advanced Mode toggle is set to the On position.
- From the Time list, select the time when the report must be generated.
- From the Period list, select the period for which the report must be generated: Last day, 3 days ago, 4 days ago or Last week.
- At the top of the window, click Save.
Export File Format
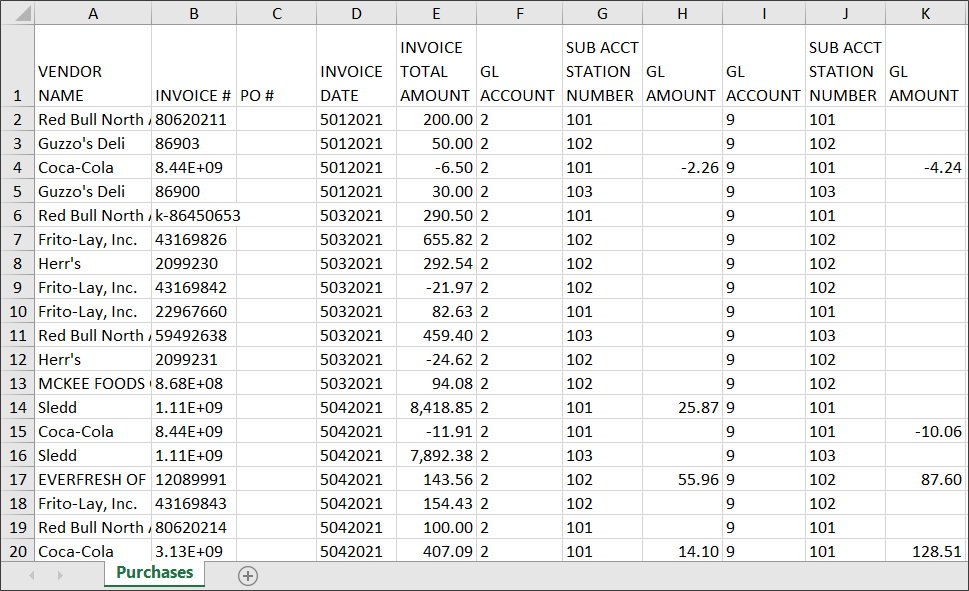
The Purchases export to IBM IS400 report is generated as an archived ZIP file that contains the XLS file with the purchases data for each selected location. The exported XLS file contains the following data:
- Vendor Name
- Invoice Number
- PO #: In this column, the following values are exported depending on the invoice type:
- Merchandise invoice: The Purchase Order # field's value from the Store Invoice form. For more information, see Creating an Invoice.
- Fuel invoice: The Terms field's value from the Fuel Invoice form. For more information, see Entering New Fuel Invoices.
- Invoice Date
- Invoice Total Amount
- For each GL account:
- GL Account
- Sub Accnt Station Number
- GL Amount
The generated report is sent at the specified email address or stored in the specified folder on the SFTP or FTP server.
Additional Actions
You can perform the following actions with the Purchases export to IBM IS400 report:
- To save the export settings, click Save.
- To view the export history, click View Log at the top of the window.
- To leave the report interface and go to the home page, click Home.
- To export the report data ahead of the schedule, select the necessary period and click Send.
- To download the exported data in the XLS format, select the necessary period and click Download.
For more information on additional report features, see Reports.


