


Generally, the process of setting up a Price Book with the Import Tool includes the following main steps:
| Steps | Corresponding menu | Example |
| Step 1: Select a Price Book element to be configured. |
Go to Operational Menu > Price Book | - The Items element is selected. |
| Step 2: Take a draft. | Go to Operational Menu > DRAFTS | - The New_Items draft is created and selected for further editing. |
| Step 3: Populate the draft with the relevant data. | Go to Working Area |
- All Price Book items from the selected location are uploaded to the draft's buffer. - Valid items only are selected and saved to the New_Items draft. |
| Step 4: Copy data from the draft to the location or a file. | Go to Data Sources panel | - The data from the New Items draft are imported to your location. |
To create a Price Book from scratch on your account, you can use any of the following scenarios:
- Importing Price Book from Account or Station
- Importing Price Book from Cash Register Dump File
- Importing Price Book from a File
- Importing Price Book from Handheld Inventory File
How to Import Price Book from Account or Station
- CStoreOffice® account is created for you.
- Import Tool module is enabled for the user's role. For details, see Turning On Import Tool Module.
- You have access to the account or station with a populated Price Book.
- Import Tool is opened. For details, see Opening Import Tool.
Steps
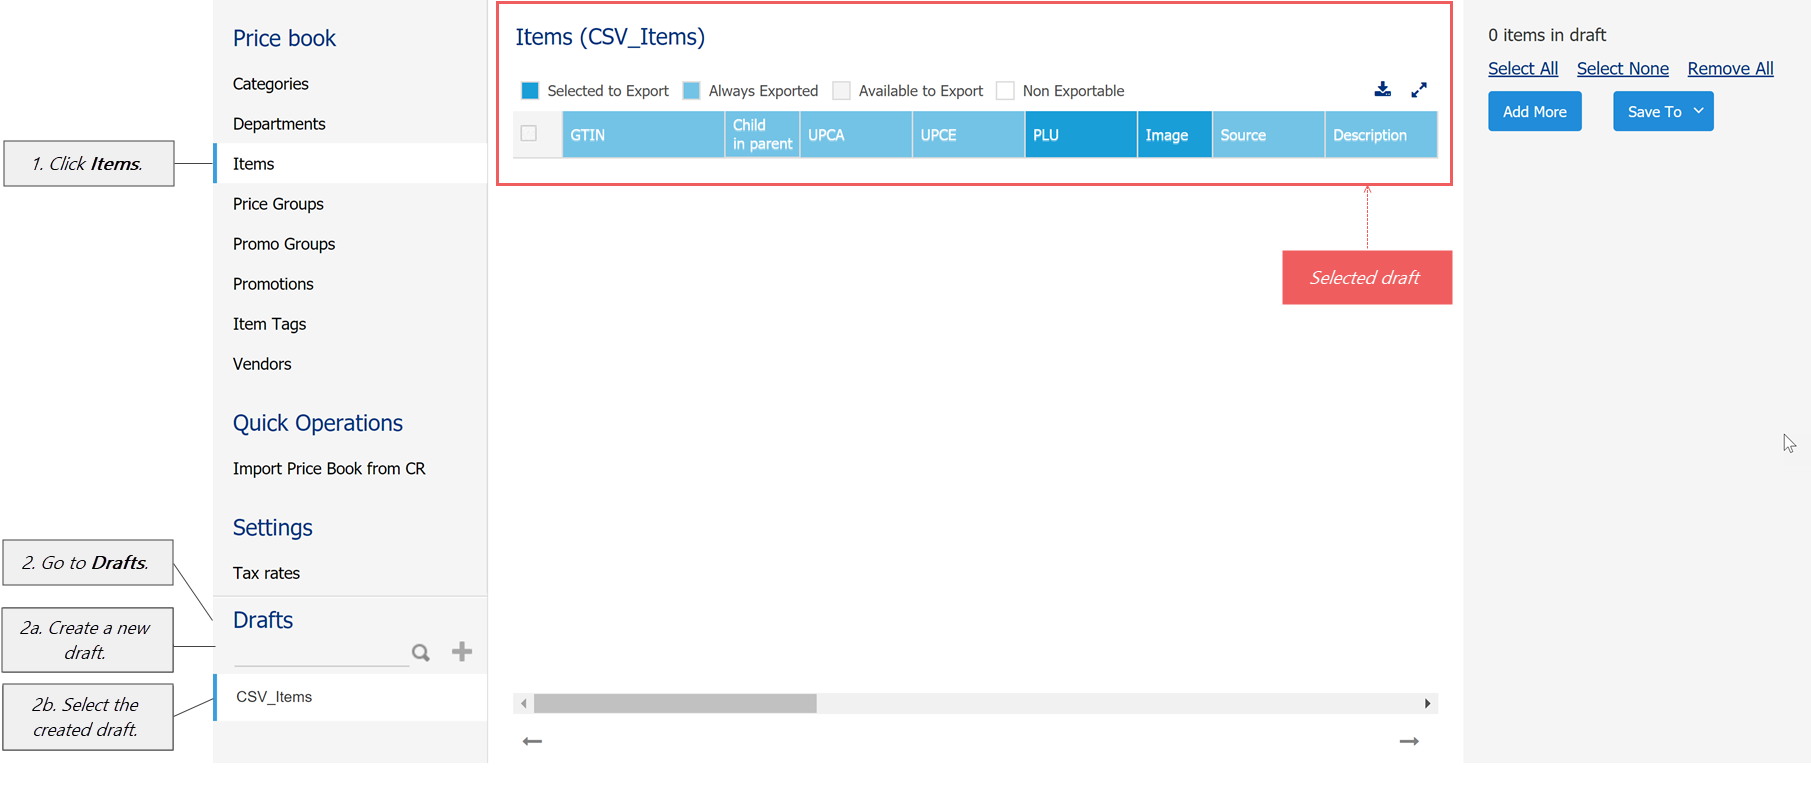
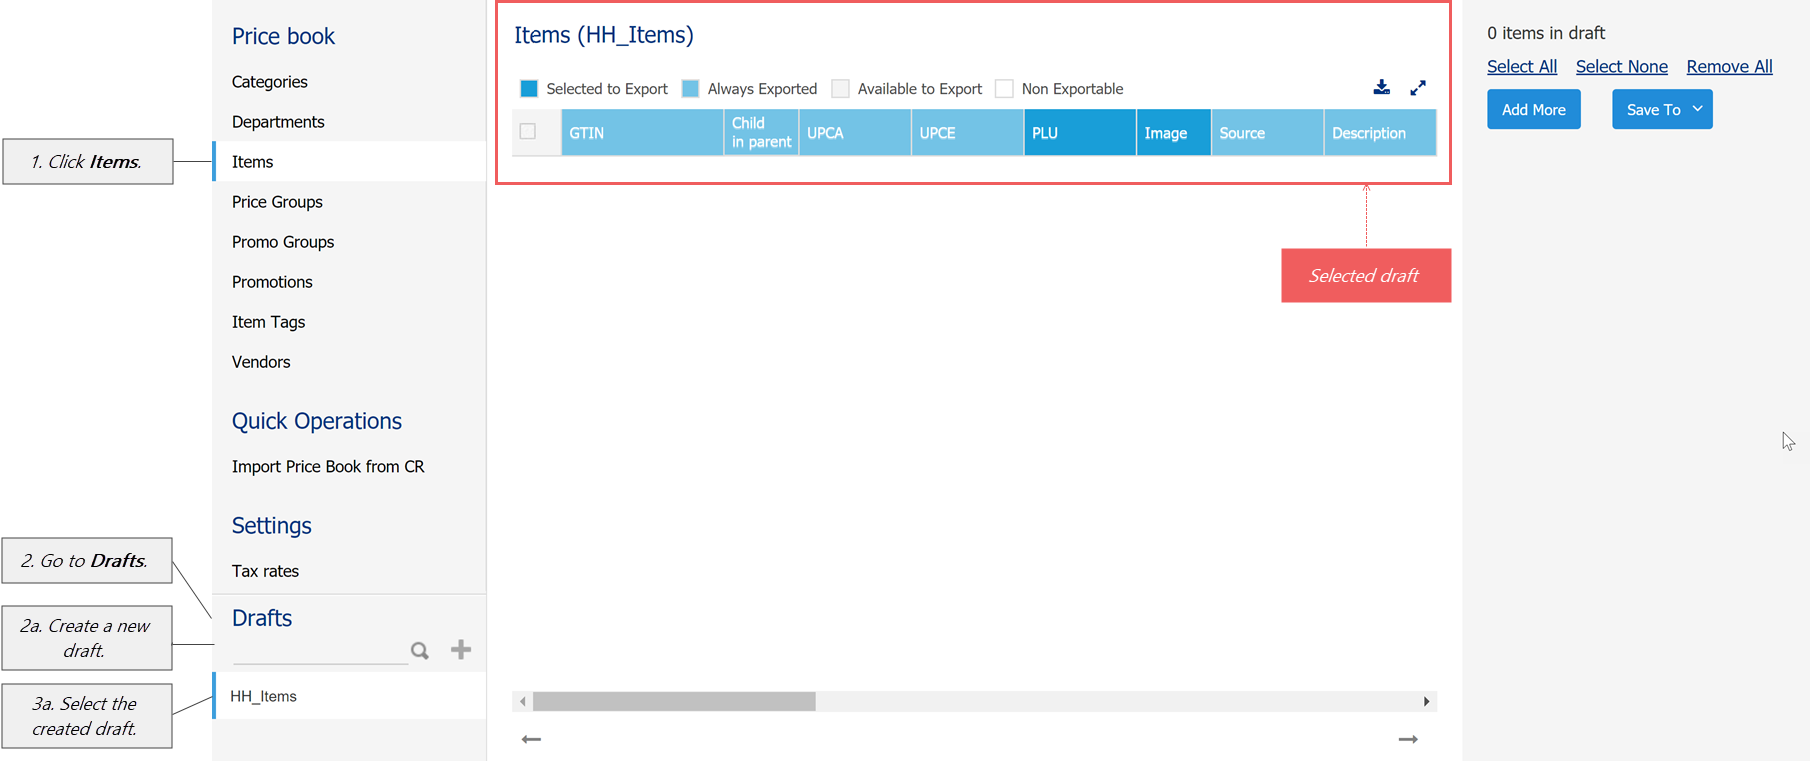
- Select a price book element. Go to Price Book, and then click Items.
- Take a draft. Go to Drafts, and then do the following:
- Create a new items draft. For details, see Working with Drafts List.
- Select the newly created draft.

- Populate the selected draft with the relevant data. Do the following:
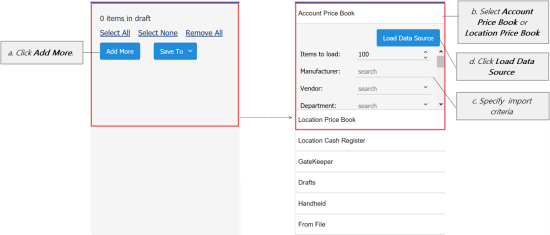
- Go to the Data Sources panel, and then click Add More.
- Depending on the import source you want to use, click Account Price Book or Location Price Book.
- Specify the importing criteria. For details, see one of the following sections:
- Importing Items from Account Price Book
- Importing Data from Location Price Book
- Click Load Data Source.
- Wait until the data is uploaded to the Items (Buffer) table.
- (Optional) Edit data in the Items (Buffer) table. For details, see Editing Data in Buffer.
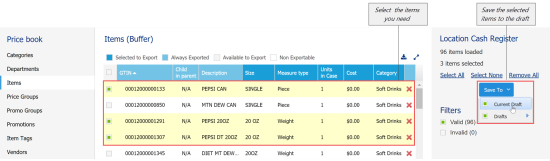
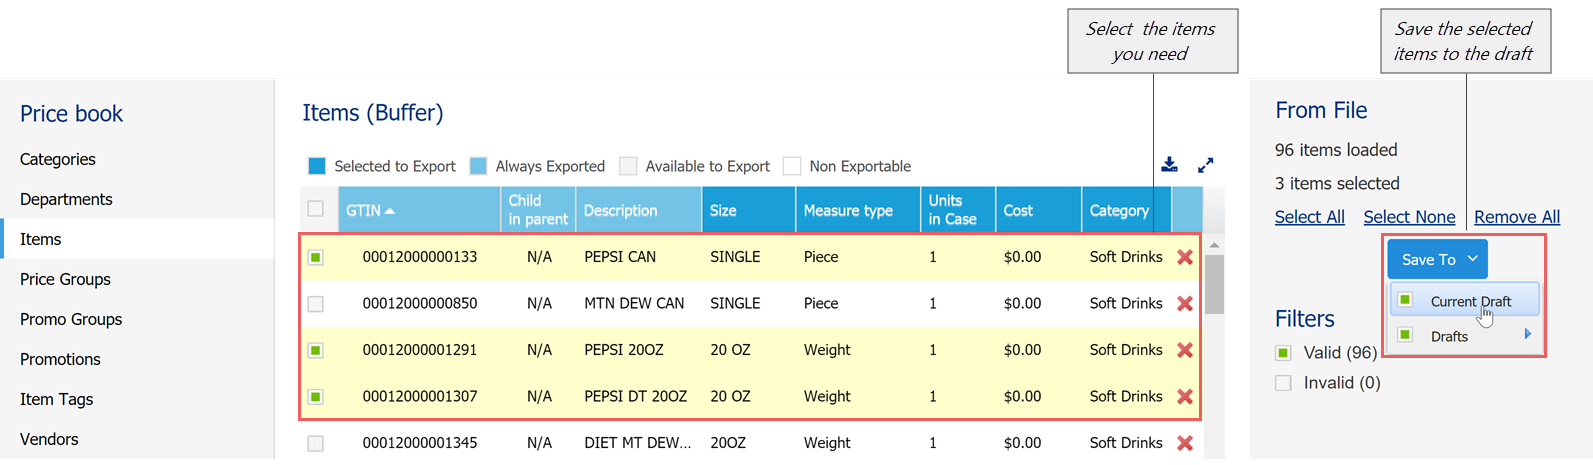
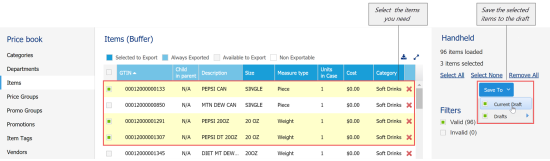
- Select the items you need. To select all items, click Select All.
- Save selected items from the buffer to your draft. For details, see Saving Data from Buffer to Draft.
- Copy data from the draft to your location. For details, see Exporting Draft Data.


How to Import Price Book from Cash Register Dump File
- CStoreOffice® account is created for you.
- Import Tool module is enabled for the user's role. For details, see Turning On Import Tool Module.
- You have access to the location using any of the following cash registers:
- Gilbarco Passport
- Verifone Ruby
- Import Tool is opened. For details, see Opening Import Tool.
Steps
- Select a price book element. Go to Price Book, and then click Items.
- Take a draft. Go to Drafts, and then do the following:
- Create a new items draft. For details, see Working with Drafts List.
- Select the newly created draft.

- Populate the selected draft with the relevant data. Do the following:
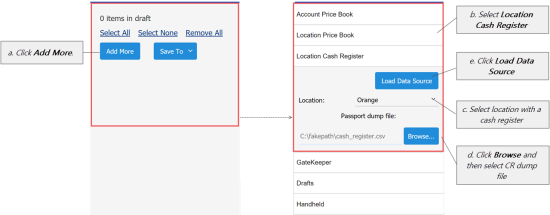
- Go to the Data Sources panel, and then click Add More.
- Click Location Cash Register.
- In the Locations list, select the location with the connected cash register from which you want to import data.
- Click Browse, and then select the cash register's dump file.
- Click Load Data Source.
- Wait until the data is uploaded to the Items (Buffer) table.
- (Optional) Edit data in the Items (Buffer) table. For details, see Editing Data in Buffer.
- Select the items you need. To select all items, click Select All.
- Save selected items from the buffer to your draft. For details, see Saving Data from Buffer to Draft.

- Copy data from the draft to your location. For details, see Exporting Draft Data.


How to Import Price Book from a File
- CStoreOffice® account is created for you.
- Import Tool module is enabled for the user's role. For details, see Turning On Import Tool Module.
- Import Tool is opened. For details, see Opening Import Tool.
Steps
- Select a price book element. Go to Price Book, and then click Items.
- Take a draft. Go to Drafts, and then do the following:
- Create a new items draft. For details, see Working with Drafts List.
- Select the newly created draft.

- Populate the selected draft with the relevant data. Do the following:
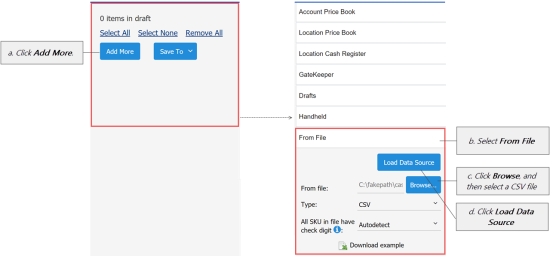
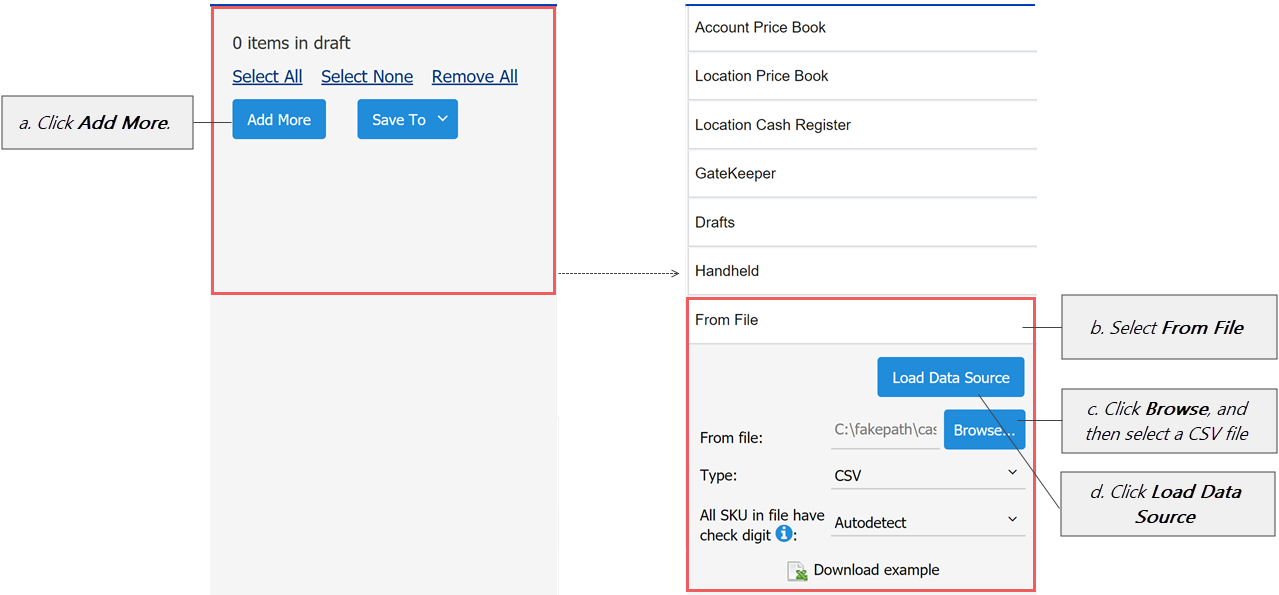
- Go to the Data Sources panel, and then click Add More.
- Click From File.
- Click Browse, and then select the cash register's dump file.
- Click Load Data Source.
- Wait until the data is uploaded to the Items (Buffer) table.
- (Optional) Edit data in the Items (Buffer) table. For details, see Editing Data in Buffer.
- Select the items you need. To select all items, click Select All.
- Save selected items from the buffer to your draft. For details, see Saving Data from Buffer to Draft.

- Copy data from the draft to your location. For details, see Exporting Draft Data.
How to Import Price Book from Handheld Inventory File
- CStoreOffice® account is created for you.
- Import Tool module is enabled for the user's role. For details, see Turning On Import Tool Module.
- Import Tool is opened. For details, see Opening Import Tool.
- Inventory files with scanned items are sent from handheld to CStoreOffice®.
Steps
- Select a price book element. Go to Price Book, and then click Items.
- Take a draft. Go to Drafts, and then do the following:
- Create a new items draft. For details, see Working with Drafts List.
- Select the newly created draft.

- Populate the selected draft with the relevant data. Do the following:
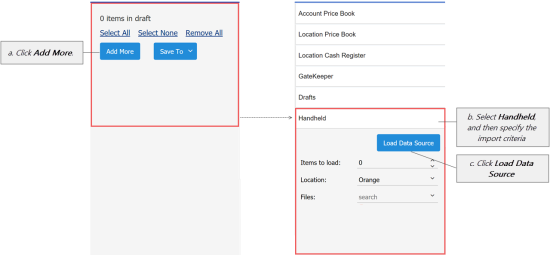
- Go to the Data Sources panel, and then click Add More.
- Click Handheld.
- Items to load - displays the number of items to be uploaded to the buffer.
- Location - start typing the location's name or select one or several locations from the list.
- Files - select the handheld inventory file from the list.
- Click Load Data Source.
- Wait until the data is uploaded to the Items (Buffer) table.
- (Optional) Edit data in the Items (Buffer) table. For details, see Editing Data in Buffer.
- Select the items you need. To select all items, click Select All.
- Save selected items from the buffer to your draft. For details, see Saving Data from Buffer to Draft.
- Copy data from the draft to your location. For details, see Exporting Draft Data.
To upload less items, enter your number manually. In this case the most popular and frequently used items will be uploaded.


