


You can print checks in CStoreOffice® in several ways.
- Immediate printing: You can print a check immediately after writing.
- Delayed printing: You can send the check to the printing queue, and print one or several checks, or all the checks at the same time when needed.
You can create a check and save it in system without printing. For example, a cashier writes a check by hand and enters it into the system manually. For more information, see Writing Checks.
You can perform the following activities:
- Print checks
- Deal with incorrectly printed checks
- View check printing history
- Send previously printed checks back to printing queue
Printing Checks
You can automatically print your account payable or payroll checks right from CStoreOffice® on your own printer if you are using preprinted checks.
Only pre-printed checks can be used for printing in CStoreOffice®.
To print a check:
- In CStoreOffice®, go to Transactions> Banking > Print Checks.
- From the Company list, select the company.
- From the Payment Account list, select the account from which the amount must be withdrawn.
- In the Starting Check # field, enter the check number that you want to be printed on the next check. The starting check number increments automatically as the checks are being printed. You can accept the default check number or edit it, if necessary (optional).
For example, if check numbers 10 through 20 were used the last time checks were run, the default for the starting check number is 21. However, if there is a new set of checks, for example, shared among the cashiers, it is necessary to enter the number of the first check manually to provide the system with the starting point for the calculation.
- In the Checks on 1st Page list, select how many checks per page you want to be printed.
- In the checks list below, review the following information:
- Check #
- Company/station: In this field you can see both the company itself or the stations assigned to it.
- Account
- Memo: You can edit the memo before printing.
- Payment date
- Recipient
- Address
- Amount
- In the checks list, select the check boxed next to checks that you want to print.
If you want to print several checks, you can select all checks at once by clicking the check box next to the Check # column header. After that, you can clear the check boxes for the checks that you do not want to print.
- To filter the checks, click the arrow icon on the right of any column and select the necessary filtering option (optional):
- Ascending sort: Select this option to sort the checks in the ascending order.
- Descending sort: Select this option to sort the checks in the descending order.
- Filter: Select this option and enter a keyword, number or number range to filter the checks by the specified criteria.
- Make sure that the printer settings are correct. For more information, see Specifying Printing Settings.
- Click Print.

- In the Print Checks window, click the Print icon or right-click the check above and select Print.
- Once the check is printed, click Done.
- Review the printed checks. If all the checks were printed correctly, click Finish.

Dealing with Incorrectly Printed Checks
If one or several checks turn to be printed incorrectly for some reason, you have the following options:
- Reprint: Select the check(s) you want to reprint, enter the new starting check number, set the number of checks per page, and then click Reprint. The checks are reprinted immediately.
- Print Later: Select the check(s) you want to reprint, and then click Print Later. The checks return to the printing queue and are available for reprinting later.
Viewing Check Printing History
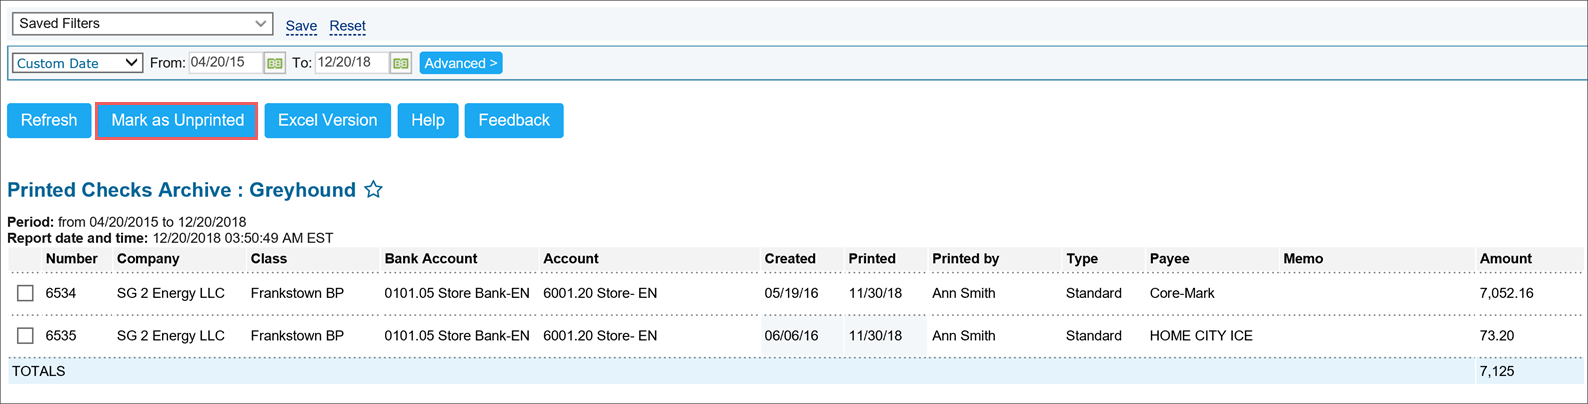
To view the check printing history, in the Related Information section, click the Printed Checks Archive link.
The check printing archive contains all information about checks printed during the specified period.
To view the check printing history for a specific period or station, use the filter settings.

For more information about the printing checks history, see Print Checks Archive report.
Sending Previously Printed Checks Back to Printing Queue
If you want to send the previously printed check back to the printing queue, select it in the archive of the printed checks and click Mark as Unprinted.
For information about printed checks archive, see Viewing Check Printing History.


