There are two ways you can write a check with CStoreOffice®.
- With the Accounting module: To use this method, go to Vendors > Account Payable > select Check as a payment option. This is the main workaround suitable for all cases dealing with checks in CStoreOffice®. For details, see Accounting.
- With the Banking module: To use this method, go to Transactions > Banking > Write Checks. This is an additional workaround for entering the manually created checks into the system without the lengthy procedure of creating the invoice. For details, see Writing Checks.
For example, you have hired a worker to clean up fallen leaves after a storm. A cashier has paid a worker with a hand written check. Previously, to enter this expense to the system, you needed to create an invoice for this transaction. With the Write Check feature, you can just enter the check information into the system spending no time on creating the invoice.
Writing Checks
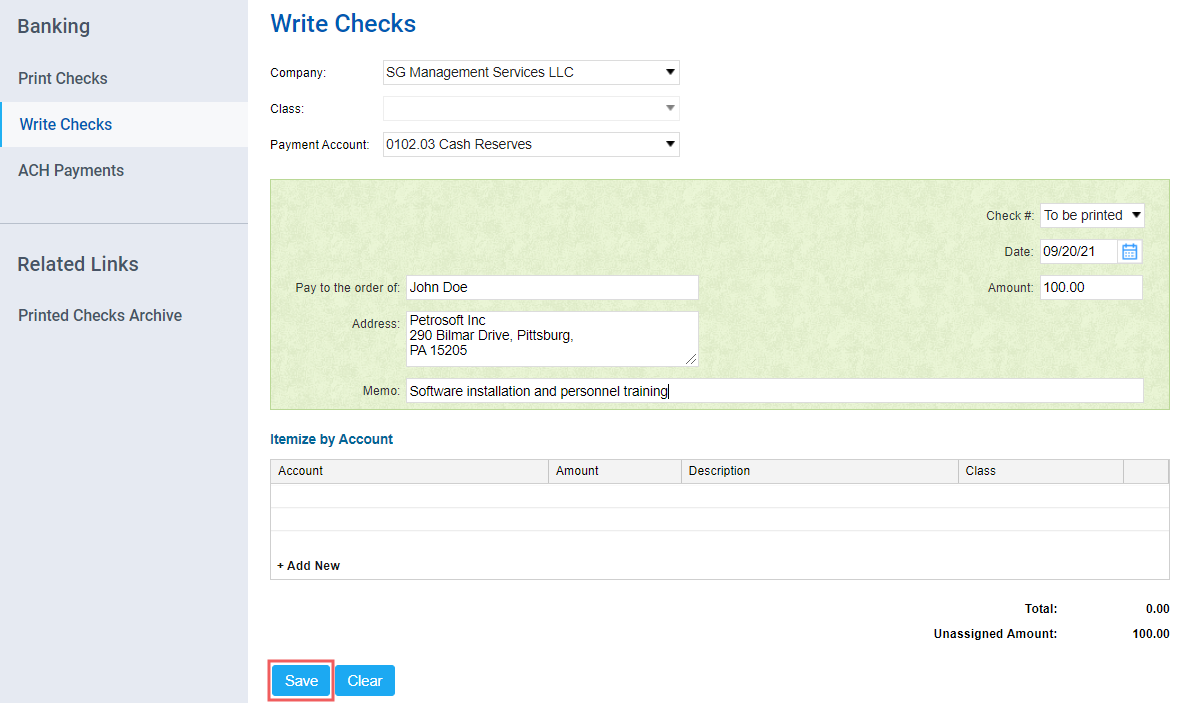
To write a check:
- In CStoreOffice®, go to Transactions > Banking > Write Check.
- From the Company list, select the company.
- From the Payment Account list, select the account from which the amount must be withdrawn.
If you want to use the payment account of the Credit Cards type, make sure the Available on Write check option is enabled for it.
To check if this option is enabled, in CStoreOffice®, go to Transactions > Account Register > Chart of Accounts. Open the necessary account for editing and make sure that in the Credit Card Attributes section on the right of the account setup form, the Available on Write Check box is selected. - Depending on whether you want the check to be printed, or just entered it into the system, do one of the following:
- Enter the check into the system without printing it. To do this, in the Check # field, enter the check number.
- Print the check immediately after writing or later. To do this, in the Check # list, select the To be printed option. If you decide to print the check using the To be printed option, you will need to enter the check number when printing the check.
- Enter the date of the check issue using the calendar. Use the current date on a check; never postdate it.
- Enter the amount issued.
- Enter the person or business to whom the check is written.
- Enter the address of a person or business receiving the money. Never use abbreviations when you fill in the payee information in the Pay to the order of line.
- In the Memo field, enter the nature of the payment (optional).
- In the Itemize by Account section, specify the following information:
- Account: From the accounts list, enter or select the account or sub-account from which the payment must be withdrawn.
- Amount: Enter the amount of money withdrawn. If the total sum withdrawn is divided between several accounts, make sure the total withdrawn from each account corresponds to the total of the payment.
- Description: Enter the payment description which appears on the voucher (optional) .
- Class: Select the station from the list, if the transaction is addressed to the specific station, not to the whole company (optional).
- To add the new line for entering the account, click Add New.
- Make sure there is no unassigned amount (which occurs when the total of the itemized by account amounts is larger or smaller than the total payment), and then click Save.