Installation and Configuration
There are no hardware requirements except for the PJR files support. For more information, see Enabling PJR Files.
Since Loss Prevention Analytics is a solution, video cameras and Direct Connect are provided in a box.
It means that this department is present at the cash register but has not been configured on the CStoreOffice® side. It is recommended to configure the department within CStoreOffice®.
Do the following:
- Make sure the DC Box is activated and powered on.
- Log in to CStoreOffice® using your Petrosoft Cloud account.
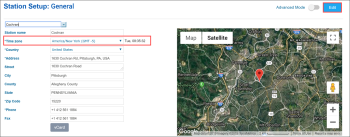
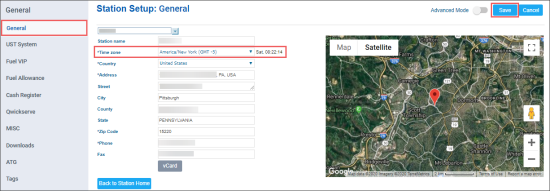
- At the top menu, go to Data Entry > Dashboard > Station Options > General.
- At the top of the Station Setup: General form, in the locations list, select the necessary location.
- At the top right of the form, click Edit.
- From the Timezone list, select the correct time zone for the location.
- At the top right of the form, click Save.
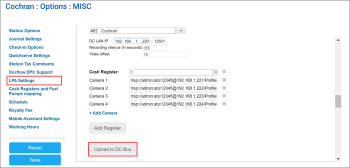
- In the left menu, select MISC.
- To the left of the form, select LPA Settings.
- Click Upload to DC Box.
- Wait for 5 minutes without powering off the DC Box. The system will reboot the DC Box and install LPA automatically.
Activating Cameras Manually
To activate cameras manually:
- Assign the IP addresses to the cameras. Do the following:
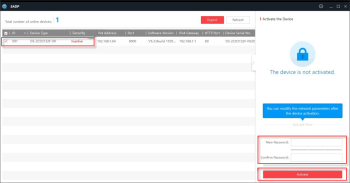
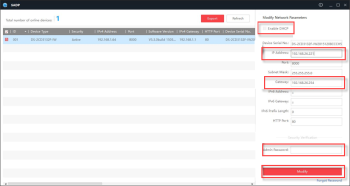
- Install and launch the SADP application that comes with the HIKVISION camera.
- Wait until the cameras appear in the list.
- Activate the cameras. Do the following:
- In the cameras list, select an inactive camera.
- In the New Password and Confirm Password fields of the activation tab, enter the password you want to use.
- Click Activate.
- Generate new IP addresses to the cameras based on your network gateway IP address. Do the following:
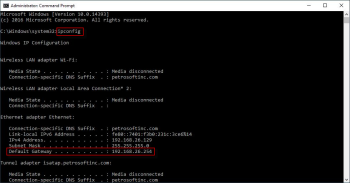
- Run the Command Prompt as an administrator, type ipconfig and then press Enter on the keyboard.
You can open the Command Prompt in the following ways:
- In Microsoft Windows 10, right-click Start and then select Command Prompt (Admin).
- In Microsoft Windows 7 and Microsoft Windows XP, click Start, in the Start Search box, type cmd and then press Ctrl+Shift+Enter on the keyboard.
- Generate new IP addresses to your cameras using your gateway IP address. For that, take the IP address value from the Default Gateway field and change its last octet value from 221 to 224 for cameras 1 to 4 respectively.
For example, the Default Gateway field value is 192.168.26.254. The last octet value here is 254. It can be any number in the range between 0 and 255. So, the IP address for Camera 1 is 192.168.26.221.
- Assign new IP addresses to the cameras. Do the following:
- Ensure that the Enable DHCP check box is not selected. If it is selected, clear it.
- In the IP Address field, enter the newly generated IP address for the camera.
- In the Gateway field, enter the value from the Default Gateway field.
- In the Admin Password field, enter the password created during activation.
- Click Modify.
- Ensure the camera is set up and working properly. Open the Mozilla Firefox browser and then do the following:
- In the address bar, enter the camera IP address and then press Enter on the keyboard.
- In the displayed window, in the User name field, enter admin.
- In the password field, enter the password created during activation.
- Install the plugin and then restart the browser after its installation.
- (Optional) If there is no picture, click the Live view tab.
- If the camera is working properly, you will be able to see the live video stream. Keep the browser open for camera view adjustment.
PJR Files are the POS Journal files that contain transaction details from the cash register. You can enable these files for the cash register manually, if applicable.
For details, see Enabling PJR Files.
Subscription
Users are billed the first calendar day for the last month's period from the first till the last day of the month.
Yes, until the first day of the next month when deactivation comes in effect.
Yes, in this case you are charged only for the days the product was activated for the specific location(s).
Nothing. After expiration of the trial period the station automatically continues working in the subscription mode unless user unsubscribes his locations.
- DC501 - provided by Petrosoft
- Video cameras - provided by Petrosoft
- Installation of DC box and cameras by a technician
No, it does not.
General
Make sure that you are connected to the Internet via the unrestricted network, such as 3G, 4G, or LTE.
Please check the video codec settings on your cameras. CStoreOffice® supports for H.264 video codec.
If you camera has the H.265 video codec configured, do one of the following:
- Change H.265 to H.264 on your cameras.
or - Use the Microsoft Edge browser.
Make sure the time zone is defined properly in the station options.
- From the CStoreOffice® main page, open the station options form. For details how to open the station options form, see Setting Up Locations.
- Go to the Station Options: General section > Time Zone field.
- Make sure a correct time zone is selected in the Time Zone field. If not, update it and then click the Save button.
