This section describes the specifics of accessing and interpreting the AIM Export report.
With this report, you can set up the station data export in the AIM format. Apart from other sales data, this report includes money orders, money order fees and other custom income sales data, matching the information in the Custom Income Sales Report.
Opening the Report
You can find the report at Reports > Accounting > AIM Export.
The Aim Export report can be opened at all levels:
- Account
- Company
- Division
- Location (Station)
For more information, see Viewing Reports.
Setting Up the Report's Export
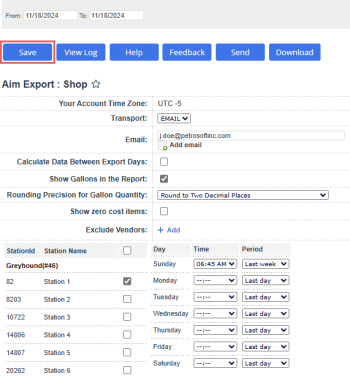
To set up the AIM export, specify the following information:
- In the Your Account Time Zone field, check the account time zone.
- From the Transport list, select the method of data transferring — FTP or Email:
- If you have selected Email, in the Email field, enter an email address at which you want to send exported data.
To specify additional email addresses, click Add email and enter the necessary addresses in the fields below. - If you have selected FTP, specify the following parameters of the FTP server on which you want to store exported data:
- In the Host field, specify the host name of the FTP server.
- In the Path field, specify a path to the folder in which the exported data must be stored.
- In the User Name and Password fields, specify credentials that must be used to access the FTP server.
- To calculate the data between the export days, select the Calculate Data Between Export Days check box.
- To add gallons from fuel invoices to the export file, select the Show Gallons in the Report option.
- To adjust the rounding precision for more accurate calculations of gallons sold, select the desired value from the Rounding Precision for Gallon Quantity dropdown:
- Round to Whole Number: round the gallon quantity to the nearest whole number, eliminating decimal values.
- Round to One Decimal Place: round the gallon quantity to a single decimal point, providing a more precise measurement while still maintaining simplicity in the report.
- Round to Two Decimal Places: round the gallon quantity to two decimal points, offering a high level of precision for more accurate and detailed reporting.
- Round to Three Decimal Places: round the gallon quantity to three decimal points, providing the most detailed and accurate reporting.
- To add items having zero cost value to the export file, select the Show zero cost items check box.
It might be needed in case you are given a free product from your supplier in addition to those you purchasing. You can add such free product as a separate line to the invoice as an item with Cost = $0.00 and then track it in the AIM Export report together with other items. - To exclude vendors from the report, follow Excluding Vendors from Aim Export Report.
- In the table on the left, select check boxes next to stations whose data you want to export.
- In the table on the right, specify a schedule for report generation per every week day:
This setting is only applicable if you include the number of gallons from fuel invoices to the export file by selecting the Show Gallons in the Report option.
- From the Time list, select the time when the report must be generated.
- From the Period list, select the period for which the report must be generated: Last day, 3 days ago, 4 days ago or Last week.
- At the top of the window, click Save.
Export File Format
The AIM Export report is generated as an archived ZIP file that contains raw data in the CSV format. The data is provided in three CSV files. The generated report is sent at the specified email address or stored in the specified folder on the FTP server.
For more information, see Exported Files Structure.
Excluding Vendors from Aim Export Report
To exclude vendors from the Aim Export report, follow these steps:
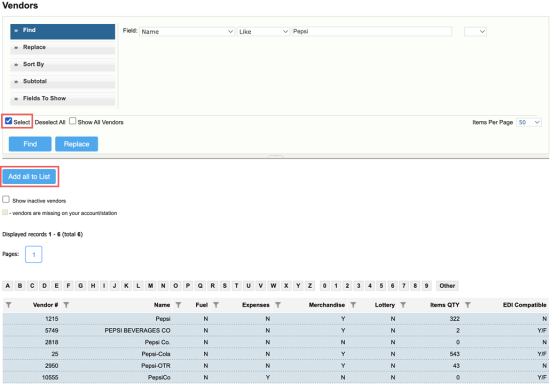
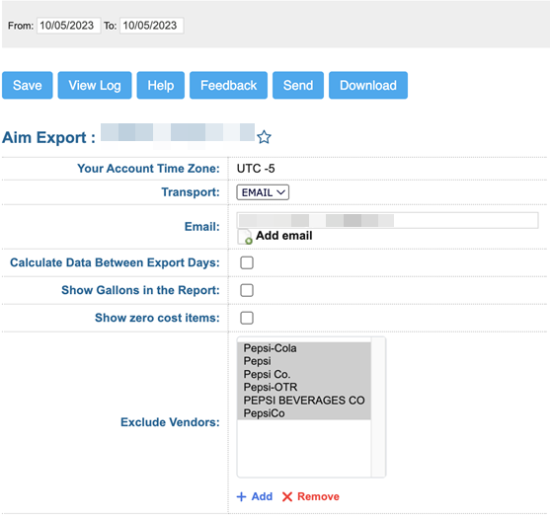
- Click Add in the Exclude Vendors field.
Result: you will be redirected to the Find and Replace Tool. - Follow Operational Panel (Find and Replace Tool) for information on how to find and filter vendors in the Find and Replace Tool.
- To add the filtered vendors for exclusion in the report, select the Select check box and click Add all to List.
- To remove vendors from the Exclude Vendors field, select it and click Remove.
Additional Actions
You can perform the following actions with the AIM Export report:
- To save the export settings, click Save.
- To view the export history, click View Log at the top of the window or click Export to AimLog at the bottom of the window.
- To leave the report interface and go to the home page, click Home.
- To export the report data ahead of the schedule, select the necessary period and click Send.
- To download the exported data in the CSV format, select the necessary period and click Download.
For more information on additional report features, see Reports.


