To resolve the problem:
- Make sure the Internet and DC Box connections are available.
- If there is a LAN printer, make sure it is plugged into an Ethernet switch.
- Make sure the printer has a roll of paper installed correctly:
- Internal printer: Paper feeds from top. If the door is left open, the printer will beep.
- LAN printer: Paper feeds from bottom.
- At the top of the screen of the QwickServe Order Manager, tap and hold on the red stripe and wait until the login screen is displayed (approximately for 5 seconds).
- On the login screen, select a user with owner access rights and enter his or her PIN to authorize in the administrative interface.
- In the administrative interface, tap the Devices tab.
- Make sure the LAN printer status is on and connected, and the internal printer is on.
- Make sure the Documents column is populated with the correct document to print.
- Tap the name of each printer and determine that the correct device model is selected:
For internal printer:
- Aclas is the original Order Station manufacturer. You can identify them by their white colored casing.
- Zonerich is the current and most common Order Station manufacturer.
- Return to the QwickServe menu and print an order. If it is not printed, go to step 9 of this procedure.
- Return to the QwickServe settings and tap the Devices tab.
- Delete all devices from the list by tapping the delete icon to the right of the device.
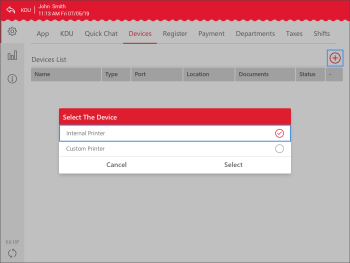
- Tap the plus icon and select Internal Printer.
- Tap Internal Printer and choose Aclas or Zonerich as described above in step 9.
- On the Internal Printer line, tap the Documents column and select Customer Receipt.
- Tap the plus icon to discover additional LAN printers. QwickServe will display printers as MAC addresses on non-SmartPOS devices and IP addresses on SmartPOS devices. Select the necessary LAN printer.
For SmartPOS, go to step 18.
- In the Documents column on the Internal Printer line, add the Kitchen Ticket.
- If QwickServe Embedded is used on SmartPOS, follow the next steps to add a printer.
You have added a LAN printer to the SmartPOS device with QwickServe Embedded in step 16. Although this printer is already in the Device List, it will not work properly if you do not complete the steps below:
- Tap the plus icon and select Custom Printer. Populate the fields to replicate the information from the LAN printer discovered in step 16.
- Delete the LAN printer discovered in step 16.
- Add the Customer Receipt and other required documents to the LAN printer.
- Tap the Register tab and make sure that the Print Order UPC-A Barcode on the Receipt option is enabled.
- At the bottom right corner, tap Save.
- Tap the back arrow icon to return to the main menu.
- Repeat the steps above for all remaining QwickServe Ordering Terminal devices and QwickServe Order Manager devices. The QwickServe Order Manager devices only need the printers set up if the customer plans printing receipts from them (this is a rare situation).
- On each QwickServe Ordering Terminal, print a test order.
Sometimes an internal printer may stop working if the QwickServe Ordering Terminal is inactive for some period of time.
Also, if the QwickServe Ordering Terminal is powered off for some reason and then powered on, you need to do a test print. To do this, launch the QwickServe application and complete two orders. The printer will wake up and start to print on the second order.
Check the following:
- Make sure the paper is loaded evenly in the tray.
- Calibrate the printer. To do this, follow the instructions in the manual for your printer model.
Check the following:
- Make sure the printer is connected to the network.
- Make sure the printer settings are configured correctly at the QwickServe Order Manager device. For details, see QwickServe Device Settings.
Check the following:
- Make sure the paper is loaded in the tray.
- Make sure the printer is connected to the network.
- Check whether the printer IP address has changed. If the IP address is different, update the printer settings at the QwickServe Order Manager device. For details, see QwickServe Device Settings.
Make sure the Wi-Fi and wired connections belong to the same subnet. If they don't, create a bridge between these subnets.
Make sure the printer is set to obtain the IP address in the DHCP mode.
If for some reason your local network configuration recommends or requires static IP assignment, you can set up a static IP address for the printer manually. For details, see Thermal Printer for Receipts, Kitchen Tickets and Reports and Thermal Printer for Sticky Labels.


