The MOP Mapping form displays payments that come from the cash registers to CStoreOffice®. This form is used for matching the CStoreOffice® MOPs with the payments from the station's cash registers.
The MOP Mapping form consists of the following three sections:
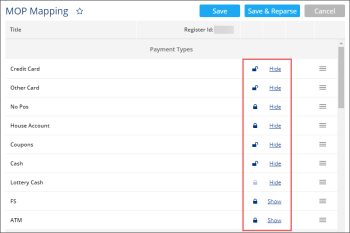
MOP Mapping > Payment Types
In the Payment Types section, the list of base MOPs is displayed by default.
For more information about base MOPs, see Base MOPs.
Mapping Payment with the Base MOP
To map the payment from the cash register with the base MOP:
- Select the base MOP.
- Double-click the column which is displayed to the right of the selected base MOP.
- Select the payment type from the list.
- At the top of the form, click Save.
You can also perform the following actions in the Payment Types section:
- Hide or display the base MOP in the Cash Reconciliation > Daily Data form by clicking Hide or Show to the right of the base MOP correspondingly.
- Allow or disallow the user to edit the MOP's value manually in the Cash Reconciliation > Daily Data form by clicking the lock icon to the right of the base MOP correspondingly.
In the example below, the following settings are applied to the base MOPs in the Cash Reconciliation > Daily Data form:
- FS and ATM MOPs are hidden from the form.
- The No Pos, House Account, and Lottery Cash MOPs are displayed on the form and their values are non-editable.
- The Credit Card, Other Card, Coupons, and Cash MOPs are displayed on the form and their values are editable.
For more information about working with payments in the Daily Data form, see Daily Data.
The lock icon of the Lottery Cash base MOP is always disabled as the Lottery Cash MOP is non-editable on the Daily Data form and cannot be changed to editable.
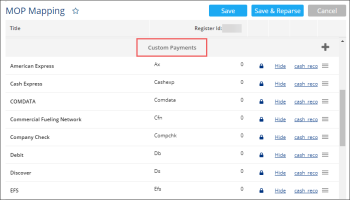
MOP Mapping > Custom Payments
In the Custom Payments section, the payments that match the custom MOPs are displayed.
For more information on how to manage custom MOPs, see Working with MOPs.
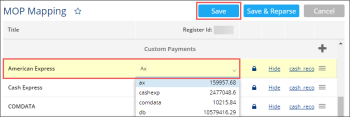
Mapping Payment with the Custom MOP
To map the payment from the cash register with the custom MOP:
- Select the custom MOP.
- Double-click the column which is displayed to the right of the selected custom MOP.
- Select the payment type from the list.
- At the top of the form, click Save.
You can also perform the following actions in the Custom Payments section:
- Hide or display the custom MOP in the Cash Reconciliation > Daily Data form by clicking Hide or Show to the right of the base MOP correspondingly.
- Allow or disallow the user to edit the MOP's value manually in the Cash Reconciliation > Daily Data form by clicking the lock icon to the right of the custom MOP correspondingly.
- Add a new custom MOP manually, by clicking the plus icon at the top right of the Custom Payments section, entering the MOP's name and selecting its payment, if any.
For more information about working with payments in the Daily Data form, see Daily Data.
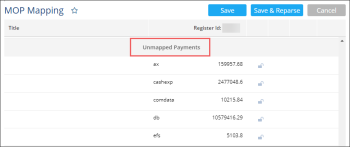
MOP Mapping > Unmapped Payments
In the Unmapped Payments section, the payments that do not match any preconfigured MOPs are displayed.


