


This form represents all the data for the shift, day (if there is only one shift in the day, the columns will be equal), and month to date data for comparison.
Daily Data Form Navigation and Additional Actions
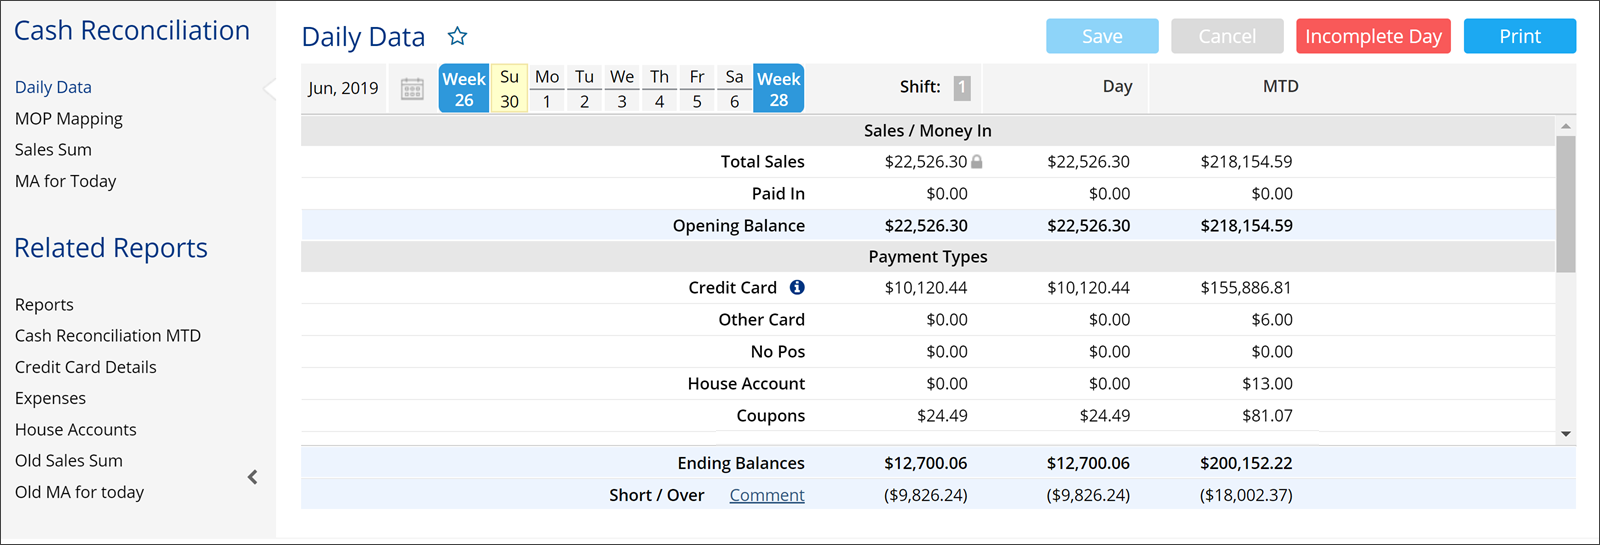
You can perform the following actions in the Daily Data form:
- To specify the shift you want, click the calendar icon and select the necessary period.
- To move to the previous / next week, click the week icon.
- To view the form in a full screen, click the corresponding icon.
- To add the form to favorites, click the favorites icon.
- To print the form, click the Print button.
- To view credit card batches automatically pulled from Verifone cash register or manually enter batches, click the CC Batches button.
- To navigate to the MOP Mapping form, in the left pane, click MOP Mapping.
- To navigate the Sales Summary form, in the left pane, click Sales Sum.
- To navigate to the MA for Today form, in the left pane, click MA for Today.
- To close the incomplete day, make the necessary editing, and then click Save and the complete day icon.
- To edit the shift information, click the row you want to edit, enter the new data and click Save.
- To edit the payments, click the payment you are interested in and enter the new data.
This option only appears if Use CR credit cards batches in advanced cash register settings is set to Allow only manual entry or Allow manual entry and processing from connected CR.
You can edit the payment value, if the manual editing is allowed for this payment type. For details, see Conditions for Manual Editing.
Daily Data Information
| Section Name | Section Description |
|---|---|
| Sales/ Money In | The section contains the following information on the incoming finances: - Total sales - the amount sold for the selected period. - Pay-ins by the method of payment. |
| Opening Balance | Total sales + Paid Ins + Beginning Cash |
| Payment Types |
The section contains the following information on the incoming finances subtotalled by base MOPs: Simple Mode: Directly editable cell in the Day column. Advanced Mode: See Managing ATM Accounting in Advanced Mode for details. |
| Custom Payments | The section contains data on payments made via custom MOPs. For more information on how to set up custom MOPs, see Adding a Custom MOP. Please note that the Fuel Deposit MOP, if it is configured, includes the difference between fuel sales and credit card amount in case the Fuel Deposit option is selected in the Station Options form. For details, see MISC > Station Options. |
| Money Out | The section contains the following information on the outcoming finances: - Expenses: Displays only cash expenses. In case the expenses invoice with both credit and cash expenses was scanned via Docs Scanner, only cash expenses will be displayed in the Expenses row. - Merchandize additions: Displays the Total Cost value for the selected period. You can verify this value using the Invoices report. For details, see Invoices Report. - CR paid outs only when present - Unmatched paid outs only when present |
| Ending Balances | Cash the end of the shift (used as Beginning cash for the next shift) |
| Short/Over | The section contains information on the shortages and overages for the shift. You can leave a comment by clicking Comment in the corresponding section. If you need the Other Charges value to be deducted from the Short/Over value for the selected shift, make sure the following conditions are met: - The Other Charges are included into the invoice total cost (Y/N) option is selected in the Setup Account form. For details, contact your system administrator or a Petrosoft representative. - The Cash method of payment is applied in the invoice. |
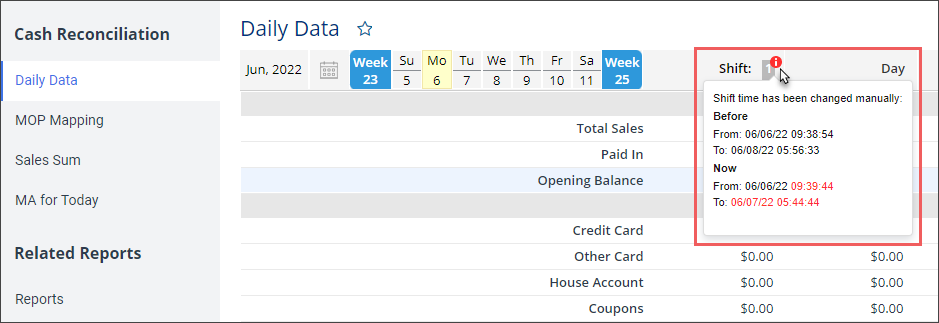
In case the selected shift is indicated with the red exclamation mark, the date and/or time of this shift was edited manually. To view more, hover over the exclamation mark.
In the Payment Types and Custom MOPs sections, if you see the closed lock icon to the right of the payment value in the Daily Data section, it means that this value is non-editable.
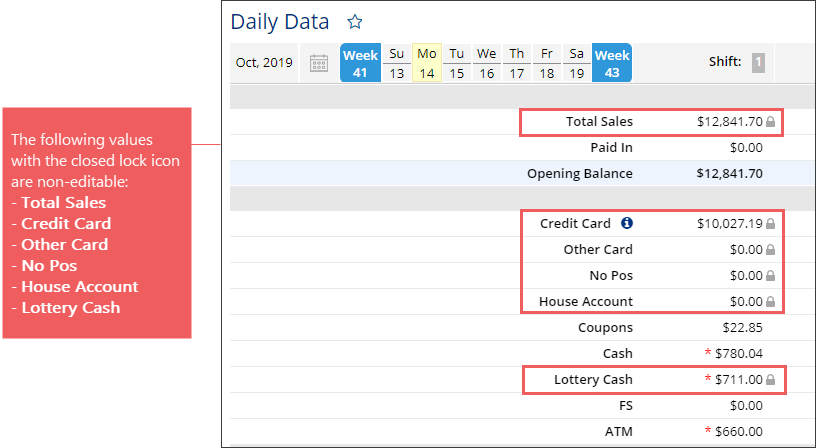
 Conditions for MOP Manual Editing
You can edit values in the Payment Types and Custom MOPs sections for the base and custom MOPs correspondingly, if the following conditions are met:
- Manual data entry is allowed for the custom MOP in the Station Options > MOP Mapping section. For details, see Adding Custom MOP.
- Manual data entry is allowed for the base or custom MOP in the Cash Reconciliation > MOP Mapping section.
- For some methods of payment, you need to additionally have a corresponding permission granted to your user. See the list of such permissions in the table below.
If you cannot find any payment in the Daily Data form, make sure it is not hidden in the Cash Reconciliation > MOP Mapping form. For details, see MOP Mapping.
| MOP Name | Permission Name |
| All MOPs | Allow users to setup Data Entry -> Mop Mapping |
| Cash | Allow users to edit Cash sales |
| Credit Card | Allow users to edit Credit Cards sales |
| Check | Allow users to modify Check sales |
| Drive Off | Allow user to modify Data Entry > Cash Register > Drive Off |
| Fuel Loyalty | Allow user to modify Fuel Loyalty |
| HM Gift Cash | Allow users to modify HM Gift Cash |
| Shop & Save | Allow user to modify Data Entry > Cash register > Shop & Save |
For more information about user permissions, see Granting Role Permissions to Roles and Users.
Manually Entering Credit Card Batches
Manual entry of credit card batches is only available when Use CR credit cards batches in advanced cash register settings is set to Allow only manual entry or Allow manual entry and processing from connected CR.
To enter the daily credit card batches from the cash register, click CC Batches button on top of the report.

Enter the data in Cash Register : Credit Card Batches form. By default, the date of the form matches the date selected for the daily report.
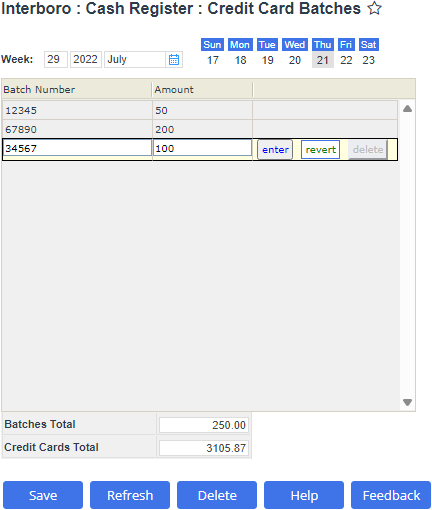
- Enter the batch number and the amount in the corresponding fields and click the enter button to add a batch.The batches are added one-by-one - the next batch can be added after a previous one is entered.
- To update a batch, click the corresponding row, click the edit button, change the values in the corresponding fields and click the enter button to save new values.
- To remove a batch, select the corresponding row and click the delete button.
- To save credit card batches, click the Save button below the form.
Always click the enter button before switching to another row. Otherwise, the provided data will be lost.
If you have mistakenly overwritten the correct number, click the revert button to return to the previously saved values.
To remove all batches for the day, click the Delete button below the form.
The total amount for all batches (Batches Total) is calculated automatically from the batches' amount. It cannot be modified.
The Credit Cards Total field contains the aggregated amount of all credit card payments from the Daily Data report. To modify it, return to the report and change the value in the Credit Card row.
Cash Reconciliation by Paypoints
It is possible to enable the cash reconciliation by paypoints for the following types of cash registers:
- Verifone Ruby/Sapphire
- Gilbarco Passport
- Wayne Nucleus
- Radiant
- SmartPOS
Cash reconciliation by paypoints provides more detailed information on activity of each cashier within a shift.
To enable this option, follow the steps:
- Go to Data Entry > Dashboard > Station Options > Cash Register.
- Switch to the Advanced settings view.
- In the CR Settings section, select the Paypoints for Cash Reconciliation check box.
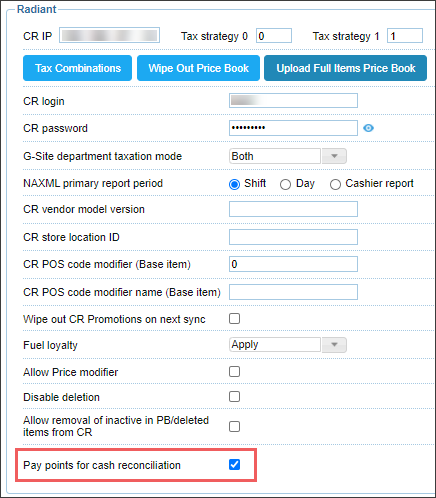
With this option enabled, Cash Reconciliation > Daily Data displays paypoint data as well and this data can be edited.
Please note that if the Pay points for cash reconciliation option is enabled, but there was no paypoints data, the Daily Data values cannot be edited in the Cash Reconciliation form.
Managing ATM Accounting in Advanced Mode
When the Enable Advanced ATM Accounting is enabled in your station settings, CStoreOffice® replaces direct manual cell entry with a continuous, movement-based ATM ledger:
- Maintains running carry-forward balances across business dates.
- Automatically adjusts store cash when money is transferred from the register drawer to the ATM.
- Tracks external money additions separately without distorting drawer reconciliation.
- Validates terminal balances against printed shift reports.
Initializing the ATM Opening Balance
Before recording daily movements for the first time in Advanced Mode, the starting balance must be initialized:
- Open Cash Reconciliation for the first active business day.
- In the Payment Types table, locate the ATM row and click the amount cell.
- The right-side ATM Reconciliation drawer opens displaying the message: ATM Opening Balance has not been initialized.
- Click the Set Opening Balance button.
- Enter the starting dollar value currently inside the ATM safe.
- In the Comment field, enter a mandatory explanation (for example, "Initial deployment physical count").
- Click the Add & Save button.
Setting or editing the opening balance requires the Initialize ATM Opening Balance permission. Any subsequent corrections made to an earlier opening balance trigger an automated recalculation of all forward business dates.
Recording ATM Cash Movements
To record an addition or payout:
- Click the ATM cell. The right-side ATM Reconciliation drawer opens.
- Click the Add ATM Action button.
- Select the Type of Transaction:
- Cash Added: Adding funds into the ATM cassette.
- Cash Dispensed: Cash dispensed to customers or removed from the ATM during servicing.
- Define the Funds Origin:
- Cash Drawer (Internal): Select this option when physical cash is taken out of the store register/deposit to refill the ATM. Saving this record automatically reduces the Cash field on the Daily Data form by the identical amount and recalculates Short/Over. Both adjustments are bound by a shared Event ID. If the amount entered is greater than the current cash drawer total, the system halts the save with an error: "Unable to Save ATM Action. The entered amount is greater than the current Cash value."
- Outside (External): Select this option when funds originate from an armored car delivery, bank branch, or third-party owner. Increases the ATM Current Balance, displays an Outside badge in the movement ledger, and leaves drawer Cash, Money In, and Money Out untouched.
- Cash Dispensed: Enter the gross cash dispensed figure shown on your terminal settlement printout slip.
- In the Comment field, enter an optional explanation.
- Click the Add & Close button.
Reconciling the ATM Balance
Verify the values displayed in the ATM Reconciliation side panel:
- Retrieve the end-of-day settlement receipt printed by the physical ATM.
- Compare the highlighted Current Balance against the cassette balance printed on the slip.
- Once balanced, close the panel and proceed with shift/day completion.
Editing Movements
To edit the movement, click the Pencil icon next to it in the ATM Reconciliation drawer, make adjustments, and click the Save button. CStoreOffice® reverses previous ledger entries, writes the updated figures, and logs the change.
If another manager modifies or completes ATM data on the same date while your side panel is open, CStoreOffice® blocks stale saves, notifies you of a newer version, and refreshes the ledger automatically.


