When working with the product catalog in PIM, you can set up descriptions of items in several languages. As a result, the items descriptions can be displayed at the POS and printed on receipts in the necessary language, depending on the POS language settings. This option can be helpful for retail chains with stores located in different geographic regions or in multilingual areas.
The process of multilingual item description setup is accomplished in the PIM portal by managers who have the following roles:
- Head Office role
- Branch Office role
Managers working with PIM perform the following activities:
- Define translations for item descriptions.
- Review and send updates.
- Review and accept changes.
- Send updates to cash registers.
Defining Translations for Item Description
This step is performed by a user who has the Head Office role in the PIM portal. As the head office manager, you can specify translations for the following item descriptions:
- Global item description
- Item description printed on the cash register receipt
To define translations for item descriptions, follow the steps:
- Log in to PIM under an account with the Head Office role.
- In PIM, go to Product Catalog > Items.
Result: The Items list opens.
- To create a new item, at the top right corner of the Items list, click the Add New button. To edit an existing item, select the necessary item in the list and at the top right corner of the Items list, click the Edit button.
- Set up the necessary item data as required. For more details, see Creating New Item.
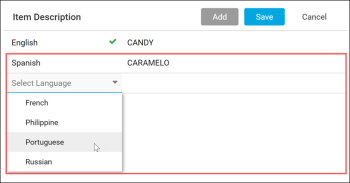
- In the Global Item Attributes section, on the right of the Item Description field, click the globe icon.Result: The Item Description form opens.
- At the top of the Item Description form, click Add.
- In the Select Language list, select a language to which you want to translate the item description.
- In the field on the right, enter the translation for the item description.
- At the top of the Item Description form, click Save.
- In the Account Item Attributes section, on the right of the Receipt CR Description field, click the globe icon.
- Repeat steps 6-9 to enter the translation for the item description printed on the cash register receipt.
- Set up sales and retail prices for the item and save the changes. For more details, see Setting Up Retail Prices to Price Group.
Reviewing and Sending Updates
This step is performed by a user who has the Head Office role in the PIM portal. As the head office manager, you must review outgoing item changes and send them to branch offices.
To review and send updates:
- In PIM, go to Updates Manager > Outgoing.
Result: The Outgoing form opens.
- In the left pane, select the location with updated data.
- In the right pane, expand the updated item(s) and review changes.
- At the top of the Outgoing form, click the Send Updates button.
- In the confirmation message window, click Yes.
Reviewing and Accepting Changes
This step is performed by a user who has the Branch Office role in the PIM portal. As the branch office manager, you must review incoming changes, adjust the price changes if necessary, and accept them in PIM.
To review and accept incoming changes, follow the steps:
- Log in to PIM under an account with the Branch Office role.
-
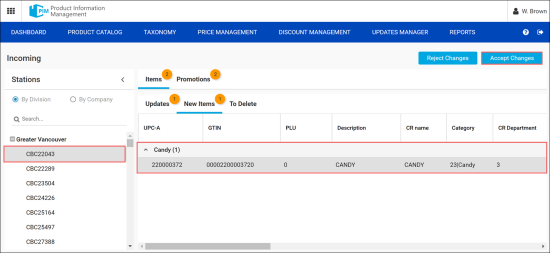
In PIM, go to Updates Manager > Incoming.
Result: The Incoming form opens.
- In the left pane, select a location for which item updates are received.
- In the right pane, expand the updated item(s) and review changes.
- At the top of the Incoming form, click the Accept Changes button.
- In the confirmation message window, click Yes.
Sending Updates to Cash Register
This step is performed by a user who has the Branch Office role in the PIM portal. As a branch office manager, you must review updates in Items Updates Manager and send them to the cash register in the necessary location. After that, item descriptions in the branch office will be displayed and printed in the necessary language, depending on the POS language settings.
To send updates to the cash register, follow the steps:
- Switch to CStoreOffice®: go to Product Switcher > CStoreOffice®.
- In the left pane of the main CStoreOffice® view, click the arrow icon next to Items Updates.
- In the Items Updates list, click a link of the location whose data you want to send to the cash register.
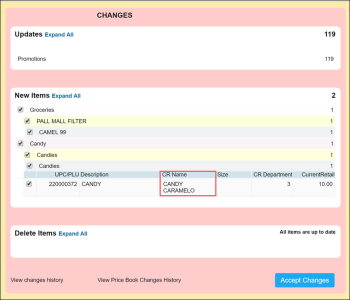
- In the Cash Register Updates Manager, review the item changes and click the Accept Changes button. For more details, see Cash Register Updates Manager.


