


Make sure all items from questionable sales meet the following conditions in CStoreOffice®:
- Each item has a CR Department assigned.
For more information on how to manage CR Departments in CStoreOffice®, see CR Departments. - Each CR Department has relevant matched category.
For more information about assigning a matched category to a CR department in CStoreOffice®, see How to assign the matched category to a department in CStoreOffice®. - Each item's category has corresponding data type.
For more information about relations between categories and data types, see Adding a New Data Type.
In case either of the conditions above is not met, the Store Sales data type is automatically applied to the transaction disregarding configured transaction assignments.
In case any of the accounting forms does not open and the Access Denied message is displayed, make sure the accounting configuration is complete for your user what means that the following conditions are met:
- At least one station, class, and company are configured for your account in CStoreOffice®.
- Each station is linked to the company.
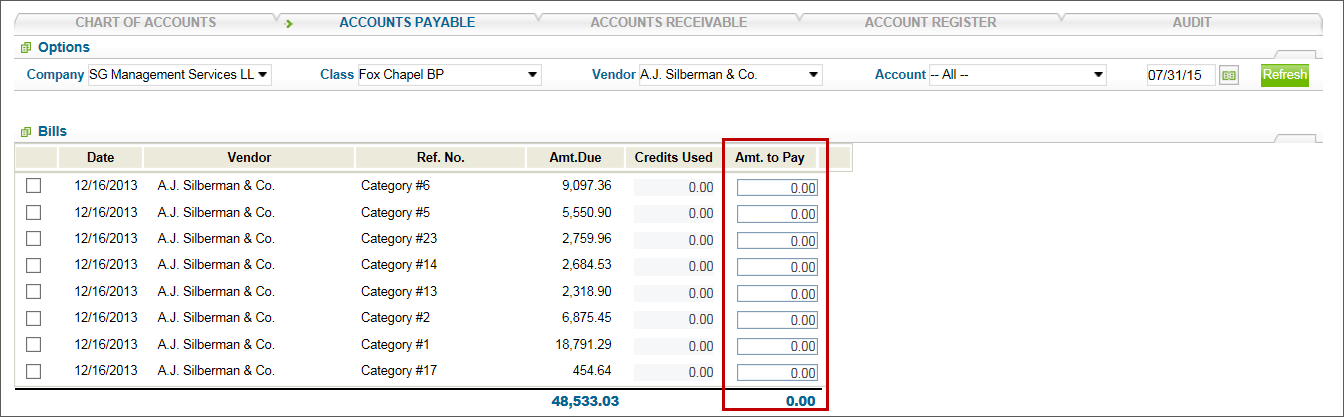
Yes, you can to enter the larger amount than the invoice amount at Vendors > Account Payable > Amt. to Pay.
Yes, it is possible to enter several identical pass through credits.
For this purpose see Vendor Balance Summary Report and Vendor Balance Detailed Report.
Go to Transactions > Audit > Highlight the audit period > click Edit > enter the checkmarks > Click save period > Send to QB Synchronization Manager.
Go to Accounting > Chart of Accounts > Find the Accounts that do not have an Account “Type” Listed > click Edit > Select and Account “Type” > click save > Try to close the Audit Period again.
They come in this way because they are being entered as a negative invoice in data entry. Then both of these invoices move into accounts payable so that they can offset each other and show the true amount that is being paid for the invoice (total invoice – credits).
Enable data types for each custom income in the transaction assignment.
Transaction Assignment > Required data Types > chose the data types “Custom Income/XX (each one of your custom incomes) > click Save > Enter the Debit and the Credit Accounts for each one of the custom income data types that you just created > click Save > Remove the data type Custom Income Sales (this one is the total of all of the custom incomes) > from this point on you will see the custom incomes come into account separately.
You can delete any accounts that were in the QB file prior to the sync at any time whether it be before or after the sync with QB, however, to avoid any possible errors with duplicate accounts it is usually best the delete any old, unused, or duplicate accounts from the QB file prior to the sync with CStoreOffice®.
- From the Home Page select Customers on the main tool bar.
- Select Bill to.
- Hit the green + to add a new customer.
- Enter the customer information in the spaces provided.
- Click the picture of the DVD to save the information for the new customer
- You should now see the new customer in the customer list.
- You can now receive payments from the customer using Accounts Receivable.
- Reports > Accounting > by Company > Select your company> General Journal.
- Change the date range and click Refresh.
- Click advance.
- Go to the name box and look for the type of transaction that you need to adjust.
- Select the type and subtotal by class (station), and then click Refresh.
The total for the month for each station that will need to be adjusted opens.
If you want to see every transaction day by day, click the station name to see the detail.
The problem might be caused by the incorrect data type mapping, for example, if you set up the Cash Register/Fuel Deposit data type in the transaction assignments. When this data type is enabled, the system automatically bypasses AP and sends fuel sales – credit cards directly to the account register.
How can I solve the problem?
- Remove the data type Cash Register/Fuel Deposit from the transaction assignment
- Convert the data for Cash Register/Credit Cards to bring the credit cards to AP but using the data converter tool.
To view the account register history of changes, go to Personal Settings > Transaction Assignments > Changes History > Accounting History.
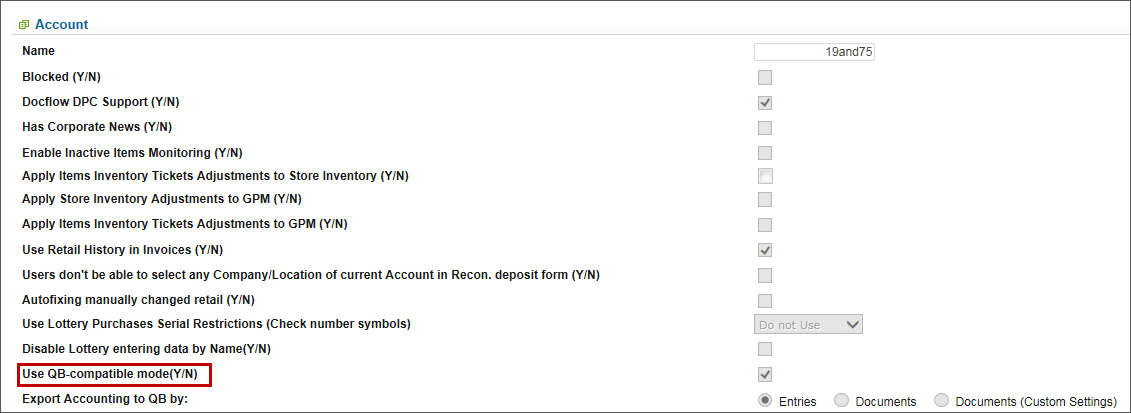
This option is turned off by default. You can remove this restriction manually.
To turn off the QB-compatible mode and allow creating transactions between the A/R and A/P accounts, go to Account Settings and clear the Use QB-compatible mode(Y/N) checkbox.
GPM stands for the Gross Profit Margin. Margins or gross profit margins represents a comparison between gross profit and the retail price at which an item is sold. The margin is usually expressed as a percentage and is illustrated in the following formula:
Gross Profit Margin (GPM)= (Retail Price — Cost) ÷ Retail Price
EXAMPLE
An item costs $.79 and is selling for $1.32.
$1.32-.79
Gross Profit Margin =$1.32 = 40%
For more detailed information, see GPM Calculation.
There are two ways you can check the transaction history:
- Accounting > Tools > Changes History > Filter by payee and accounts.
- Reports > Accounting > Accounting > General Journal Report.
First of all, make sure your payee type corresponds to the account type.
- Payee type Vendor corresponds to the Accounts Payable account type.
- Payee type Customer corresponds to the Accounts Receivable account type.
Example
For example, you want to send money to the John Smith. You select John Smith as a payee, and select the account type Account Payable. But Jonh Smith is registered as a customer in your Price Book. You cannot use this account type (A/P) to deal with your customer because this account is supposed to be used with the vendors. You need to add this payee, John Smith, as a vendor as well.
To add a current payee as a new type of payee (the old payee type is saved as well), follow the steps:
-
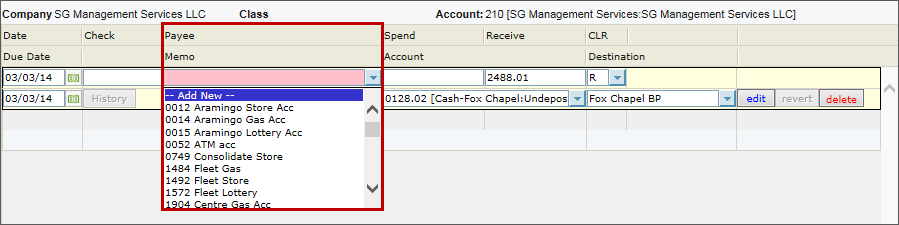
In the Payee field, select Add New from the list.

-
Select the payee type corresponding to the type of the account you want to use for this transaction.
- Click Next.
-
Enter the information about the new payee type, and then click Save&Close.


This message means your account is not assigned to any company.
If you have the permission to manage companies, you can create a company yourself in Admin Tools > Companies > New.
If you do not have the necessary permission, contact your manager to complete the accounting configuration for you by creating a company for your account.
The account is never technically completely deleted. Since the account might have transaction or be part of the transaction assignment, its deletion might cause the data loss on the data entry forms. So instead of deleting, the account is made inactive with the possibility to restore it.
Make sure all the account types are set up correctly in the Settings > Company > Chart of Accounts.
Make sure there are no transactions within the audit period for the accounts marked as inactive in the General Journal report (Reports on the company level > Accounting > Accountant Reports > General Journal).
CStoreOffice® does not restrict the access of the Quick Books web connector for the client. The client may download the web connector on any computer or server that they are using.
***Right Networks does support synchronization through the web connector onto their system. The customer would just need to call the technicians at Right Networks and they will help the customer with this process and will even test the first sync with them.
www.rightnetworks.com
1-888-417-4448
To get the password from the Home page got to Reports > Select Account or Store > Accounting > Export: QB Synchronization Manager > Setup [New] > View Privacy Settings > Copy and Paste this Password into the Web Connector > Try to Synchronize the Data with Quick Books again.


