


In the ITL/ClearVision section, you can configure settings for ITL cash registers.
To access the ITL cash register settings:
- At the top left of the Cash Register form, select Advanced.
- From the CR Brand list, select ITL.
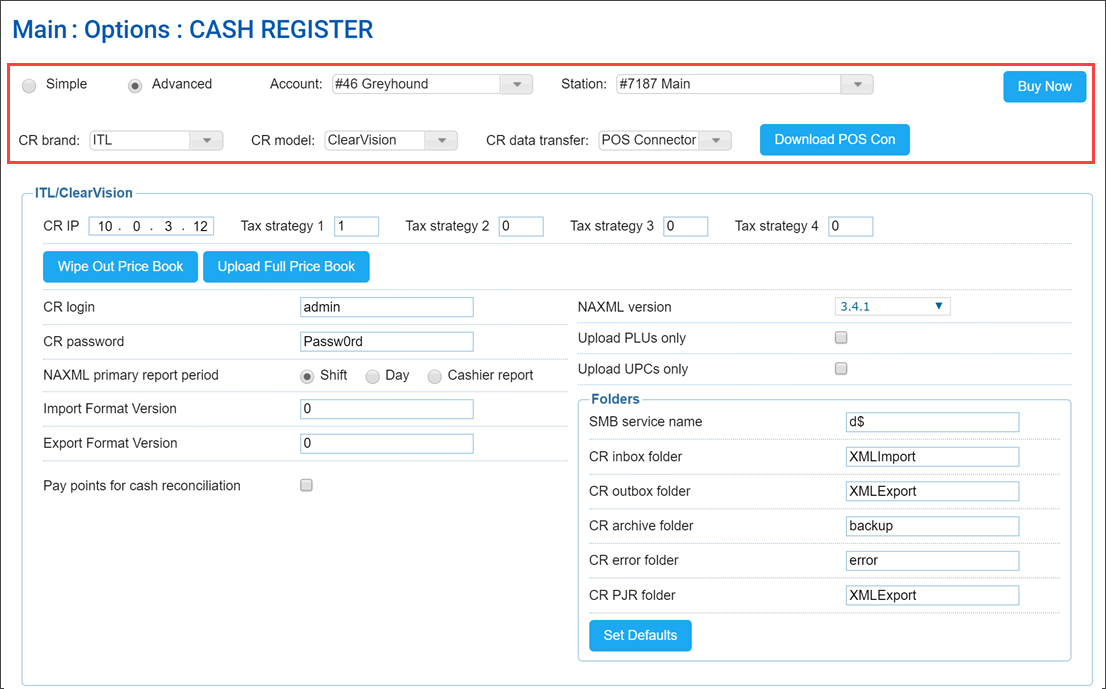
You can configure the following settings:
- CR IP: The IP address of the cash register.
- Tax strategy: The tax strategy settings to be applied at the cash register. For more details, see Configuring Taxation Strategy for Cash Register.
- CR login: The user name to log in to the cash register.
- CR password: The password to log in to the cash register.
- NAXML primary report period: The primary reporting period for the cash register.
The period must be the same as the period value configured at the POS. Otherwise, movement reports will not be accepted by CStoreOffice®.
- Shift
- Day
- Cashier Report
- Import Format Version: The BOS import format version used.
- Export Format Version: The BOS export format version used.
- Allow removal of inactive in PB/deleted items from CR: Enable this option to remove from the cash register the items that have been deleted or marked as inactive in the Price Book. The items are removed when Price Book updates are sent to the cash register. For more information on how to send updates to the cash register, see Reviewing and Accepting Changes.
- Pay points for cash reconciliation: Enable this option to use paypoints data for cash reconciliation. With this option enabled, CStoreOffice® will process the cash register reports to get paypoints data and present more detailed information on cash reconciliation in the Cash Reconciliation > Daily Data form. As a result, you will be able to trace every cashier's activities at each cash register separately.
If the Pay points for cash reconciliation option is disabled, the cash register reports are not parsed for paypoints data and cash is reconciled by shifts. For more information about reconciling shifts by pay points, see Cash Reconciliation by Paypoints.
- NAXML version: The version of the NACS XML Data Interchange protocol used for communication between CStoreOffice® and cash register.
- Upload PLUs only: Enable this option to upload only item POS codes in the PLU format to the cash register. Item PLUs are sent to the cash register with Price Book updates.
- Upload UPCs only: Enable this option to upload only item POS codes in the UPC format to the cash register. Item UPCs are sent to the cash register with Price Book updates.
If you want to send both item PLU and UPC codes to the cash register, leave the Upload PLUs only and Upload UPC only check boxes not selected.
- Folders: Paths to folders where data is stored at the cash register:
- Smb service name: The name of the Samba network shared folder. Specify the service name if Samba is used as the transport protocol.
- CR inbox folder: The path to the folder where incoming data is stored.
- CR outbox folder: The path to the folder where outgoing data is stored.
- CR archive folder: The path to the folder where archive data is stored.
- CR error folder: The path to the folder where error messages are stored.
- CR PJR folder: The path to the folder where PJR files containing transaction details are stored.
- Set Defaults: Use this button to set default values for paths to folders.
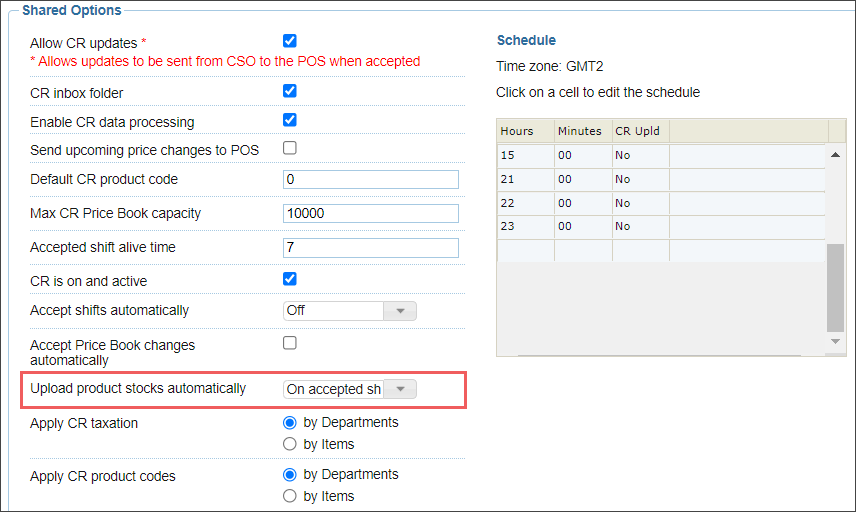
In the Shared Options section, you can configure the following list only for 1.4.5 and 1.4.6 versions of ITL ClearVision cash registers:
- Upload product stocks automatically: In this list, you can configure product stocks uploading from CStoreOffice® into your system:
- Select On accepted shift, if you need to upload centralized data on product stocks automatically after each shifts acceptance.
- Select Off, if you need to turn off the automatic product stocks upload.

In addition to configuring settings, you can perform the following activities:
- Wipe Out Price Book: Use this button to delete the Price Book at the cash register and upload the Price Book from CStoreOffice® to the cash register instead.
- All price book data, including departments, promotions, items, is cleared from the cash register.
- All price book data is populated at the cash register from the account's price book in CStoreOffice®.
Please note that the wipe out process may take from 10-15 minutes to 1 hour. During this process, the cash register will be unavailable.
- Upload Full Items Price Book: Use this button to upload the Price Book from CStoreOffice® to the cash register. This operation is used in conjunction with items updates. After clicking this button, you need to accept changes in the Cash Register Updates Manager. As a result, full price book is uploaded to the cash register. For details, see Reviewing and Accepting Changes.
After the Upload Full Items Price Book button is clicked, it changes its color to indicate the process of pushing the price book data. Once the price book updates are accepted, the button returns its initial color.


