


This section describes the specifics of accessing and interpreting the Fuel Purchases Detailed report.
A newer version of the report is available at Reports > Fuel > Purchases > Fuel Purchases Detailed New. Current report version is planned to be replaced by a new one in the next 23.0.0 CStoreOffice® Release. To learn more about updated report's functionality, see Fuel Purchases Detailed New Report.
Opening the Report
You can find the report at Reports > Fuel > Purchases > Fuel Purchases Detailed. For more information, see Viewing Reports.
Viewing the Report
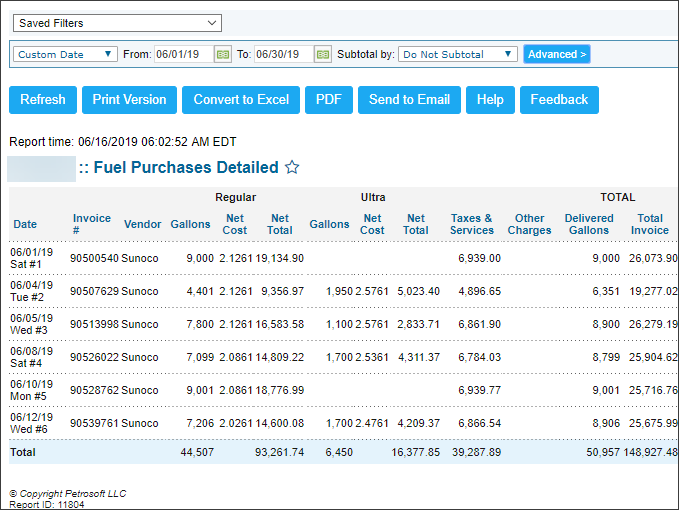
Fuel Purchases Detailed report provides the detailed information on the invoices for purchased fuel within the specified period. The report displays fuel types or fuel products depending on the transaction assignment settings:
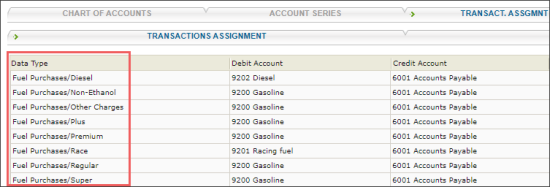
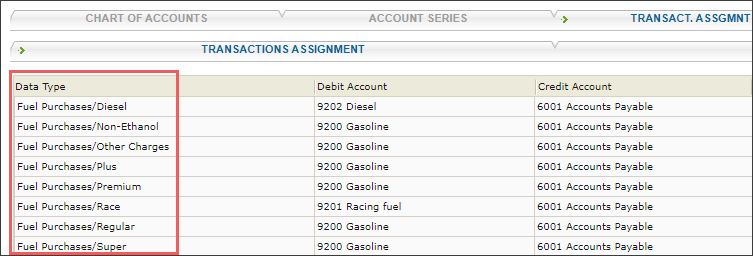
- Fuel products are displayed in the report, if each fuel product is configured as the Fuel Purchases data type as it is displayed in the image below.
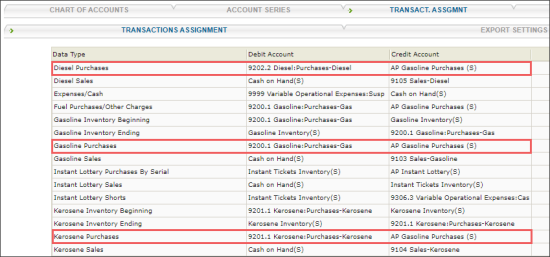
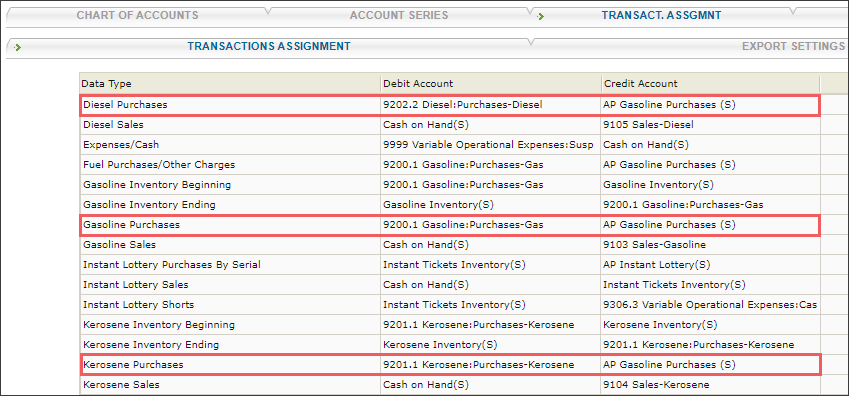
- Fuel types are displayed in the report, if each fuel type is configured separately within relevant purchases data type as it is displayed in the image below.
For more information on how to assign transactions, see Transaction Assignment.
If you need to regenerate report for the fuel types instead of fuel products or vice versa, remove and create corresponding transactions using the Data Converter Tool. For details, see How to regenerate the Fuel Purchases Detailed report for fuel types instead of fuel products or vice versa?
The Fuel Purchases Detailed report contains the following information:
- Date
- Invoice #
- Vendor
- For each fuel product or fuel type, the report displays the following data:
- Gallons
- Net Cost
- Net Total
- Tax & Services
- Other Charges
- Delivered Gallons
- Total Invoice

If the report does not display existing fuel purchases data, make sure the vendor from which fuel is purchased, has the Fuel vendor type selected in the Vendor Setup form. For details, see Setting Up Merchandise Vendors.
Filtering and Sorting the Report Data
To get the exact information you need, you can apply filters to the report. To set up a filter, select one or more filtering options. Once the filter is set up, at the bottom of the filter section, click the Refresh button to display the report data by the filter criteria.
You can specify the period you are interested in manually using the calendar or use one of the available filtering options, and then click Refresh There are the following filtering periods available:
- Custom Date
- Yesterday
- Current Month
- Current Quarter
- Current Year
- Last Month
- Last Quarter
- Last Year
- Last 12 months
In addition to the time interval filter, you can filter and sort the report data by advanced criteria. To use the advanced filter, click the Advanced button and configure the filter using the following options:
- Subtotal By. Select one or several filtering options to break down the report results by the specified criteria.
- Station Included. Select the stations you want to view the report for.
- Filter by Items. Select this option and use the search tool to find the particular items you want to filter by.
- Filter by Vendor. Select this option to filter the report results by specific vendor.
- Sort by. Select the order of the report columns you want. Select the Ascending or Descending option for the corresponding type of filtering.
Press CTRL to select several items at a time.
Select the Show Only option to view only the information for the selected items, and Show All Except to view the information for all the items except the selected ones.
Additional Actions
To view and edit the fuel invoice, including taxes and services, click the invoice number, date or corresponding value in the Taxes & Services column.
For more information on additional report features, see Reports.


