Click to leave your feedback on the Help system.

Tobacco Scan Data Supporting PMUSA

With this report, you can set up the transaction-level scan data export to the Altria Group Distribution Company (“AGDC”) (previously named Philip Morris Companies Inc.) on a weekly basis.

This report is only available for the cash registers with the PJR files enabled. For more information, see Enabling PJR Files

This section consists of the following subsections:

Before You Begin

For collecting and sending your data files, the Altria Group Distribution Company cooperates with the third-party client - IRI. Before starting to set up the scan data export settings, make sure the following conditions are met:

To check the conditions above, use the following step-by-step procedures and trainings:

video: Export settings for one Altria account number

This video shows how to set up Tobacco scan data export settings for one Altria account number.

Watch Video

video: Export settings for multiple Altria account numbers

This video shows how to set up Tobacco scan data export settings for multiple Altria account numbers.

Watch Video

Opening Report

You can find the report at Reports > Accounting > Tobacco Scan Data Supporting PMUSA. For more information, see Viewing Reports.

Setting Up Export

  1. Specify the manufacturers whose sales data you are going to export:
  1. Select the category to export the data from. To add more categories, click Add category.
  2. Set the email to receive alerts about export errors.

  3. From the Transport list, select the method of data transferring. Always use SFTP value.
  4. In the Host field, enter the scandata.insightsc3m.com value.
  5. In the Path field, enter the /incoming/ value.
  6. In the User Name and Password fields, enter the data received from scan data help desk.
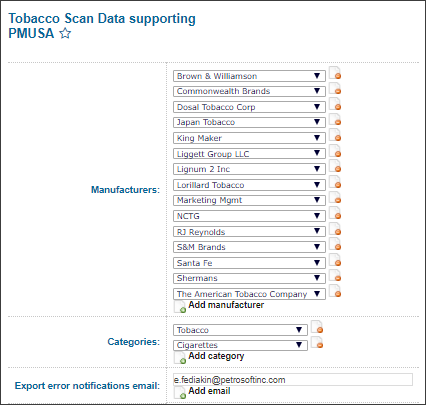
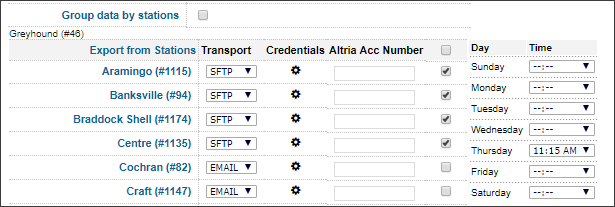
  7. If you are configuring export settings for several stations, leave the Host, Path, User Name, and Password fields blank here and set these parameters for each station individually in the Export from Stations section > click the Settings icon.

  1. In the Report period: From and To fields, specify the time period of the exported data.

  2. Select the Group data by stations check-box.
  3. From the Day and Time columns, select day of the week and time for the report generation. Make sure the day and time are set before Wednesday at 05:00 PM as it is required by third-parties.
  4. If you are accepting your shifts manually, make sure you have enough time to accept your shifts for weekend in Monday. Otherwise, your data will not have the appropriate ending day and will be rejected.

  5. From the Export from Stations list, select the stations to participate in exporting data.
  6. If you want the station to have the specific export settings, different from the ones for the whole account, enter the following information for the station:
  7. Transport. The same as for the account.
  8. Credentials. In the Credentials column, click the icon for the station, and then enter the transport parameters depending on the transport type.
  9. Altria Account Number. Station identifier.
  10. The transport and account number information is to be provided by the Altria representatives.

  11. In the next column, clear the check-box for stations not participating in export.

  12. At the top left of the report, click the Save button.

Testing Report Export Settings

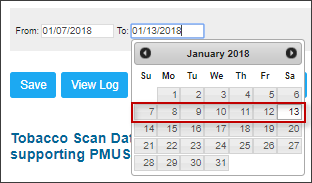
To make sure that the export settings are set up correctly, you may export the report data ahead of the schedule. Do the following:

  1. Go to the top of the report form and set the sending date range. The recommended date range is from Sunday to Saturday. For example, you can take the most recent data range available.

  2. Make sure that its data is correct. Click the Download button, extract the report file from archive and check its data.
  3. Export the report data ahead of the schedule. Click the Send button and wait until the report data are exported. When successful 'Done' notification is displayed, it means your report data are exported successfully.

Typical Errors

When viewing the report log, you may encounter the following error codes:

Error Code Error Description Error Possible Reasons/ What to Check Troubleshooting Steps
ID-5-2-3 Invalid Week Ending Date failed:
Week Ending date is not on Saturday.
  • Site is offline.
  • Site did not have all shifts accepted before file was sent.
  1. Check and fix the error possible reasons.
  2. Resend the file.
ID-8-9-1 Multiple Non-Discounted Final Sales Prices for Identical UPC/Store/Day.
  • Price Book Changes on specific UPC.
  • Go to the Price Book and then check UPC to see if price change was made on that day.
  1. Take a screenshot of the price change in the system.
  2. Reply to IRI with the price change screenshot.
ID-8-10-2 All Records Reporting a Discount for UPC/Store/Day.
  • Accidentally reporting a discount on buy-downs.
  • We don’t report buydowns in file, we up the price to take the buydown off.
If prices are correct, then no action is needed.
ID-8-11-1 Multiple Discounted Final Price Values for UPC/Store/Day/Identical Reported Discounts.
  • Discounts not reported correctly.
  • Mobile Coupons not showing in file.
  • Coupons as Method of Payments not captured in file.
  1. Reply to IRI with explanation.
  2. (Optional) Check LPA if they have video to see if coupon was accepted during transaction.
ID-5-5-1 Record Count Outside Expected Range: Number of records in the file is significantly larger or smaller than the previous week.
  • Duplicated transactions.
  • Missing Transactions.
  • Incorrect Resubmissions.
  • Store was offline for a long time, now we are reporting sales skewing data count.
  1. Check the error possible reasons.
  2. In case an error is found, resubmit the file to overwrite the old file.
ID-5-3-1 All 7 days within a week should be reported in Field 3 (transaction date) for each store if open all 7 days.
  • Check accepted shifts to see if there are shifts for those days.
  • Download file to check for those missing dates to see if they are there.
  • Ask owner if store was closed on particular day (especially holidays).
  • Shifts were not accepted before file was auto-sent.

Do one of the following:

  • Resend file if dates are in file.
    or
  • Respond to IRI that store was closed on particular days.
ID-6-4-1 No USSTC Items present
  • Check to make sure category is selected in setup for snuff.
  • Check to make sure that USSTC is marked in manufacturer in setup.
  • Check to make sure that account wants USSTC reported (some do not).

Do one of the following:

  • Fix the error reason, if any, and then resubmit the file.
  • In case of no error reason is fixed, ignore this error.


ID-9-1-1 Missing Loyalty ID/Rewards Number Field 37 Auto triggered if data is missing in loyalty fields. Ignore this error. If account is not approved for loyalty, this trigger will occur.
ID-5-10-1 Blank Core Fields- One or more of the core fields are blank. Critical details missing in core fields.
  • Download file to see if data is missing.
  • Look for missing city, zip codes and phone numbers in CSO under locations.
  1. Fix the error reason.
  2. Resubmit the file.
ID-4-4-1 Invalid Summary Line Format     ERROR : Bad summary record format 0|0|0 Common Cause:
File summary record format is not correct (Whole Number | Whole Number | Number with 2 Decimals)
  1. Fix the error reason.
  2. Resubmit the file.

Additional Actions

To view the export history, click View Log or click Tobacco Scan Data Supporting PMUSA Log at the bottom of the page.

To leave the report interface and go to the home page, click Home.

To view the log of the last export, click Show/Hide Last Transmission log.

For more information on additional report features, see Reports.