Viewing with the Orders and Invoices Schedule
The Orders and Invoices Schedule widget displays merchandise events as a daily calendar. Events are displayed on the three-hour grid according to the order and delivery time set for vendors. Using this widget, you can get a clear vision and know the exact time when orders are to be placed and deliveries take place.
Each type of event is marked with a separate color. You can see the following events:
- Order Reminder: Date and time when an order for the vendor must be created.
- Manual Order: Order created manually.
- Auto Order: Order automatically generated by CStoreOffice®.
- Delivery: Date and time when an order from the vendor must be delivered.
- Invoice: Date when an invoice for the vendor is issued.

Viewing with the Orders and Invoices Timeline
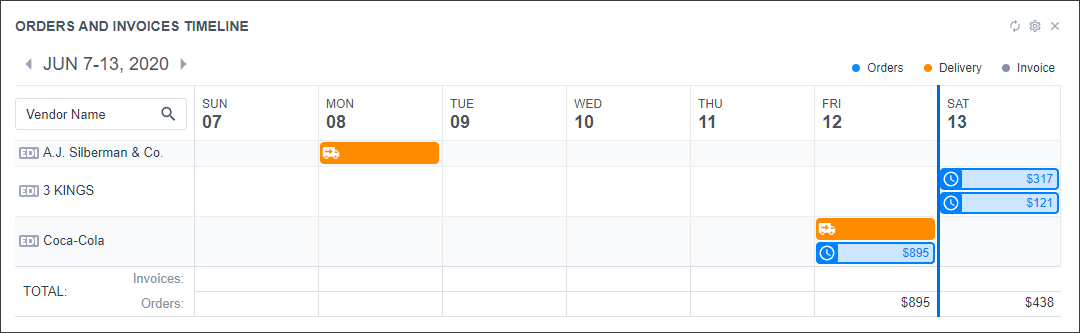
The Orders and Invoices Timeline widget displays merchandise events as a weekly calendar. Events for each vendor are displayed in a separate row.
Each type of event is marked with a separate color. You can see the following events:
- Order Reminder: Date and time when an order for the vendor must be created.
- Manual Order: Order created manually.
- Auto Order: Order automatically generated by CStoreOffice®.
- Delivery: Date and time when an order from the vendor must be delivered.
- Invoice: Date when an invoice for the vendor is issued.
Working with Vendors and Orders
While reviewing the events, you may want to edit data for a vendor or order. You can perform the following activities directly from the dashboard:
Editing, Confirming or Deleting Orders
You can edit settings for a specific order directly from the dashboard. For example, you may want to increase the ordering quantity for some item in case a great amount of this item has been sold after the order was created.
To edit the order settings:
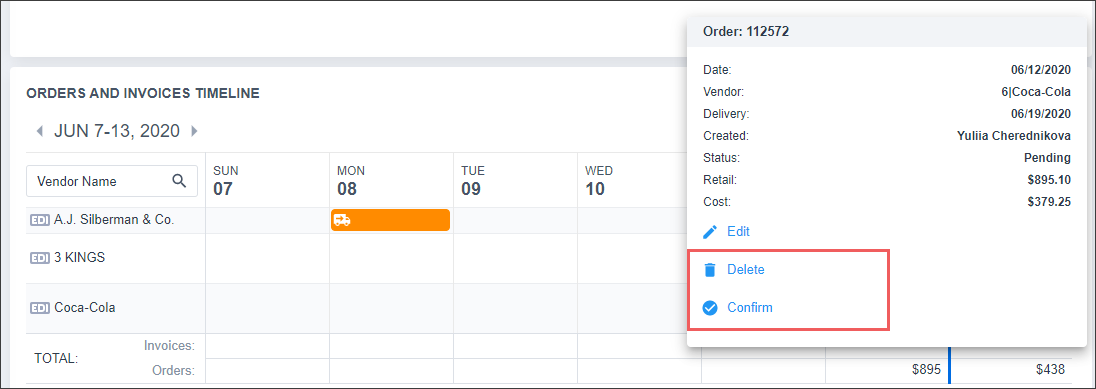
- In the Orders and Invoices Schedule or Orders and Invoices Timeline widget, in the events list, click the order.
- In the pop-up window, click Edit.
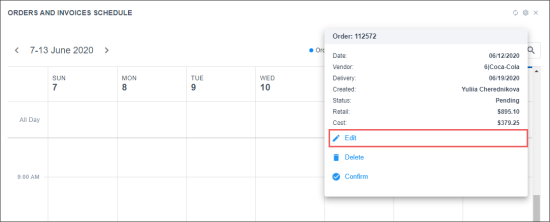
Result: The Purchase Order form with the order details is displayed.
- Edit the order settings as required. For details, see Viewing and Adjusting the Order's Items.

In a similar manner, you can confirm an order or delete it directly from the dashboard. To do this, click the order and in the pop-up window, select the necessary command.
By default, the widget displays events for the top 15 vendors. The top vendors are vendors having the greatest values in the Total Cost field in invoices for the location during the last 90 days. The vendors in the list are sorted from largest to smallest cost amount.
You can select what vendors and events you want to display in the widget and change the reporting period. For details, see Selecting Data to Display in the Widget.
Editing Vendor Settings
You can edit settings for a specific vendor directly from the dashboard. For example, you may want to change the orders and delivery schedule for the vendor.
To edit vendor settings:
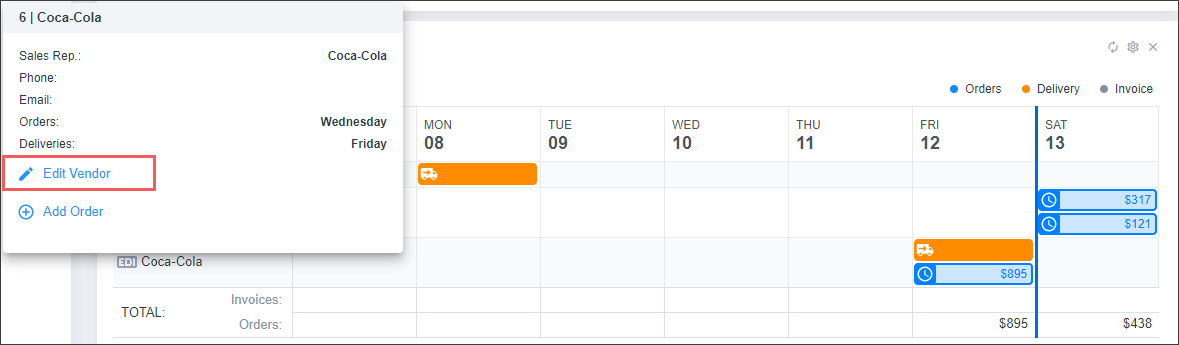
- In the Orders and Invoices Timeline widget, in the vendors list, click the vendor.
- In the pop-up window, click Edit Vendor.

Result: The form with vendor settings is displayed.
- Edit the vendor settings as required. For details, see Setting Up Merchandise Vendors.