The Merchandise Orders report is used to order the items needed for a store.
The number of items to order is automatically calculated by CStoreOffice® according to the following formula:
Items to Order = Sales Forecast + Minimum Stock - On Hand Quantity
To generate the Merchandise Orders report in CStoreOffice®:
- Set up the order settings.
For details, see Setting Up the Merchandise Order Settings. - View the order items and adjust them, if needed.
For details, see Viewing and Adjusting the Order's Items. - Send your order to the vendor.
For details, see Sending Order to the Vendor.
Setting Up the Merchandise Order Settings
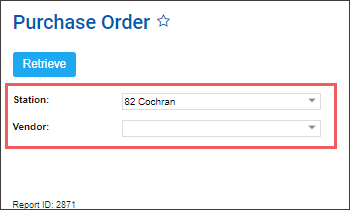
in the Purchase Order form:
- In the Station list, select a station.
- In the Vendor list, select a vendor.
- View and edit, if necessary, the following order data:
- Order number generated automatically by CStoreOffice®.
- Delivery Date and time in the from: and to: fields.
- Next Delivery Date and time in the from: and to: fields.

The delivery date and time and next delivery date and time settings are configured at Vendor Ordering Settings.
- Use the Include item groups dropdown to select which items are included in the report. The report data is filtered according to the tags assigned to the selected items.
To select tags by which the report data must be filtered, expand the tags tree and select the check boxes next to the necessary tags. You can filter the report data by root tags and tags of the lower level in the tags hierarchy. You can also create a combined filter by selecting different root and child tags. - Configure the following settings for the order items, if necessary:
- Order only items with cost advantage: Select this option, to order only items that have been sold within the last month and which are included into the invoices within the last month.
- Exclude items with no retail (supplies): Select this option, to exclude from the order the items with the retail value which is equal to zero.
- Select one of the following options, to define the way how to display the items in the order form:
- Show only items needed to order: The system suggests to order only the items which have the Items to Order value which is equal to or greater than 50 per cent of items in the smallest package. The Items to Order value for an item is calculated using the formula: Items to Order = Sales Forecast + Minimum Stock - On Hand Quantity.
- Also show items not needed to be ordered: The system suggests to order the items according to the rule described above but for the items which have the Items to Order value which is equal to or greater than 0 per cent of items in the smallest package.
- Show all active items for this vendor: All active items of the selected vendor are suggested to be ordered despite the Items to Order value which is described above.
- Order company bestsellers up to so many per category: If you need to view the best sellers in the order form, select how many such items per category should be displayed:
- 10
- 20
- 50
- 100
- 150
- 200
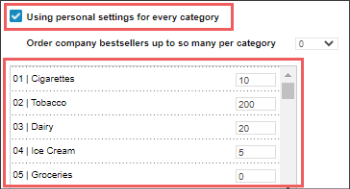
- Using personal settings for every category: If you need to display a certain amount of best sellers for each category, select this option and specify the amount of best sellers for each category in a separate list.
- Subtotal by Item Tag: If you need to group the items in the order by a certain tag, select it from the list.
If you need to view only best sellers, the Show only items needed to order option should be also selected. Otherwise, if the Also show items not needed to be ordered option is selected, all vendor's items, including best sellers, will be displayed. In this case, best sellers will have the BS mark highlighted in green.

- At the top left of the report form, click Generate.
Viewing and Adjusting the Order's Items
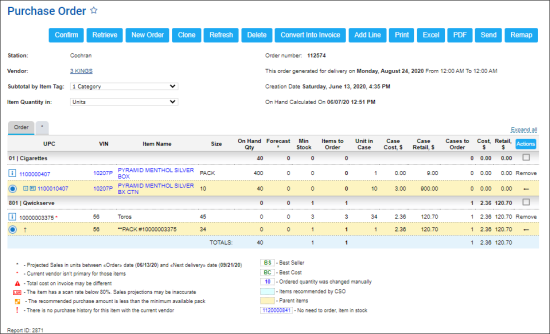
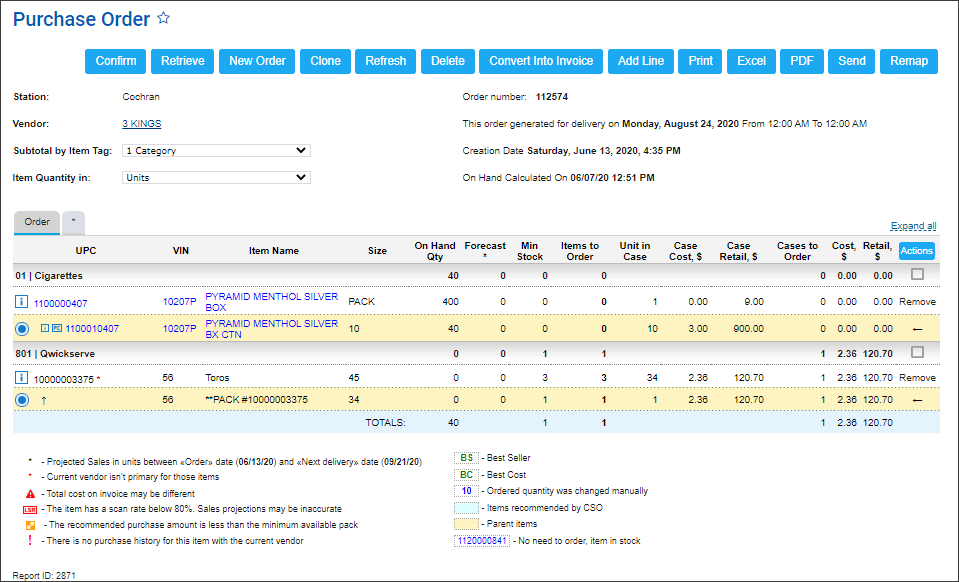
In the generated order, you can view the following order data for each item included into the order:
- UPC
- VIN
- Item Name
- Size
- On Hand Qty
- Forecast
- Min Stock
- Items to Order
- Unit in Case
- Case Cost
- Case Retail
- Cases to Order
- Cost
- Retail
To edit the order items, you can perform any of the following actions:
- To view the detailed information on the order items, click the name of the desired category or click Expand All.
- To edit the on hand quantity for the item, in the On Hand Qty column, click the current value for the item, enter new value, and then click any other order place.
- To edit the minimum stock number for the item, in the Min Stock column, click the current value for the item, enter the new value, and then click any other order place.
- To edit the number of items to order, in the Items to Order column, click the current value for the item, enter the new value, and then click any other order place.
- To remove the item that is not to be ordered, in the Actions column, click Remove and then confirm the removal.
- To add an item to the order, click Add Line, search an item by UPC-A, and then click Add.
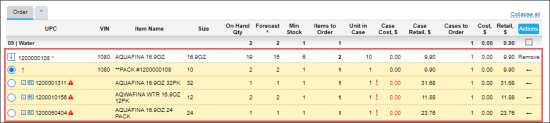
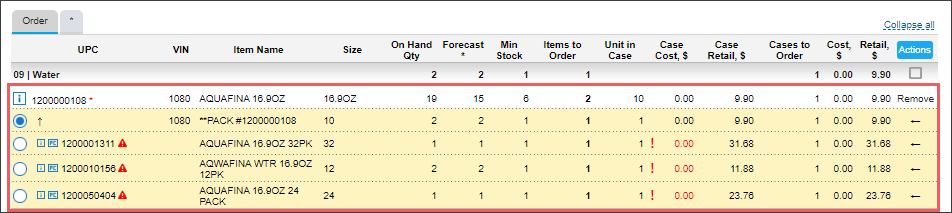
- To choose the best package size you need, before completing the order, review all the items in the order form suggested by the system, and select the package that suits your best:
- At the top of the list of suggested items, the system will display the most suitable package from the current vendor.
- Lower in the list, the items from the same vendor with other available packages are displayed.
- At the end of the list, the items with the suitable packages but from other vendors are displayed. They are marked with the red exclamation mark.
- To create an invoice for the order, click Convert Into Invoice.
- To create a copy of the order, click the Clone button. A new order in the Pending status is created. The cloned order will have the same items and settings, whereas the On Hand Qty, Forecast, Min Stock, and Items to Order values for each item in the order will be recalculated in accordance with the current system data.
- To make sure the On Hand Qty, Forecast, Min Stock, and/or Items to Order values for all items in the order are up-to-date and recalculate them, if needed, click the Refresh button.
- To export the order to vendor, click Send. The Send button is disabled in case the vendor's export settings are not configured. For details, see Setting Up Vendors.
- To make current vendor the primary vendor for the items added to the order, click the Remap button.
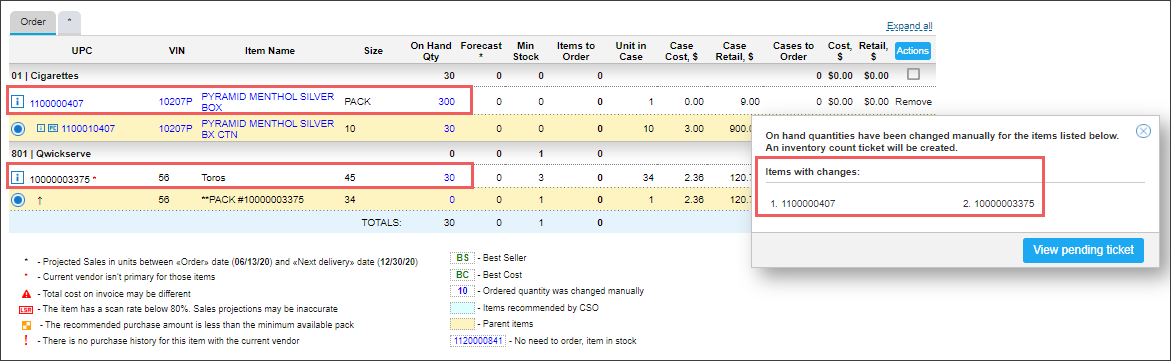
If the On Hand Qty value has been changed manually for the order, an inventory count ticket is then created automatically during the order confirmation process. For details, see Sending Order to the Vendor.
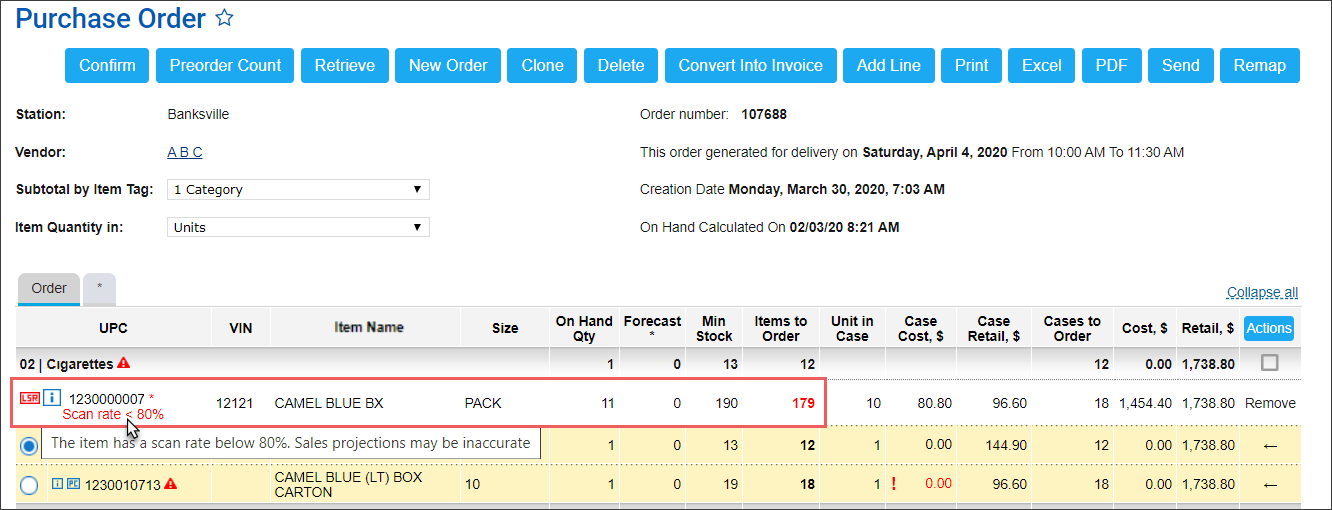
If the Items to Order value is highlighted in red and the system notifies you about the item's scan rate which is lower than 80%, you will need to enter the Items to Order value manually for such item.
The Refresh button is displayed to the right of the Clone button if the order is created today and the mentioned item's settings have been changed recently.
If the Min Stock value has been changes manually by the user, the system does not recalculate it during 21 days.
Please note that the Remap button is available only to users with the Owner, Executive, and Supervisor roles.
Sending Order to the Vendor
To send your order to the vendor:
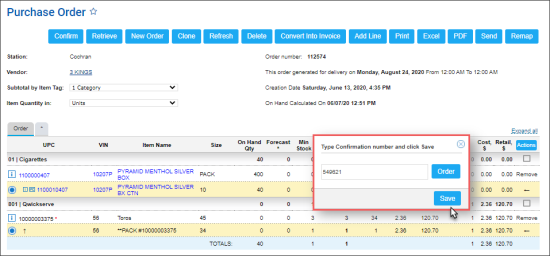
- Click the Confirm button.
- Do either of the following:
- Enter the order confirmation number manually.
- Click the Order button to generate the confirmation number automatically.
- Click Save.
If the On Hand Qty value was changed for any order's item, an inventory count ticket will be created automatically for such items. The system notifies for which items the inventory count tickets are created. Click View pending ticket, to open the Itemized Inventory: Pending Tickets form. For details, see Itemized Inventory.

- Click Send to vendor button above the order.