


With this report, you can set up the data export to comply with Altria Group Distribution Company (AGDC) Digital Trade Program Tier 3 on a regular basis.
Before You Begin
Before you start configuring the report for your locations, make sure they have an active Go Loyalty subscription.
If a location does not have an active Go Loyalty subscription, such location is disabled in the report and cannot be configured.
If the location's Go Loyalty subscription has been expired, the report's data is not sent for this location.
For collecting and sending your data files, the Altria Group Distribution Company cooperates with the third-party client - IRI. Before starting to set up the data export settings, make sure your CStoreOffice® account settings are configured properly and data files can be collected and sent from CStoreOffice® to IRI.
If you have not already filled out a Scan Data Discovery form, please choose the form that best fits your company structure:
- Altria One account number for entire company, follow this link or scan QR code below:

- Altria One account number for each location or a combination of locations, follow this link or scan QR code below:


Opening the Report
You can find the report at Reports > Accounting > Export Data > Activity Log Metrics (Altria Tier3).
For more information, see Viewing Reports.
Setting Up the Report's Export
You can set up the data export with the Activity Log Metrics (Altria Tier3) report in the following two ways:
- Quick Report's Export Setup: Quick and easy export setup in a few steps with the default report settings.
- Connectivity Check: Test whether the system can actually access the target FTP folder using the provided credentials.
- Advanced Report's Export Setup: Complete export setup with customization of the default report settings.
To quickly set up the data export using the default report's settings:
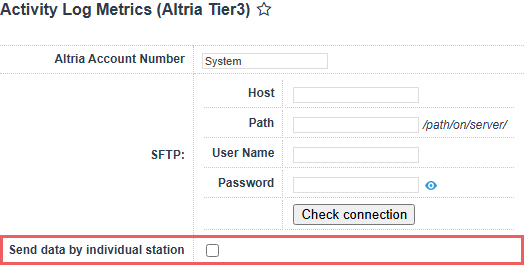
- Specify the 5-digit account (company / head office) number provided by the Altria representatives.
- Specify the data export settings for the whole account (all locations at once) or for each location separately in either of the following ways:
- For the whole account:
- Make sure that the Send data by individual station option is not selected. If not, clear it.
- In the SFTP group of fields, specify the host, directory on the host, and credentials received from Altria for the account.

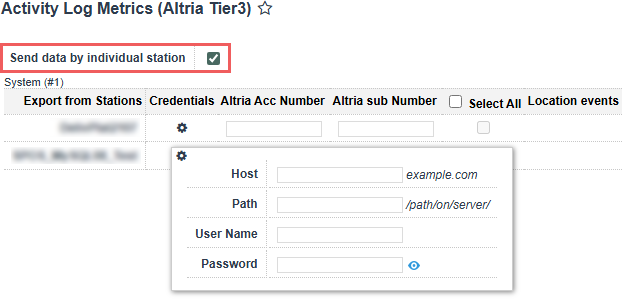
- For each location separately:
- Make sure that the Send data by individual station option is selected. If not, select it.
- In the Credentials column, click the settings icon for the location which settings you want to configure.
- In the location's credentials window, specify the host, directory on the host, and credentials received from Altria for the specific location.
- In the Altria Acc Number field, for each location enabled in the locations list, specify the 5-digit account number (company / head office) provided by the Altria representatives.
- In the Altria Sub Number field, for each location enabled in the locations list, specify the RCN (6 digits) provided by the Altria representatives for the specific location.
- Repeat two previous steps for each location you need.

By selecting the Send data by individual station option, you are telling the report that you have separate account number for Altria and that you have to send the data per station not as one whole company.
- At the top left of the report form, click Save.
To check that the default report settings are preconfigured properly, set the Advanced Mode toggle into the On position. For more information on how to customize the default report setting, see Advanced Export Setup.
Before the report export is configured and scheduled, it may be wise to check the correctness of connection settings. This will help you proactively troubleshoot the most common export problems that may be related to invalid credentials, insufficient permissions or typo in the domain or path where the report will be exported. The connectivity check can be performed at either the account level or for each station individually:
- Fill in SFTP settings.
- Under SFTP settings, click the Check connection button.
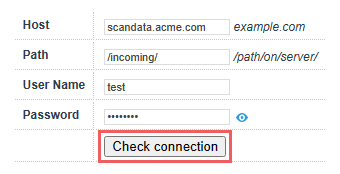

CStoreOffice® will try to establish the connection to the host using the provided credentials. If successful, "Connected" message is displayed. Otherwise, you will get one of the following errors:
| Message | Reason | Troubleshooting |
|---|---|---|
|
Unable to establish the connection. The server is unreachable. |
Invalid host name or the host is down. |
Verify the value in the Host field. If it is valid, contact the scan data help desk. |
|
Access denied because username and/or password is invalid. |
Invalid login, bad password or unsupported user. |
Verify the values in User Name and Password fields. Click the small eye icon next to the Password field to show the password. |
|
The requested path was rejected by the server. |
Invalid or missing path. |
Verify the value in the Path field. If it is valid, contact the scan data help desk. |
|
Destination folder access denied. |
You are not allowed to access the provided path on the host. |
Contact the scan data help desk. |
The connectivity check may take a while. However, you can click the Check connection button and continue configuring the form export.
To set up the data export in the advanced mode by customizing the default report's default settings:
- Set the Advanced Mode toggle into the On position.
- In the Export error notifications email field, enter your own email to receive notifications about the export errors.
- In the Number of resubmission retries field, leave the default value. It specifies the number of attempts that CStoreOffice® must make to send the report to the destination. After the last failed attempt, CStoreOffice® sends an email notification with the error description to the system administrator. For more details, see File Sending Control.
- In the Waiting in minutes for repeat field, leave the default value in 30 minutes. It specifies the time interval between attempts to send the report to the destination. If CStoreOffice® fails to send the report for some reason, it waits for the specified period of time and then makes a new attempt.
- In the Automatic File Sending fields (available for individual stations), make sure the default period (1 month) is defined.
- At the top left of the report form, click Save.
Data Export Control
To control whether the report is exported successfully, you can perform the following actions:
- Try sending the report ahead of time.
- Check if the required reports are generated and sent successfully.
Try sending the report ahead of time
To make sure that the export settings are set up correctly, you may export the report data ahead of the schedule. Do the following:
- Go to the top of the report form and set the sending date range. You can take the most recent data range available.
- Click the Download button, extract the report file from archive and check its data.
- Export the report data ahead of the schedule. Click the Send button and wait until the report data are exported. When successful 'Done' notification is displayed, it means your report data are exported successfully.

File Sending Control
CStoreOffice® allows you to control if the required reports are generated and sent successfully to the destination by schedule. To do this, CStoreOffice® introduces a special service—File Sending Control—that is responsible for the following activities:
When the report is to be generated by schedule, CStoreOffice® launches the File Sending Control service. The service performs the following actions:
- The service checks if data for report generation is available:
- If data for report generation is available, CStoreOffice® generates the report (see step 2).
- If data for report generation is not available, CStoreOffice® writes information about the error to the report log and sends an email notification with the error description to the system administrator.
- CStoreOffice® generates the report and attempts to send it to the specified destination:
- If the report is successfully sent, CStoreOffice® writes information about successful report delivery to the report log.
- If the report fails to be sent, CStoreOffice® waits for the period of time defined in the Waiting in minutes for repeat field and makes another attempt to send the report. CStoreOffice® attempts to send the report for the number of times defined in the Number of resubmission retries field. If the last attempt fails, CStoreOffice® writes information about the last error to the report log and sends an email notification with the error description to the system administrator.
If the report could not be sent to the location five times due to the connection issues, the report sending is turned off automatically. The location's manager will receive an immediate e-mail with the details about the reasons of the report sending cancellation.
CStoreOffice® lets you check the report schedule and send missed reports to the destination. A report is considered missed if it was to be generated and sent at a specific time, but CStoreOffice® failed to do this for some reason. Such situation can occur, for example, if the software system was shut down for a long period of time.
To overcome such situations and make sure that reports are generated and sent to the destination by the defined schedule, CStoreOffice® leverages the report verification mechanism.
The report verification mechanism is launched every 15 minutes. The mechanism retrieves the date when the report was generated and sent for the last time and compares this date with the current date. Depending on the comparison results, CStoreOffice® can perform the following activities:
Case 1. Date of Latest Report is Earlier Than Current Date
If the date of the latest report is earlier than the current date (that is, the latest report was generated before the current date), CStoreOffice® calculates the date when the latest report was to be created. After that, CStoreOffice® compares the date of the latest report and the calculated date:
- If the date of the latest report and the calculated date match, CStoreOffice® considers that the report was successfully generated and sent and performs no additional activities.
- If the date of the latest report and the calculated date do not match, CStoreOffice® compares the calculated date and the current date:
- If the current date and the calculated date match, CStoreOffice® gets the time for report generation.
- If the current time is earlier than the time for report generation, CStoreOffice® performs no additional activities.
- If the current time is later or equal to the time for report generation, CStoreOffice® launches the report generation and sending task.
- If the current date and the calculated date do not match, CStoreOffice® considers that the report has missed its schedule and launches the report generation and sending task as of the calculated date.
Case 2. Date of Latest Report Matches Current Date
If the date of the latest report matches the current date, CStoreOffice® checks if the report is to be generated on the current day:
- If the report is to be generated on the current day, CStoreOffice® checks the time for report generation.
- If the current time is earlier than the time for report generation, CStoreOffice® performs no additional activities.
- If the current time is later or equal to the time for report generation, CStoreOffice® launches the report generation and sending task.
- If the report is not to be generated on the current day, CStoreOffice® performs no additional activities.
Location events
Messages about relevant events in the location appear in the Location events column.
The messages about these events may appear in this column:
- Successful report submission: shows submission date and time and which week the report was submitted for.
- Failed report submission: shows date and time when the issue occurred and which week the report was not submitted for. The following issues may occur:
- Connection issue: the system stopped report submissions because of connection issues.
- No data: appears in case if the data is absent for the station.
- User-initiated credential update: appears when the user updated the credentials for the location.
- Report delivery subscription expiration: a notification when the report delivery subscription expired.
Exported File Structure
The report exports the data in the pipe-separated (|) plain text file where a single action is written on a new line. The file does not include column headers.
As a control mechanism, the very first line in the Digital Data File MUST contain the following values separated by pipe delimiter:
- The total number of rows in a file. If that number does not match the file contents, the file may be rejected during submission.
- scandata@petrosoftinc.com
For example, 100| scandata@petrosoftinc.com.
If the data is sent for the entire account (Send data by individual station option is cleared), the system sends one consolidated submission for all selected stations. Otherwise, a separate submission per location is performed.
The file name follows this pattern: {account name / location name}_CampaignActivityLog_{date in MMYYYY format}.
Activity Log Field Format
| Length | Description | Example |
|---|---|---|
| 10 | RCN: a 6-digit ID unique in AGDC systems. Only one number is allowed. | 123456
|
| 8 |
Date of the activity, in |
20251201
|
| 20 | Start or end time, in 24-hour HH:MM:SS format. Use the same time for the same transaction. Do not use 00:00:00 unless it happened exactly at midnight. |
08:25:46
|
| 40 | Code for the specific digital ad/asset interacted with (see Ad ID Sourcing below). | SJ530USSTCApp32025
|
| 20 | Unique loyalty ID (US phone number). Must match the Loyalty ID used in Scan Data submissions. See Loyalty ID / Rewards Number Rules below for details and limitations. | 12345698768
|
| 20 | What happened. See Activity Types below for details. | Sent
|
| 20 | Channel of the interaction (app or push notification). | Push
|
| 50 | Promotion ID. Retailer-specific number representing the ATOC Offer/Ad Code in the retailer system. | 12345ND
|
| 2 | 2-letter state code of the location. | TX
|
| 1 | Y if the Loyalty ID completed EAIV on the retailer platform, N otherwise. |
Y
|
| n/a | Empty field reserved for future use. | n/a |
Ad ID Sourcing
| Asset / Offer type | Description | Example |
|---|---|---|
| ATOC-provided asset | Use the file name downloaded from the Digital Asset Library. | SJ530USSTCApp32025
|
| Push notification |
String in |
PMUSAPUSH325
|
Loyalty ID / Rewards Number Rules
- Must be a unique, unaltered customer-facing identifier (phone number).
- If a specific customer's phone number (Loyalty ID) is logged in the system more than 5 times in a single day, it violates the submission rules. This is typically done to prevent fraud (such as a clerk using their own number for every customer).
- Must match the Loyalty ID used in the Scan Data file.
Activity Types
-
• Sent: Push notification sent to Loyalty Customer.
-
• Delivered: Push notification delivered to Loyalty Customer.
-
• Opened: Loyalty Customer opened the notification.
-
• Click: Loyalty Customer clicked the offer message in app
-
• CTC (Click to Card, also: “claimed”, “added”): Loyalty Customer took action to add ATOC offer value to their Loyalty ID/Card (Tier 4 AGDC Digital Trade Program).
-
• LTC (Load to Card): System loaded offer value to the Loyalty ID/Card (Tier 4 AGDC Digital Trade Program).
-
• Bounced (or Skip): Loyalty Customer skipped the offer in app.
-
• Viewed (also: Access, adview, couponviewed, viewed): Loyalty Customer viewed the offer in app.
-
• NewRegistration: Member registered the ATOC offer to their Loyalty ID/Card (aka registered/saved) (Tier 4 AGDC Digital Trade Program)..
-
• Redeem: Member took action to add or redeem the ATOC offer to their Loyalty ID/Card (Tier 4 AGDC Digital Trade Program)..
Additional Actions
To view the export history, click View Log or click Activity Log Metrics (Altria Tier3) Export Log at the bottom of the page.
To leave the report interface and go to the home page, click Home.
For more information on additional report features, see Reports.


