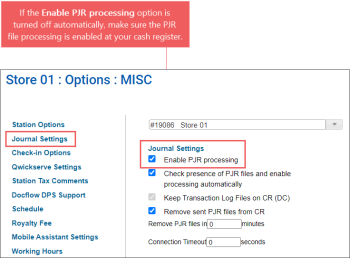
If you turned on the Enable PJR processing option and it was turned off automatically by CStoreOffice®, it means the PJR file processing is disabled at your cash register. To troubleshoot this issue:
- Enable the PJR file processing at your cash register.
- Turn on the Enable PJR processing option in the cash register settings.
For more information, see MISC > Journal Settings.
You have probably reached the limit of 10 000 loaded items which is set on the Passport cash register with the base feature bundle application. For the Enhanced Store feature bundle on the Passport cash register, there is no limit for loading or scanning items.
To fix the issue, try to apply any of the following solutions:
- Enable the Allow removal of inactive in PB/deleted items from CR option in the cash register settings and resend the full price book again. For more information on how to configure Passport CR settings in CStoreOffice®, see Gilbarco Passport Settings.
- Enable the Use PLU batch cache option in the cash register settings and wipe your CR out and then upload the price book from CStoreOffice®. For more information about the Wipe Out Price Book feature, see How does the Wipe Out Price Book feature work?
- Upgrade the base feature bundle application to the Enhanced Store one on your Passport CR.
When NCR POS is stuck and its Import Diagnostic panel displays the Stuck statuses, use the troubleshooting steps described below to make sure that all required settings in CStoreOffice® are configured properly for this cash register.
- Check the tax strategy configured for the cash register in CStoreOffice®.
- Open the Cash Register section in the location settings form.
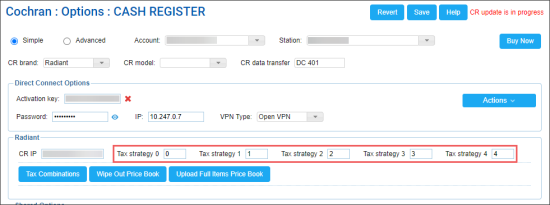
- In the Radiant subsection, check the tax strategy fields. Make sure there is no the 99 value in any of the Tax strategy fields. If so, change it as the 99 Tax strategy value is not compatible with the NCR cash registers.
- At the top of the Cash Register section, select Advanced to switch to the advanced settings of the cash register.
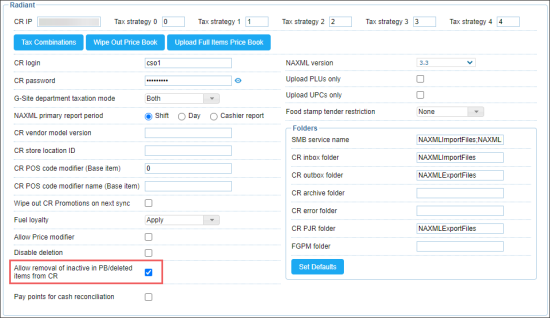
- Go to the Radiant subsection and make sure the option Allow removal of inactive in PB/deleted items from CR is selected.
- Go to the Shared Options subsection and make sure the following settings are configured:
For more information on how to open the Cash Register section, see Setting Up Locations. For more information on how set up the cash register settings, see Station Options: Cash Register.
- The Send upcoming price changes to POS option is selected.
- In the Accept shifts automatically list, select Direct Accept based in shift period.
- The Accept Price Book changes automatically option is selected.
- The by Items option is selected in the following options:
- Apply CR taxation
- Apply CR product codes
- Apply CR Radiant Item Type attribute
- The Enable sales location for Car Wash items option is selected.
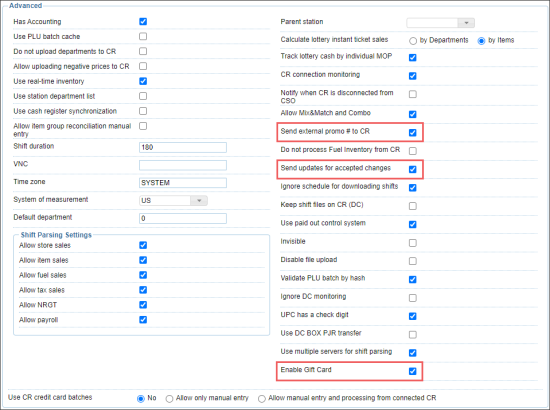
- Go to the Advanced subsection, and make sure the following settings are configured:
- The Send external promo # to CR option is selected.
- The Enable Gift Card option is selected.
- The Send updates for accepted changes option is selected.
For more information on how to configure other Radiant CR settings, see Radiant Settings.
Go to the location's shared options and make sure the CR is on and active option is selected for the location. If this option is not selected for the location, it means that the location is not active and not connected in CStoreOffice® and, therefore, it is not visible in the reports.
For more information about how to configure location's shared options, see Shared Options.
Possible reason: Items with the same UPCs were uploaded from the Mobile Assistant application with empty CR Department value.
Future recommendations: In case you are uploading items from the Mobile Assistant application, make sure the Allow to change existing items option is turned off in the station options in CStoreOffice®. For details, see Mobile Assistant Settings.
Troubleshooting steps:
- Don't click Accept Changes for now.
- Check if the items from the Delete Section you want to keep active have the CR department assigned.
- Open the CStoreOffice® page in a separate window.
- From the CStoreOffice® main page, go to Price Book > Items.
- Select the item you need to check and then click Edit or View.
- In the Item Setup form, check the CR Department field. If it is empty, select the relevant CR Department for the item and then click Save.
- Come back to the Cash Register Updates Manager form and close it.
- Open the Cash Register Updates Manager from again and check the Delete Items section.
For more information on how to work with the Cash Register Updates Manager, see Cash Register Updates Manager.
Result: The items with updated CR Department value should not be included into the Delete Items section.


