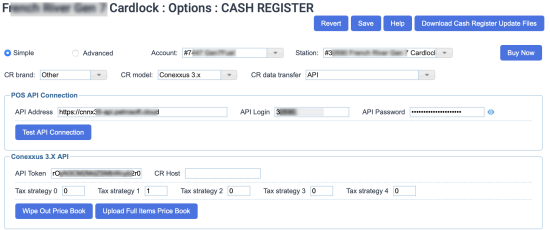
The CR transport settings section is displayed when you select the CR transport medium for the cash register.
The CR transport settings vary depending on the selected medium type:
The SmartPOS type of medium is available if you select SmartPOS as the cash register brand.
For this medium type, you do not need to configure any medium-specific settings. Only settings for the SmartPOS terminal must be configured. For details, see SmartPOS Settings.
If you select the POS Connector as the CR transport medium, you need to download the POS Connector installation file and install the software module on the back-office computer at the location.
To download and install the POS Connector:
- On the back-office computer where the module must be run, log in to CStoreOffice® and navigate to the cash register settings for the location.
- To the right of the CR data transfer list, click Download POS Con.
Result: The install.cmd file is downloaded to the default downloads location on the computer.
- Navigate to the default downloads location, find the downloaded file and double-click it to install the software module on the computer.
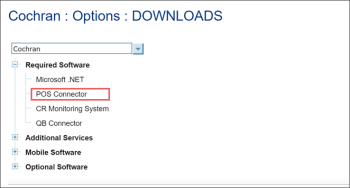
You can also download the installation file from the Downloads section in CStoreOffice®. To do this, in CStoreOffice®, navigate to Data Entry > Dashboard > Station Options > Downloads and under Required Software, click POS Connector.
To learn the step-by-step POS Connector installation procedure, see How to Install POS Connector.
If you select Direct Connect as the CR transport medium in the general cash register settings, the Direct Connect Options section is displayed.
The Direct Connect options are presented in the simple and advanced views of the Cash Register form:
- In the simple view, only basic Direct Connect options are displayed.
- In the advanced view, all Direct Connect options are displayed. For this reason, it is recommended that you configure the Direct Connect options using the advanced view.
You can view and configure the following Direct Connect options for the cash register:
General Settings
You can configure the following general settings for the DC Box:
- Serial Number: Specify the serial number of the DC Box set up at the location.
- Activation Key: This option is available for the DC-400 series model. Specify the activation key for the DC Box. The activation key is provided with the DC Box device and must be entered in the DC Box Activation wizard when you activate the DC Box at the location.
You can also generate a new activation key with CStoreOffice®. For details, see Generating the Activation Key with DC-400 series.
- Password: Specify the password to connect to the DC Box.
- IP: Specify the IP address of the DC Box.
- VPN Type: Select the type of VPN channel to be created to the cash register — PPTP or OpenVPN.
- Activate DC Box: Use this button to activate the DC Box manually. To do this, click the button and select the necessary activation options. At the last step of the wizard, copy the generation code and paste it in the DC web interface.
- Online Activation: Use this button to activate the DC Box online.
For DC-400 series devices, the Activate DC Box and Online Activation commands are available under the Actions button.
LAN Settings
In the DC LAN section, you can configure the LAN settings for the DC Box.
Select the mode in which the DC Box must operate and specify the network settings. The DC Box can operate in the following modes:
- Static: The DC Box is connected to the LAN with the static IP addressing scheme. In this mode, you must specify the following settings:
- IP: The DC Box IP address.
- Mask: The mask of the network where the DC Box is set up.
- Gateway: The IP address of the default gateway in the network where the DC Box is set up.
- CR Connection*: Enable this option if communication with the cash register must be carried out over the LAN interface.
- DHCP Client: The DC Box is connected to the LAN where the DHCP server is available and this server is used to assign IP addresses to devices in the network.
In this mode, you can enable the CR Connection* option if communication with the cash register must be carried out over the LAN.
- DHCP Server: The DC Box acts as the DHCP server in the network. The DC Box is responsible for assigning IP addresses to devices connected to it over the SIN interface. In this mode, you must specify the following settings:
- IP: The DC Box IP address.
- Mask: The mask of the network where the DC Box is set up.
- DHCP IP Range: The range of IP addresses that can be assigned to devices connected to the DC Box over the SIN interface.
- CR Connection*: Enable this option if communication with the cash register must be carried out over the LAN interface
If you have the network configuration for which the LAN Gateway should be ignored, in the Gateway field, enter the 0.0.0.0 value. It might be needed, for example, when CR IP is outside the local subnet.
Options marked with asterisk are available only for DC-400 series.
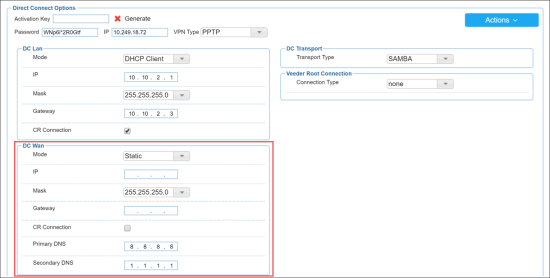
WAN Settings
In the DC WAN section, you can configure the WAN settings for the DC Box.
Select the mode in which the DC Box must operate and specify the network settings. The DC Box can operate in the following modes:
- Static: The DC Box is connected to the WAN with the static IP addressing scheme. In this mode, you must specify the following settings:
- IP: The DC Box IP address.
- Mask: The mask of the network where the DC Box is set up.
- Gateway: The IP address of the default gateway in the network where the DC Box is set up.
- CR Connection*: Enable this option if communication with the cash register must be carried out over the WAN interface.
- Primary DNS*: The IP address of the primary DNS server.
- Secondary DNS*: The IP address of the secondary DNS server.
- DHCP: The DC Box is connected to the WAN where the DHCP server is available. In this mode, you must specify the following settings:
- Primary DNS: The IP address of the primary DNS server.
- Secondary DNS: The IP address of the secondary DNS server.
Options marked with asterisk are available only for DC-400 series.
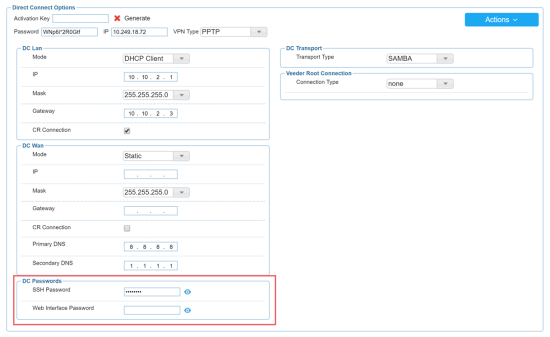
DC Passwords
In the DC Passwords section, you can specify the passwords to connect to the DC Box:
- SSH Password: Specify the password to connect to the DC Box over SSH.
- Web Interface Password*: Specify the password to connect to the DC Box web interface.
To view the saved or entered password, to the right of the password field, click the eye icon.
Options marked with asterisk are available only for DC-400 series.
Transport Settings
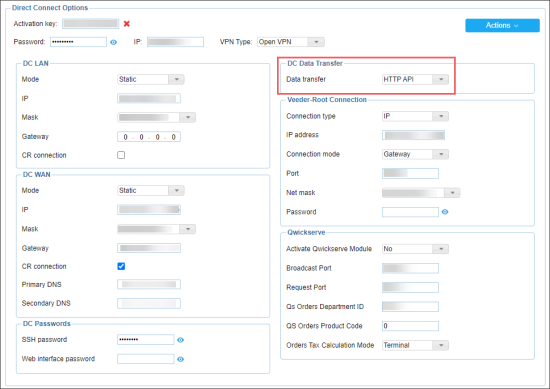
In the DC Data Transfer section, you can specify what transport protocol the DC Box must use for data exchange. You can select one of the following options:
- SFTP
- HTTP API: The transport for the cash registers that is used via the HTTP API protocol. This transport protocol is selected automatically for Verifone cash registers as it provides the system reliability even if there is a poor network quality.
If you select API as the CR transport medium in the general cash register settings, the POS Connection API section is displayed.
The API settings are presented in the simple and advanced views of the Cash Register form. You can view and configure the following settings:
- API Address: The IP address of the Cloud API web server. This address must be provided to the POS side.
- API Login: The user name to connect to the Cloud API web server.
- API Password: The password to connect to the Cloud API web server.
- Test Connection: Use this button to make sure a connection to the Cloud API web server can be established.
You can select Mako - Non DC only if you use the Verifone cash register and need to connect to Mako router installed at your locations. Mako connection is used without DC Box and, therefore, does not require DC Box to be installed.
If you select Mako - Non DC as the CR transport medium in the general cash register settings, the Mako connection section is displayed where the Mako IP address is displayed and stored.
You can select Acumera - Non DC only if you use the Gilbarco Passport cash register and need to connect to Acumera router installed at your locations. Acumera connection is used without DC Box and, therefore, does not require DC Box to be installed.
To connect your Gilbarco Passport CR to the Acumera router, in the CR data transfer list, select the Acumera Non DC option. In the AVID field, enter the Acumera client identifier provided by Acumera.
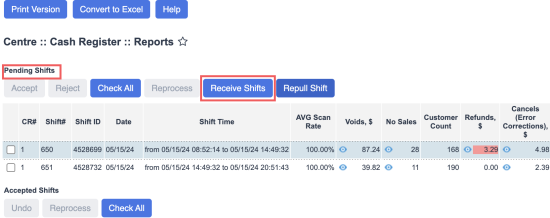
- By clicking Receive Shifts:

