


To start receiving invoices from an EDI vendor, you need configure settings for this EDI vendor in CStoreOffice®. Vendor settings must be configured at two levels:
In this section, you can find the information about the settings which are required specifically for EDI vendors. For configuring common vendor settings, refer to the Setting Up Merchandise Vendors section.
Configuring EDI Vendor Settings at the Account Level
To configure EDI vendor settings at the account level:
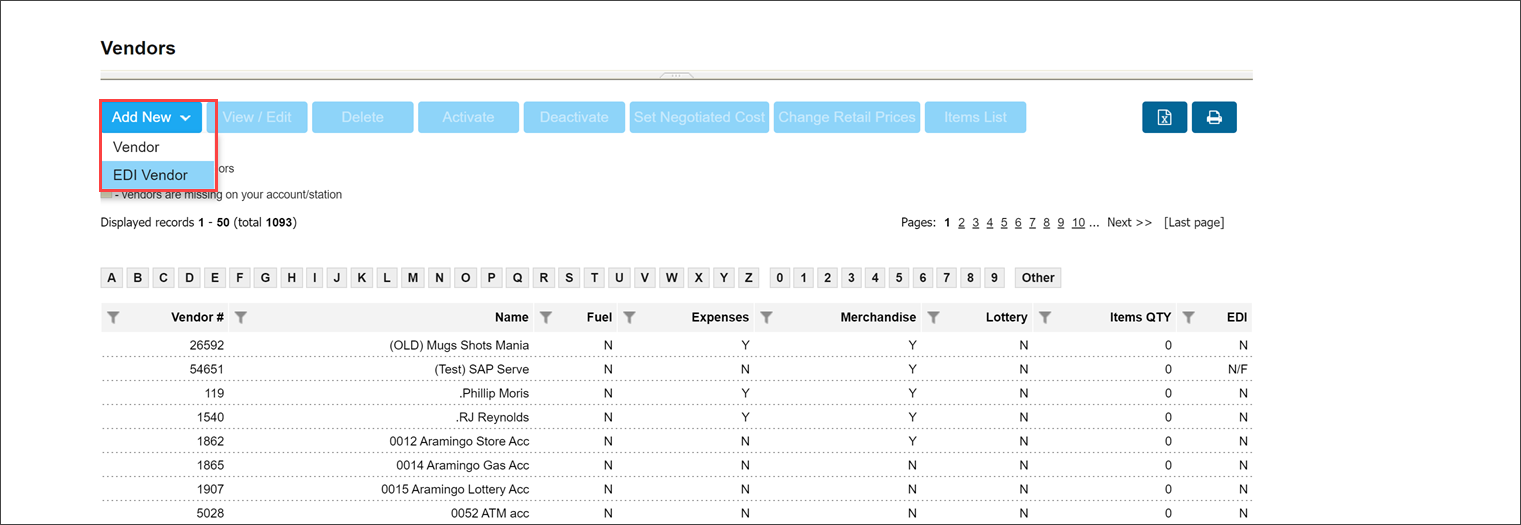
- Go to
- At the top of the vendors list, click Add New > EDI Vendor.

- In the Name field, start typing the vendor name. If you are adding a standard vendor, CStoreOffice® displays a list of suggestions. From the list, select the necessary vendor. Otherwise, enter the vendor name manually.
If you select a standard vendor, CStoreOffice® automatically populates the vendor details such as tax ID, address and vendor type in the General Info section. For a custom vendor, you need to specify the general information for the vendor manually.
- In the Account Number field, enter the account number assigned to you by the vendor.

- Select the Use Fintech option, if you need to apply the fintech method of payment to a vendor.
- In the Switch to EDI Vendor section, configure the following settings:
- Hide EDI alert message: Select this check box to hide alert messages when sending invoices via EDI during manual scanning of invoices for this vendor. The option is not enabled by default.
- Use vendor suggested units in case: Select this check box to take the Unit in Case value from vendor invoices. Otherwise, the Unit In Case value is taken from the account's price book.
- Use vendor suggested retails on new items: Select this check box to take the suggested retail prices for new Price Book items included in EDI invoices submitted by the vendor. If this option is not enabled, the retail prices for newly added items are taken from the Price Book in CStoreOffice®.
- Use parent-child on EDI invoices: Select this check box to take the suggested parent-child relations between the items included in EDI invoices submitted by the vendor.
- Create New Items in Standard PB: Select this check box to create new items in the standard Price Book automatically during EDI invoice parsing.
- Move scans to invalid status: Select this check box to mark scanned invoices as invalid if invoices are coming via EDI.
- Apply EDI suggested retail: Select one of the following conditions to assign the suggested retail prices included in EDI invoices submitted by the vendor:
- No Change: The retail price suggested by the vendor is not assigned to the item in the invoice. This option is enabled by default when the Apply EDI suggested retail option is enabled.
- If Greater: The retail price suggested by the vendor is assigned to the item in the invoice in case the vendor retail price is greater than the item retail price.
- If Different: The retail price suggested by the vendor is assigned to the item in the invoice in case the vendor retail price is greater or less than the item retail price.
- Apply to: The If Greater and If Different options can be applied to item categories in one of the following ways:
- Apply to all categories: Under Apply to, select All categories option.
- Apply to specific categories: Clear All categories under Apply to and move the required categories to the right box in the Categories list.
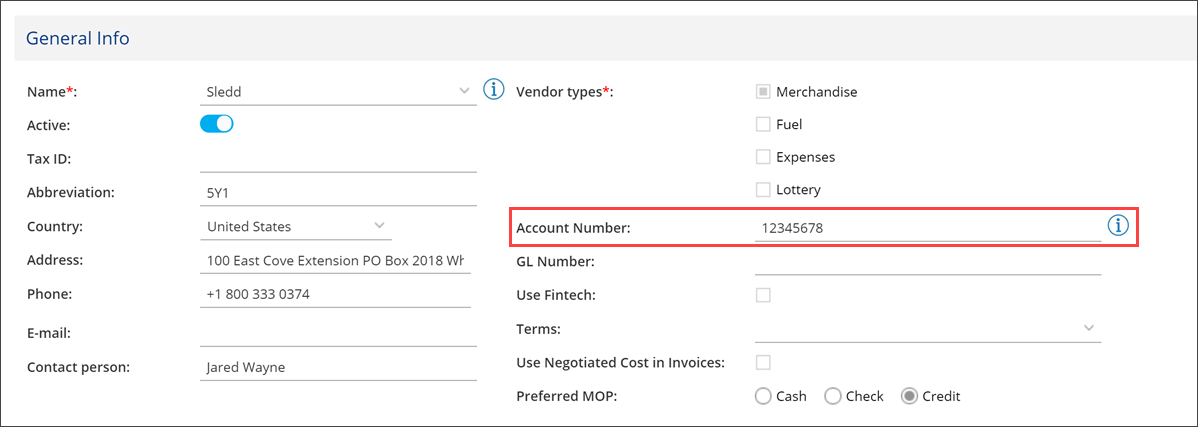
The fintech method of payment can be applied only to EDI vendor.

If the category name appears in red, it indicates that no price book items from the vendor exist under this category.
Even if you select these categories, the changes will not be saved because settings cannot be applied to empty categories. Only non-empty categories, which appear in black, will be saved in the right pane of the Categories list, while "red" categories will be moved back to the left pane.
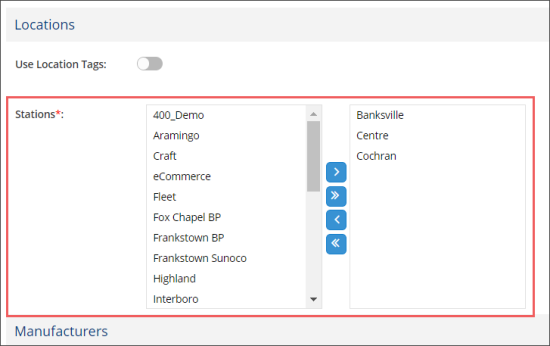
- In the Stations section, set up a list of locations for which the vendor must be active.
- At the top right of the form, click Save. You can now configure location-specific settings for the vendor.

Configuring EDI Vendor Settings at the Location Level
You need to configure vendor settings specific for every location.
To configure EDI vendor settings at the location level:
- At the top of the vendor form, from the Stations list, select the location for which you want to configure vendor settings.
- In the Station Account Number field, enter the account number assigned to this location by the vendor. You can find the account number in a vendor invoice.
- If you want to use the specified account number for orders, enable the Use for orders option and in the Order Settings section, specify the ordering settings. For details, see Configuring Vendor Ordering Settings.
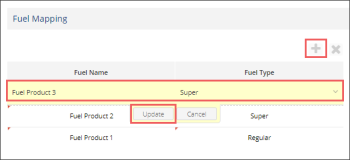
- Set up the fuel mapping, if needed:
- At the bottom of the page, go to the Fuel Mapping section.
- For each fuel type, you need to map:
- Click the plus icon.
- Enter the fuel name.
- Select the fuel type.
- Click Update.
If the EDI invoice received by CStoreOffice® contains a new fuel product which is not mapped with any fuel type yet, you will need to map it manually in this section and then reprocess the invoice. For more information, see Fuel EDI invoice displayed in the parser cannot be found among fuel invoices.
- To the right of the Starting Invoice Date field, click the calendar icon and select the date when the vendor must start sending invoices to CStoreOffice®.
The vendor can send invoices from previous dates as well.
- At the top right of the form, click Save.
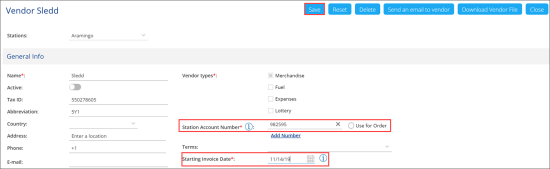
If you need to add several station account numbers, they should be separated by semicolons. For example: "982595;972173;894356".
The value from the Station Account Number field is added then to the Vendor Account field in the email to vendor. For details, see Sending a Request to Vendor.
The Fuel Mapping section is displayed only for the EDI vendors with the fuel type configured at the station level. For more information, see Setting up the Fuel Products.


