


Reports Scheduling
If you want to run reports periodically on a regular basis, you can schedule reports in CStoreOffice®.
When you schedule reports, you select one or more reports and define with what periodicity and at what level these reports must be generated. At the specified time, CStoreOffice® automatically runs the necessary reports and sends them at the email address specified in your account profile.
For more information about setting up the email for receiving system notifications, see Account Info or Edit Employee.
You can perform the following operations for reports scheduling:
- Create new report schedules
- Test report schedules
- Edit report schedules
- Disable report schedules
- Delete report schedules
- View scheduled reports
Creating New Report Schedules
A report schedule is a task to automatically run specific reports. In CStoreOffice®, you can create as many report schedules as you need.
To create a report schedule:
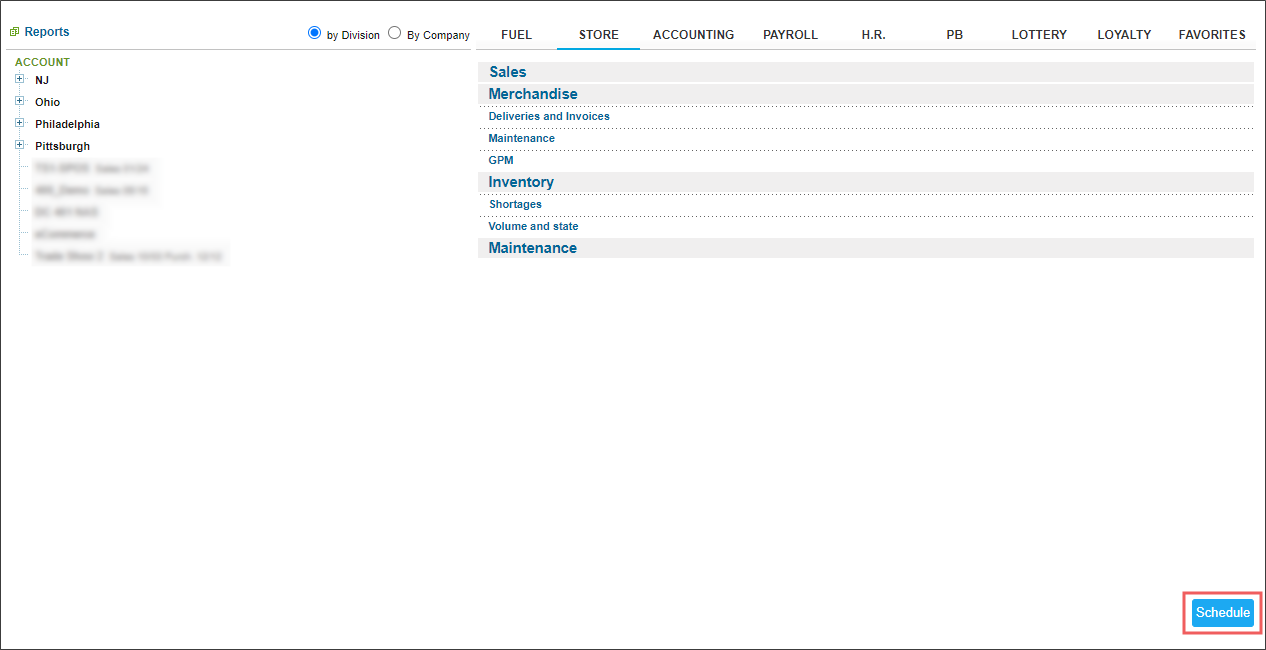
- From the home CStoreOffice® page, go to Reports.
- At the bottom right corner of the Reports page, click Schedule.
- In the Schedule Name field, enter the name of the schedule task.
- In the date fields, specify the start date of the report schedule. By default, the current date is selected.
- In the time field, select the time at which the report must be generated.
- To adjust the report time according to the Daylight Saving Time, select the DST check box.
- From the Reports period list, select the period for which the report must be generated:
- Yesterday
- Current Month
- Current Quarter
- Current Year
- Previous Month
- Previous Quarter
- Previous Year
- Last 12 Months
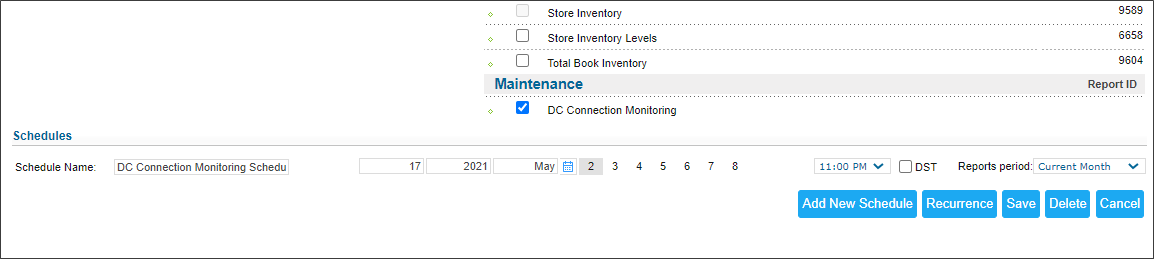
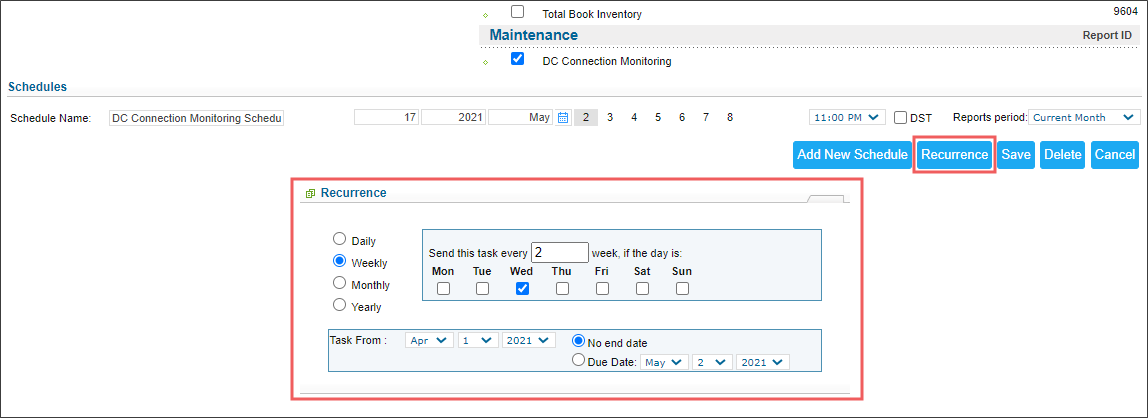
- Below the date and time fields, click Recurrence and specify the report schedule:
- Specify how often the report must be generated: Daily, Weekly, Monthly or Yearly.
- In the field to the right, specify the periodicity with which the report must be generated. For example, to run the report every two weeks, select Weekly and in the Send this task every <N> week field, specify 2. Use check boxes below this field to select the week day(s) on which the report generation task must be launched.
- In the Task From section, specify the lifetime settings for the schedule. If you want the schedule to be valid for an infinite period of time, select No end date. If you want the schedule to be finite, select Due Date and specify the end date of the schedule.
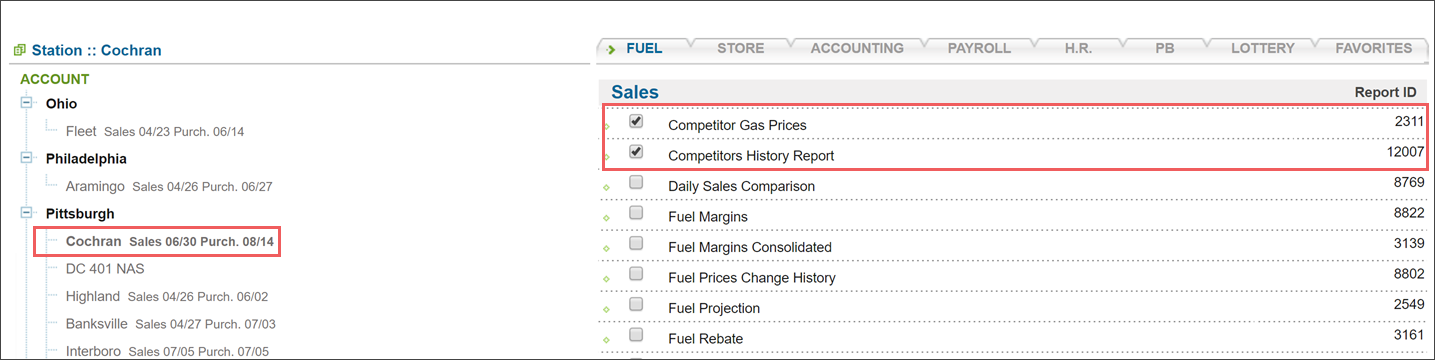
- Select the level for which the report(s) should be generated from the panel on the left side of the reports list.
- In the reports list, select check boxes next to one or more reports that you want to generate by the configured schedule. You can select reports on different tabs of the Reports page.

- At the bottom of the page, in the Schedules section, click Save to save the schedule changes.
Testing Report Schedules
After you set up a report schedule, you can test it to make sure the report generation task will work properly in future. Report schedule testing helps prevent situations when you do not receive important data due to incorrectly configured settings of the report schedule.
To test a report schedule:
- From the home CStoreOffice® page, go to Reports.
- At the bottom right corner of the Reports page, click Schedule.

- In the Schedules section, from the Other Schedules list, select the report schedule you want to test.

Result: The form with the selected report schedule settings opens.
- At the top right corner of the Schedules section, click Send a Test Report.


CStoreOffice® will send a test email message with reports generated by the schedule task to the email address specified the account settings.
To check or update the email address used for receiving the reports from CStoreOffice®, go to:
- Settings > Profile > Account Info > Email field
or
- Settings > General > Employees > select employee > Edit Employee > Email field.
If you do not receive email messages, check the following:
- Make sure the correct email address is specified in the Petrosoft account settings.
- Make sure email messages do not get to the junk email folder of your mail client.
Editing Report Schedules
You can edit a created report schedule at any time. For example, you may want to change the periodicity with which the report must be generated or add a new report to the schedule task.
To edit a report schedule:
- From the home CStoreOffice® page, go to Reports.
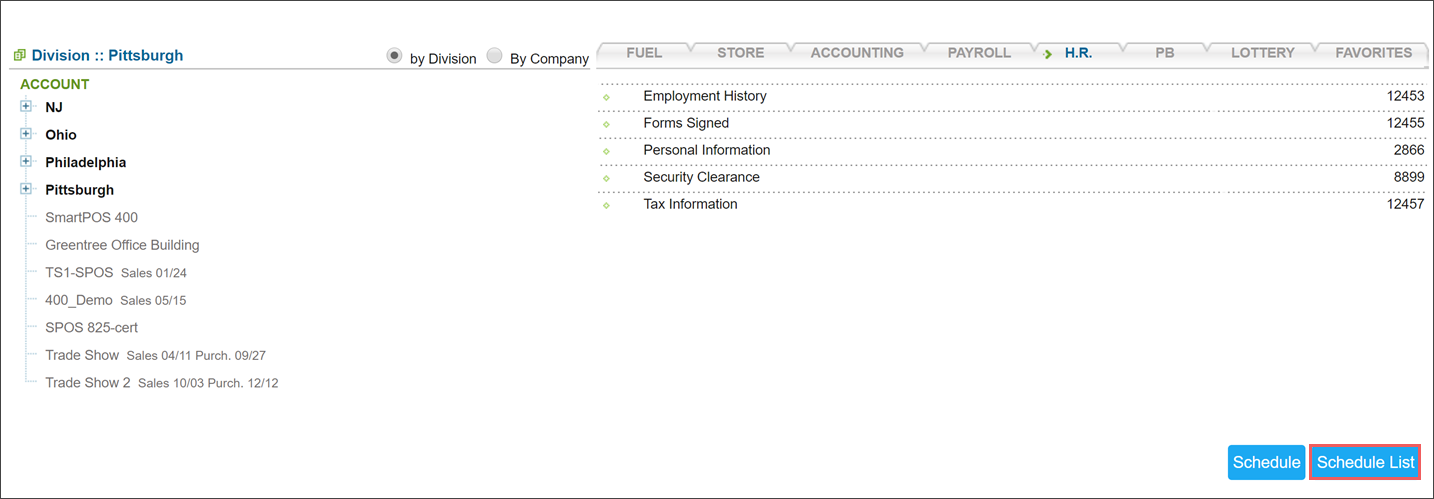
- At the bottom right corner of the Reports page, click Schedule List.

- At the bottom right corner of the report schedule, click Edit.

- Edit the schedule data as required and then click Save to save the changes.

Disabling Report Schedules
If you do not want to receive reports generated by a report schedule for some time, you can disable this schedule. When you disable a schedule, the schedule remains in the schedule list, but the report generation task is put on hold. You can enable this schedule at any time later.
To disable a report schedule:
- From the home CStoreOffice® page, go to Reports.
- At the bottom right corner of the Reports page, click Schedule List.
- Below the report schedule, select the Temporary disable check box.

- At the bottom right corner of the report schedule, click Save to save the changes.

Deleting Report Schedules
You can delete a report schedule, for example, if you do not want some reports to be generated automatically in future.
To delete a report schedule:
- From the home CStoreOffice® page, go to Reports.
- At the bottom right corner of the Reports page, click Schedule List.
- At the bottom right corner of the report schedule, click Delete.


Viewing Scheduled Reports
Reports generated by report schedules are sent at the email address specified in details of the Petrosoft Cloud account.
To check or update the email address used for receiving the reports from CStoreOffice®, go to:
- Settings > General > Employees > select employee > Edit Employee > Email field.
Each scheduled report is sent in a separate email.
- To view a scheduled report, open the Inbox folder of your mail client and check reports from the CStoreOffice® notification system.
- To stop receiving emails with a specific report, click the Unsubscribe from this report link in the email body or disable a corresponding report schedule. For more details, see Disabling Report Schedules.


