


With this report, you can set up the transaction-level scan data export to the JTI-Macdonald Corp. (later referred as JTI).
To start working with the report, use the following navigation tips:
- Before You Begin: Learn about the prerequisites you need to meet to be able to use the report.
- Opening the Report: Check how to find the report in the user interface.
- Setting Up the Report's Export: Learn how to set up the report's export in both quick and advanced modes.
- Quick Report's Export Setup
- Connectivity Check
- Advanced Report's Export Setup
- Data Export Control: Learn how to check that the export settings are configured properly and the report data is successfully sent.
- Submission Guidelines
- Exported File Structure: Learn the structure of the exported file.
- Additional Actions: Check what other actions you can perform with the report.
Before You Begin
Before you start configuring the Scan Data reports for your locations, make sure they have an active Scan Data subscription.
If a location does not have an active Scan Data subscription, such location is disabled in the report and cannot be configured.
If the location's Scan Data subscription has been expired, the report's data is not sent for this location.
Opening the Report
You can find the report at Reports > Accounting > Export Data > Tobacco Scan Data supporting JTI (Canada).
The report can be opened at all levels:
- Account
- Company
- Division
- Location (Station)
For more information, see Viewing Reports.
Setting Up the Report's Export
You can set up the data export with the Tobacco Scan Data supporting JTI (Canada) report in the following two ways:
- Quick Report's Export Setup: Quick and easy export setup in a few steps with the default report settings.
- Connectivity Check: Test whether the system can actually access the target FTP folder using the provided credentials.
- Advanced Report's Export Setup: Complete export setup with customization of the default report settings.
To quickly set up the data export using the default report's settings:
- Select CR Departments and Categories for the items to be included into the report. Mind the following conditions to be met:
- You can set up both or only one of the above parameters, CR Department or Category.
- When both, CR Departments and Categories, are set up, only the items matching both fields will be included in the report. See details in the example below.
- CR Department: 03|Drinks
- Category: 06|Juices
For example, the following parameters configured in the report:
The following logic will be applied to the items in this case:
| Item Parameters | Is included in the report? Y/N | ||
| Name | CR Department | Category | |
| Hot Water | 03|Drinks | 07|Drinks | N |
| Apple Juice with Ice | 02|Cold Drinks | 06|Juices | N |
| Orange Juice | 03|Drinks | 06|Juices | Y |
Based on the example above, only Orange Juice will be included into the report data, because it is the only item that matches both report parameters, CR Department and Category.
- CR Departments:
- Click Add department.
- Select the department from the list.
- Categories:
- Click Add category.
- Select the category from the list.
To delete the CR department, click the corresponding delete icon to the right of this CR department name.
To delete the category, click the corresponding delete icon to the right of this category name.
- Company Name (in JTI): Your company name in JTI system (letters and numbers only). Only applicable when data is sent for the whole account (Send data by individual station is disabled). This field is automatically filled with your CStoreOffice® account name, with special characters and spaces removed. You can manually adjust the value if needed.
- Specify the data export settings for the whole account (all locations at once) or for each location separately in either of the following ways:
- For the whole account:

- Clear the Send data by individual station option.
- In the SFTP group of fields, specify connection parameters for the server where files are sent. Contact your scan data provider for more information.
- For each location separately:
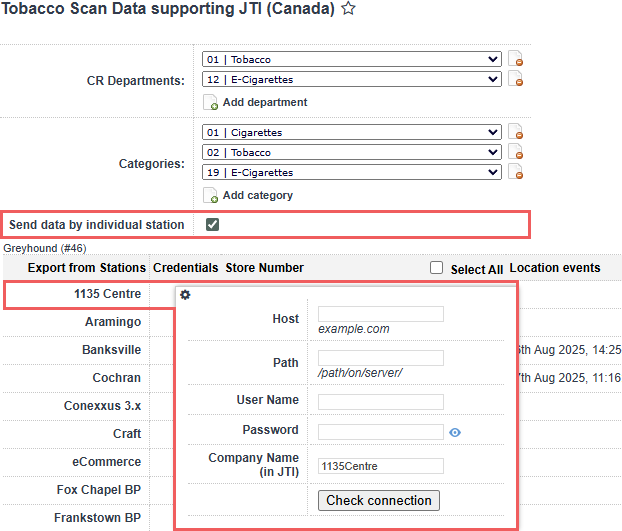
- Select the Send data by individual station option.
- In the Credentials column, click the settings icon for the location which settings you want to configure.
- Specify connection parameters for the server where files are sent. Contact your scan data provider for more information.
- Company Name (in JTI): Specify the name of the company in JTI system (letters and numbers only). This field is automatically filled with your CStoreOffice® business unit name, with special characters and spaces removed. You can manually adjust the value if needed.
- Repeat two previous steps for each location you need.
- In the Store Number field, specify the unique store ID in JTI system for each location enabled in the locations list.
- At the top left of the report form, click the Save button.
To check that the default report settings are preconfigured properly, set the Advanced Mode toggle into the On position. For more information on how to customize the default report setting, see Advanced Export Setup.
Before the report export is configured and scheduled, check the correctness of connection settings. This will help you proactively troubleshoot the most common export problems that may be related to invalid credentials, insufficient permissions or typo in the domain or path where the report will be exported. The connectivity check can be performed at either the account level or for each station individually:
- Fill in SFTP settings.
- Under SFTP settings, click the Check connection button.
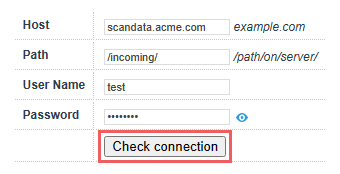

CStoreOffice® will try to establish the connection to the host using the provided credentials. If successful, "Connected" message is displayed. Otherwise, you will get one of the following errors:
| Message | Reason | Troubleshooting |
|---|---|---|
|
Unable to establish the connection. The server is unreachable. |
Invalid host name or the host is down. |
Verify the value in the Host field. If it is valid, contact the scan data help desk. |
|
Access denied because username and/or password is invalid. |
Invalid login, bad password or unsupported user. |
Verify the values in User Name and Password fields. Click the small eye icon next to the Password field to show the password. |
|
The requested path was rejected by the server. |
Invalid or missing path. |
Verify the value in the Path field. If it is valid, contact the scan data help desk. |
|
Destination folder access denied. |
You are not allowed to access the provided path on the host. |
Contact the scan data help desk. |
The connectivity check may take a while. However, you can click the Check connection button and continue configuring the form export.
To set up the data export in the advanced mode by customizing the default report's default settings:
- Set the Advanced Mode toggle into the On position.
- Select CR Departments and Categories for the items to be included into the report. Mind the following conditions to be met:
- You can set up both or only one of the above parameters, CR Department or Category.
- When both, CR Departments and Categories, are set up, only the items matching both fields will be included in the report. See details in the example below.
- CR Department: 03|Drinks
- Category: 06|Juices
For example, the following parameters configured in the report:
The following logic will be applied to the items in this case:
| Item Parameters | Is included in the report? Y/N | ||
| Name | CR Department | Category | |
| Hot Water | 03|Drinks | 07|Drinks | N |
| Apple Juice with Ice | 02|Cold Drinks | 06|Juices | N |
| Orange Juice | 03|Drinks | 06|Juices | Y |
Based on the example above, only Orange Juice will be included into the report data, because it is the only item that matches both report parameters, CR Department and Category.
- CR Departments:
- Click Add department.
- Select the department from the list.
- Categories:
- Click Add category.
- Select the category from the list.
To delete the CR department, click the corresponding delete icon to the right of this CR department name.
To delete the category, click the corresponding delete icon to the right of this category name.
- Company Name (in JTI): Your company name in JTI system (letters and numbers only). Only applicable when data is sent for the whole account (Send data by individual station is disabled). This field is automatically filled with your CStoreOffice® account name, with special characters and spaces removed. You can manually adjust the value if needed.
- In the Export error notifications email field, enter your own email to receive notifications about the export errors.
- If data is sent for the whole account (Send data by individual station is disabled), specify the connection parameters you have received from the scan data provider.
- In the Number of resubmission retries field, leave the default value. It specifies the number of attempts that CStoreOffice® must make to send the report to the destination. After the last failed attempt, CStoreOffice® sends an email notification with the error description to the system administrator. For more details, see File Sending Control.
- In the Waiting in minutes for repeat field, leave the default value in 30 minutes. It specifies the time interval between attempts to send the report to the destination. If CStoreOffice® fails to send the report for some reason, it waits for the specified period of time and then makes a new attempt.
- In the Report period >From and To fields, make sure the time period of the exported data is defined. To change it, contact your system administrator.
- If data is sent for each location separately (Send data by individual station is enabled):
- Select the Send data by individual station option.
- In the Credentials column, click the settings icon for the location which settings you want to configure.
- Specify connection parameters you have received from the scan data provider.
- Company Name (in JTI): Specify the name of the company in JTI system (letters and numbers only). This field is automatically filled with your CStoreOffice® business unit name, with special characters and spaces removed. You can manually adjust the value if needed.
- Repeat two previous steps for each location you need.
- In the Store Number field, specify the unique store ID in JTI system for each location enabled in the locations list.
- In the Automatic File Sending fields, make sure the default period is defined. To change this period, contact your system administrator. Make sure the day and time are set before Wednesday at 05:00 PM as it is required by third-parties.
- At the top left of the report form, click Save.
If you are accepting your shifts manually, make sure you have enough time to accept your shifts for weekend in Monday. Otherwise, your data will not have the appropriate ending day and will be rejected.
Data Export Control
To control whether the report is exported successfully, you can perform the following actions:
- Try sending the report ahead of time.
- Check if the required reports are generated and sent successfully.
Try sending the report ahead of time
To make sure that the export settings are set up correctly, you may export the report data ahead of the schedule. Do the following:
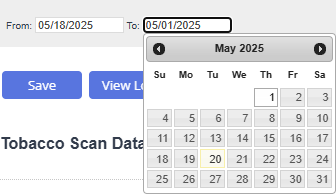
- Go to the top of the report form and set the sending date range. The recommended date range is from Sunday to Saturday. For example, you can take the most recent data range available.
- Make sure that its data is correct. Click the Download button, extract the report file from archive and check its data.
- Export the report data ahead of the schedule. Click the Send button and wait until the report data are exported. When successful 'Done' notification is displayed, it means your report data are exported successfully.

File Sending Control
CStoreOffice® allows you to control if the required reports are generated and sent successfully to the destination by schedule. To do this, CStoreOffice® introduces a special service—File Sending Control—that is responsible for the following activities:
When the report is to be generated by schedule, CStoreOffice® launches the File Sending Control service. The service performs the following actions:
- The service checks if data for report generation is available:
- If data for report generation is available, CStoreOffice® generates the report (see step 2).
- If data for report generation is not available, CStoreOffice® writes information about the error to the report log and sends an email notification with the error description to the system administrator.
- CStoreOffice® generates the report and attempts to send it to the specified destination:
- If the report is successfully sent, CStoreOffice® writes information about successful report delivery to the report log.
- If the report fails to be sent, CStoreOffice® waits for the period of time defined in the Waiting in minutes for repeat field and makes another attempt to send the report. CStoreOffice® attempts to send the report for the number of times defined in the Number of resubmission retries field. If the last attempt fails, CStoreOffice® writes information about the last error to the report log and sends an email notification with the error description to the system administrator.
If the report could not be sent to the location five times due to the connection issues, the report sending is turned off automatically. The location's manager will receive an immediate e-mail with the details about the reasons of the report sending cancellation.
CStoreOffice® lets you check the report schedule and send missed reports to the destination. A report is considered missed if it was to be generated and sent at a specific time, but CStoreOffice® failed to do this for some reason. Such situation can occur, for example, if the software system was shut down for a long period of time.
To overcome such situations and make sure that reports are generated and sent to the destination by the defined schedule, CStoreOffice® leverages the report verification mechanism.
The report verification mechanism is launched every 15 minutes. The mechanism retrieves the date when the report was generated and sent for the last time and compares this date with the current date. Depending on the comparison results, CStoreOffice® can perform the following activities:
Case 1. Date of Latest Report is Earlier Than Current Date
If the date of the latest report is earlier than the current date (that is, the latest report was generated before the current date), CStoreOffice® calculates the date when the latest report was to be created. After that, CStoreOffice® compares the date of the latest report and the calculated date:
- If the date of the latest report and the calculated date match, CStoreOffice® considers that the report was successfully generated and sent and performs no additional activities.
- If the date of the latest report and the calculated date do not match, CStoreOffice® compares the calculated date and the current date:
- If the current date and the calculated date match, CStoreOffice® gets the time for report generation.
- If the current time is earlier than the time for report generation, CStoreOffice® performs no additional activities.
- If the current time is later or equal to the time for report generation, CStoreOffice® launches the report generation and sending task.
- If the current date and the calculated date do not match, CStoreOffice® considers that the report has missed its schedule and launches the report generation and sending task as of the calculated date.
Case 2. Date of Latest Report Matches Current Date
If the date of the latest report matches the current date, CStoreOffice® checks if the report is to be generated on the current day:
- If the report is to be generated on the current day, CStoreOffice® checks the time for report generation.
- If the current time is earlier than the time for report generation, CStoreOffice® performs no additional activities.
- If the current time is later or equal to the time for report generation, CStoreOffice® launches the report generation and sending task.
- If the report is not to be generated on the current day, CStoreOffice® performs no additional activities.
Submission Guidelines
JTI supports weekly data submission schedules. Reports must be submitted no later than the agreed-upon day of the following week.
The first day of the reporting week is Monday and the last day is Sunday.
Exported File Structure
The report exports the data in the plain text file with the pipe ("|") separator. Leading zeros in fields are removed.
The file is named according to the following rule: <Week Ending Date (YYYYMMDD)>_<JTI Company Name>.csv (for example, 20240803_DonsConvenience.csv)
The first line of the file is a header row with names of all fields.
| Field | Length | Description | Example |
|---|---|---|---|
| Sales Date | 10 | The date representing the day of the sale in YYYY-MM-DD format. |
2024-07-30 |
| UPC | 14 |
The UPC (GTIN/EAN/PLU) code assigned to the SKU. GTIN must be provided as a 14 digit non-compressed right justified zero filled code with the check digit in the rightmost position. A pack of and a carton of the same cigarettes are considered two different SKU's/UPCs. |
61900000538 |
| SKU | 8 | This identifier is a code or number that uniquely identifies a SKU in your chain. It could be same value as the UPC Code. | ON01202 |
| Description | 40 | The description of the SKU / Product / UPC. | Rothmans King Size 25 ONT |
| Brand/Manufacturer | 20 | Brand/manufacturer of the product. | JTI |
| Store ID | 10 | The number assigned by the company to the store. | 101 |
| Store Name | 32 | The name of the store. | Tobacco Store |
| Address | 64 | The physical street address of the store. Multiple short address lines can be concatenated together. | 1 Main Street |
| City | 24 | The name of the city per Canadian postal definitions. | Toronto |
| Province | 2 | The province code in two character Canada Post abbreviation (for example, ON = Ontario). | ON |
| Postal Code | 7 | The postal code of the store. Postal code should be in the A1A 1A1 format. |
M4B 1B3 |
| Unit of Measure Name | 10 | The description of the SKU/UPC’s unit of measure. For example pack, carton, pouch, and the like. | Pack |
| Quantity | 10 | This should be the number of units sold of the stated Unit of Measure. For example if the UOM is in packs, then the Unit Sales should show the number of packs – and the related dollar amount. If the week’s sales for a product/UPC in a given store resulted in a net return quantity then this amount can have a negative value. | 10 |
| Sales Amount | 10 | Numeric with 2 decimal digits. This should be the total dollar value of units sold. | 89.99 |
Additional Actions
To view the export history, click View Log or click Tobacco Scan Data supporting JTI Export Log at the bottom of the page.
To leave the report interface and go to the home page, click Home.
To view the log of the last export, click Show/Hide Last Transmission log.
For more information on additional report features, see Reports.


