


This section describes the specifics of accessing and interpreting the QB Synchronization History report.
This report is permission-based. For accessing the report, make sure the Accounting.Export.QB Synchronization History permission is granted to your user. For more information, see Roles and Permissions Management.
Opening the Report
You can find the report at Accounting > Export Data > QB Synchronization History Report.
The report can be opened at all levels, except for the Division level.
For more information, see Viewing Reports.
Viewing the Report
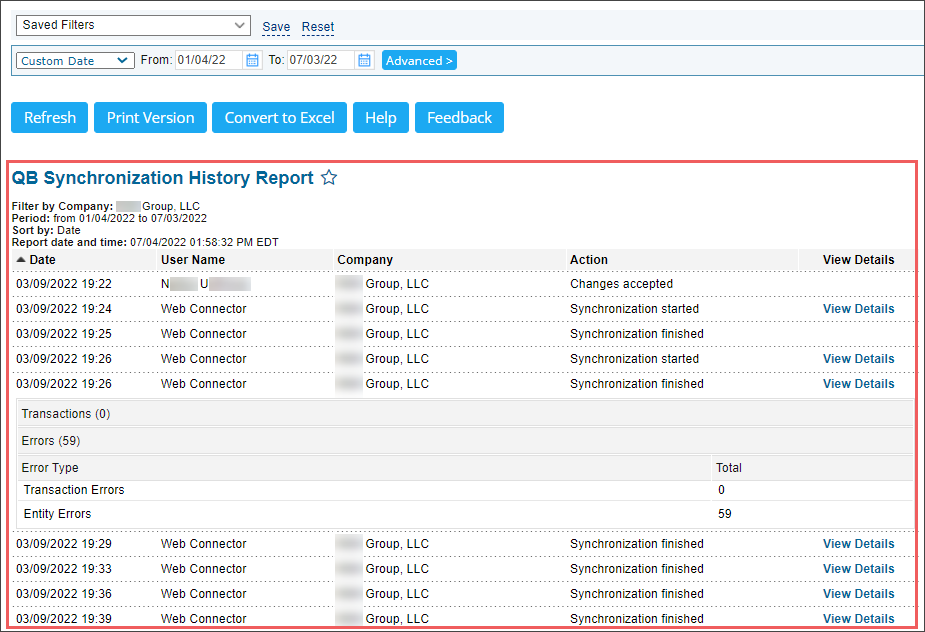
The QB Synchronization History report provides information on the history of the QB synchronization.
The report contains the following information:.
- Date: Date and time hen the action was performed.
- User Name: User who performed the QB synchronization,
- Company: Company for which the synchronization took place.
- Action: Action that took place. The following actions are tracked:
- Changes accepted
- Synchronization started
- Synchronization finished
- View Details: Click this link to expand the detailed information about the synchronized action, such as the number of transactions synchronized, number and type of errors occurred during this process.

Filtering and Sorting the Report Data
To get the exact information you need, you can apply filters to the report. To set up a filter, select one or more filtering options. Once the filter is set up, at the bottom of the filter section, click the Refresh button to display the report data by the filter criteria.
The report provides the following filtering and sorting options:
- Date: Select this filtering option and specify the period you are interested in, and then click Refresh. There are the following filtering periods available:
- Yesterday
- Current Month
- Current Quarter
- Current Year
- Last Month
- Last Quarter
- Last Year
- Filter by: Select one several filtering options you want, and then click[ Refresh. There are the following filtering options available:
- User Name
- Company
- Action
- Sort by: Select the order of the report columns you want to be displayed after the Date column. Select the Ascending or Descending option for the corresponding type of filtering. There are the following sorting options available:
- Priority 1. Select the column to be displayed right after the Date column.
- Priority 2. Select the column to be displayed after the first column.
- Priority 3. Select the column to be displayed after the second column.
Press CTRL, to select several items at a time.
Additional Actions
To view the specific synchronization details, click View Details.
To reload the form, click Refresh.
To print the report, click Print Version.
To open the report the Microsoft Excel document, click Convert to Excel.
To open the Petrosoft University Portal, click Help.
To create a ticket, click Feedback.


