


- Adding New Category
- Adding or Editing Category Description
- Editing Existing Category Name
- Activating/Deactivating Category
- Deleting Category
- Adding Image to Category
- Assigning/Unassigning Location to Category
Adding New Category
- Add a new category to the menu from the menu top level.
- Add a new category to the menu category from the category.
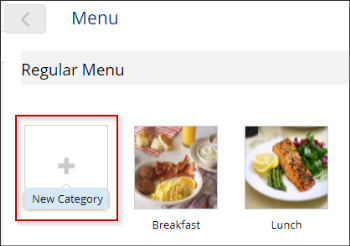
Adding Category to Menu
To add a new category to the menu, follow the steps:
- Double-click this menu, and then click the plus sign > New Category.
-
Enter the category name, and then press ENTER on your keyboard.

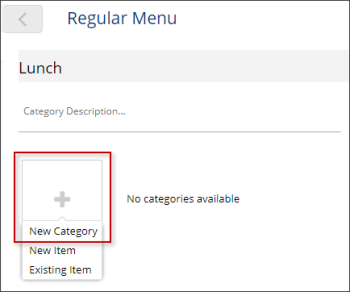
Adding Category to Existing Category
To add a new category to the existing menu category, follow the steps:
- Double-click the menu, double-click the category, and then click the plus sign > New Category.
-
Enter the category name, and then press ENTER on your keyboard.

Adding or Editing Category Description
To add or edit the category description, double-click the category and then edit the Category Description field.
The category description is then displayed at the customer's interface in the QwickServe terminal.
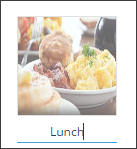
Editing Existing Category Name
To rename the existing category, click the current category name and enter the new one.
Activating/Deactivating Category
You can activate or deactivate a category for all stations on the account or for each station separately.
To activate or deactivate a category for one or several stations, follow the steps:
- Click the category you want to activate or deactivate.
- At the right of the category, click the activate/deactivate sign.

- In the locations list opened for the category, select one or several locations.
- In the Active column, click the Active/Inactive sign.
- (Optional) In case several locations are selected, at the bottom right of the selected locations, click the Update button.
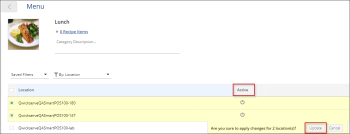
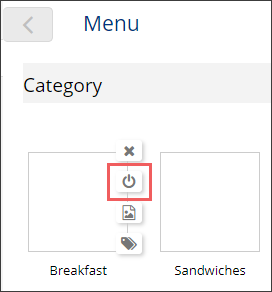

The activated category is available and deactivated category is not visible within the customer's interface in the QwickServe terminal.
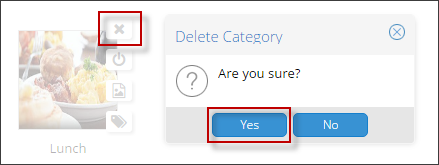
Deleting Category
To delete the category, click it, click the cross sign, and then confirm the deletion by clicking Yes.
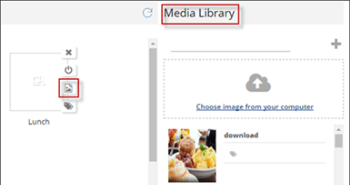
Adding Image to Category
To add an image to a category, follow the steps:
- Click this category, and then click the icon for adding the image.
- Set the category image. Do the following:
- Click the space for the image.
- At the right of the space for the image, click the image icon.
- Select the image from the Media Library list. For more information on Media Library, see Working with Media Library.
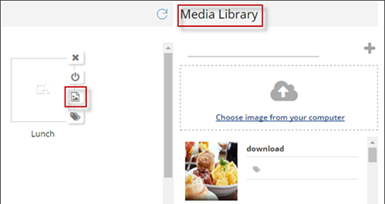
To edit or delete the category image, click this category, click the sign for adding the image, and then click Change or Delete.
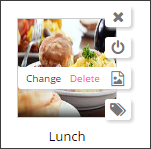
Once deleted, the image is technically unassigned from the category and is still available in the media library.
Assigning/Unassigning Location to Category
Locations feature is designed for addressing different groups of categories or recipe items between the QwickServe Order Manager devices or kitchen printers, which saves time and makes the kitchen processes more flexible. For more information, see QwickServe Locations.


