This guide explains how to install and connect the Eagle Eye E360 to work with Petrosoft Loss Prevention Analytics.
Prerequisites
Before starting installation, make sure all required components are purchased and installed.
- DC Box
A Direct Connect device must be installed on site. You can purchase it through the Petrosoft Customer Portal or requested directly from our Sales Department. - Loss Prevention Analytics subscription
An active Loss Prevention Analytics module is required. You can purchase it through the Petrosoft Customer Portal or requested directly from our Sales Department. - Network-attached storage (NAS)
To record video, you need a NAS device. Make sure your NAS is set up and connected to your network before you begin. For optimal compatibility, we recommend using Buffalo NAS devices.
Installation
You will be up and running in no time. Our installation is fully automated and designed to be as simple as possible. Follow the steps below to complete your setup:
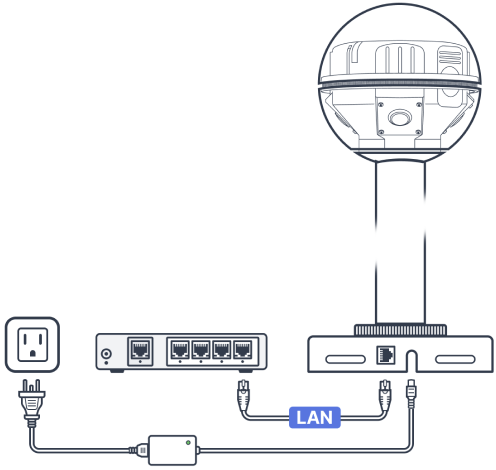
- Mount your Eagle Eye device on a magnetic metal surface. The built-in magnet will hold it securely in place, allowing for a quick, tool-free installation.
- Connect Eagle Eye to network
- Plug an Ethernet cable into the Eagle Eye and connect the other end to your network router or switch.
- Plug the power adapter into the Eagle Eye device and a surge protector, then connect the surge protector to a power outlet.
- Once your devices are powered on, the system handles the rest. No manual setup is required; please allow approximately 5 minutes for the system to initialize after power-on.
For mounting on non-metal surfaces, an optional steel plate is available for purchase. This plate can be secured using the included double-sided adhesive ring or by using screws for a more permanent installation.
For the fastest setup, Eagle Eye, DC Box, and NAS devices must be on the same part of your network (the same subnet). This ensures your devices can "see" and communicate with each other transparently.
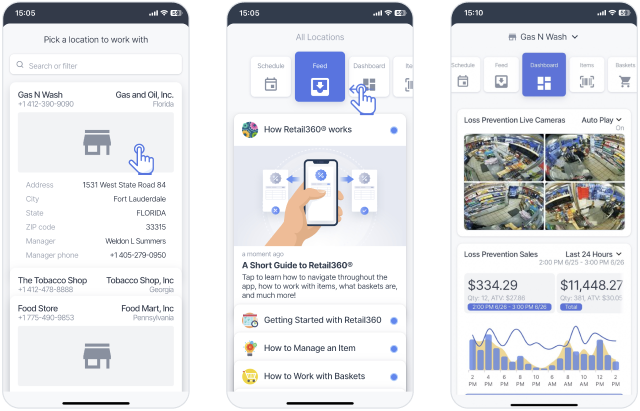
Verify installation
- Open Retail 360 Mobile or CStoreOffice®.
- Open live cameras and ensure all 4 video streams are displayed.