


The key to a successful inventory is making sure all invoices are correct and accepted and all shifts are balanced.
To get a good inventory result, ensure the following:
- The current shift you are working with is closed.
- The brand-new shift is opened.
To start the inventory using scanner:
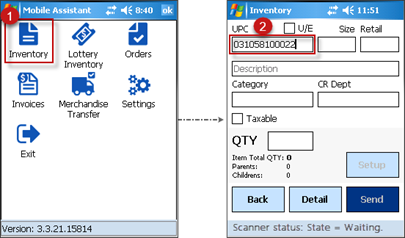
- On the Mobile Assistant main screen, click Inventory.
- On the Inventory screen, scan the item and then press ENT on the scanner’s keyboard.

- (Optional) If you need to edit the scanned item data or the scanned item doesn’t exist in the database and you want to add it to the inventory, do one of the following:
- To edit the scanned item data, click Setup. For more information, see Setting up Items.
- To add a new item:
If the existing item is not scanned from the handheld, see CipherLab 9700 Troubleshooting > Existing item is not scanned for troubleshooting steps.
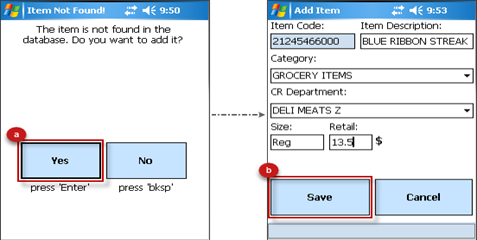
- On the Item Not Found screen, click Yes or press ENT on the scanner’s keyboard.
- On the Add Item screen enter the item’s data and click Save.
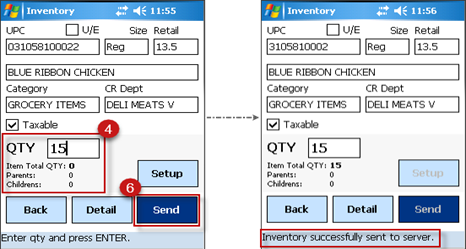
- In the QTY field, enter the number of the items that you have.
- (Optional) If you need to continue inventory, press ENT on the scanner’s keyboard and go to step 2.
- On the Inventory screen, click Send. The inventory of all the scanned and newly added items send to CStoreOffice® Cloud.


Please note that the fields on the Add Item screen correspond to fields on the Item Setup screen. For more information, see Setting up Items.
You can perform the following actions with the items prepared to be included into the inventory on the Inventory screen:
- To see the list of added to inventory items, by clicking Detail.
- To go to the next or previous item, by using the right (VW-R) or left (VW-L) buttons on the scanner correspondingly.


