


To create a new invoice:
- On the Mobile Assistant main screen, click Invoices.
- On the Receive Invoice screen, specify the following fields and click Advanced Invoice:

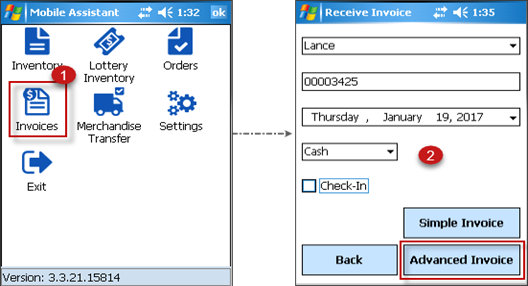
- Select the vendor.
- Enter the invoice number.
- Select the received date for the invoice.
- Select the method of payment: cash, check #, or credit.
- On the new advanced invoice screen, scan the item and then press ENT on the scanner’s keyboard.
- (Optional) If scanned item doesn’t exist in the database or the VIN value is not specified for the item, on the Add VIN to Item screen, specify the following fields and then click Save Item:
- VIN: Vendor Identification Number
- UiC: Units in Case
- Cost: Cost per one unit
- Case Cost: This value calculates automatically when you enter values in the UiC and Cost fields.
Please note that the simple Receive Invoice screen contains the same fields for entering invoice data, excluding the UiC, Cost, Case Cost, Extended Cost fields. Click the Simple Invoice button, if you don’t need to enter data in these fields.
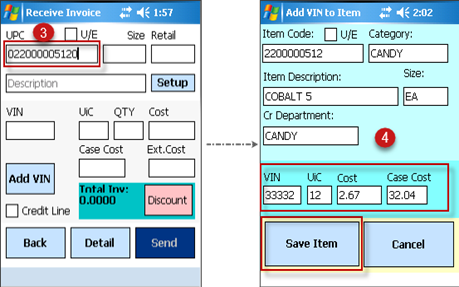
- (Optional) In case the item you scanned doesn’t exist in the database, specify all the other fields on the Add VIN to Item screen.
- On the new advanced invoice screen, specify the following data and then press ENT on the scanner’s keyboard:
For more information on filling out the fields for newly added item, see Setting up Items.
- In the QTY field specify the number of cases in the invoice. The extended cost value in the Ext.Cost field calculates automatically.
- (Optional) Click Add VIN to specify one more vendor identification number, if the item belongs to more than one vendor.
- (Optional) Click Discount to set a discount to invoice (in percent or in dollars).
- (Optional) if you need to continue adding items to the invoice, go to step 3.
- On the new advanced invoice screen, click Send. The invoice with all the scanned and newly added items send to the CStoreOffice® Cloud.
You can perform the following actions with the items prepared to be included into the invoice on the new simple invoice or advanced invoice screens:
- To edit the scanned or added item, by clicking Setup. For more information, see Setting up Items.
- To see the list of added to invoice items, by clicking Detail.
- To go to the next or previous item, by using the right (VW-R) or left (VW-L) buttons on the scanner correspondingly.


