


Docs Scanner supports for the following file formats: JPEG, PNG, and PDF.
To add a document to Docs Scanner:
- From the CStoreOffice® home page, go to Docs and Files > Docs Scanner.
Result: The Docs Scanner interface opens.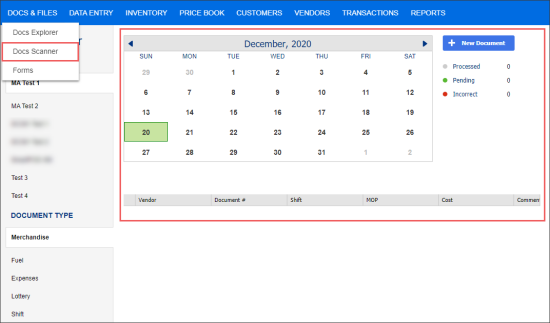
- If you have access to several locations, in the left pane, select the location for which you want to add an invoice. You may search the location you need by its name.
- In the left pane, in the Document Type menu, select the type of the document you are going to add. You have the following options:

In case you don't see your location in the left pane, make sure it is visible. Go to Data Entry > Dashboard > Cash Register > Advanced and make sure the Invisible check box is not selected. For details, go to Advanced Settings.
In case fuel invoices are scanned at the location for the first time, a DPC manager gets the corresponding email notification.
- Merchandize
- Fuel
- Expense
- Lottery
- Shift
- In the central area in the calendar, click the day for which you are adding the invoice or report. By default, the invoice or report is created for the current date.
- To the right of the calendar, click New Document.
Result: The Document Information form opens.
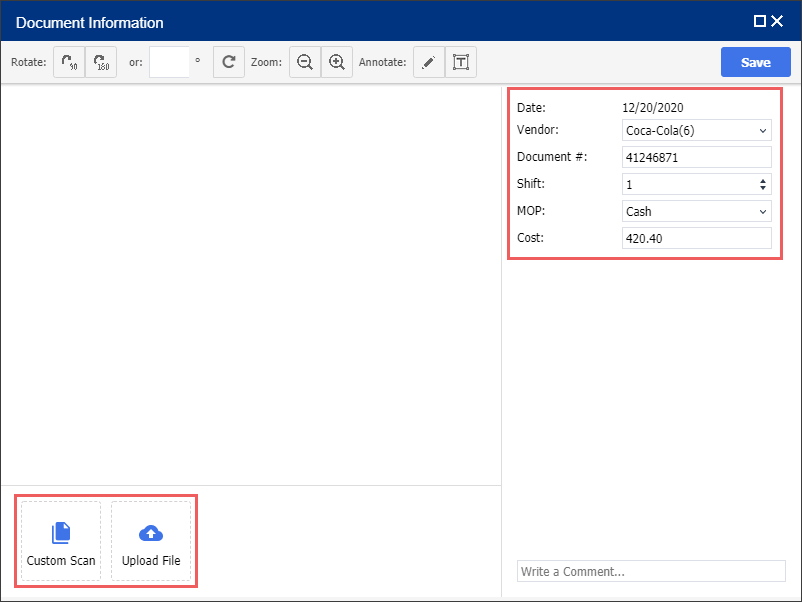
- In the right pane, of the Document Information form, enter the following information about the invoice or report:
- (Invoice only) Vendor: Select the vendor. To filter the list, start entering the name or number of the vendor.
- (Invoice and shift report) Document #: Enter the invoice/shift number from your paper invoice. The document number must meet the following requirements:
- The document number must be unique for the date and shift.
- The document number must be up to 20 characters.
- You cannot enter the same document number of the same shift and date.
- (Invoice and shift report) Shift: Enter the shift when the invoice was received.
- (Invoice only) MOP: Select one of the available methods of payment. If you select Check, in the field below, enter the check number.
- (Invoice only) Cost: Enter the total cost from the invoice in dollars, for example: 420.40
- Use one of the following methods to add an invoice or shift report image:

To be able to scan documents from EDI vendors, make sure the Use Fintech option is enabled for this vendor. For details, see Setting Up Merchandise Vendors.
- Custom Scan: Click this button at the bottom left of the form, if you want upload the document into the system in either of the following ways
- Make a camera snapshot of a paper invoice or shift report.
- Scan a paper invoice using a scanner.
- Upload File: Click this button, if you already have the image on your computer (for example, it was scanned earlier or sent to you), browse to the image, select it and then click Open.

You can use camera or scanner in the Docs Scanner section only of the Dynamsoft Service component is installed on your computer. If it is not installed yet, you will be prompted to install it after clicking the Custom Scan button. For details, see Installing the Dynamsoft Service Component.
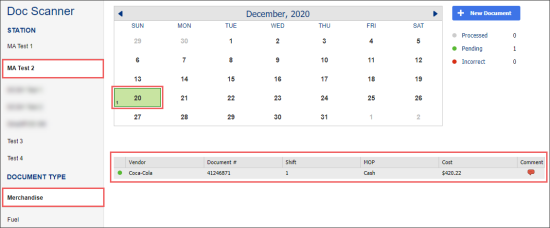
- The image is added to the Document Information window. You can click on it to preview it.
- (Optional) If you want to add a message for the Operator, in the right pane, click Write a comment..., enter the message in the text box and click OK.

The added comment appears in the right pane. The Operator will see the comment during the invoice processing and take the necessary actions or reply to you. You can check if the message has been read and see replies from the Operator when monitoring the status of the invoice later. Read messages are displayed on the white background, and unread messages are displayed on the grey background. For more information, see Monitoring the Status of Invoices and Shift Reports.
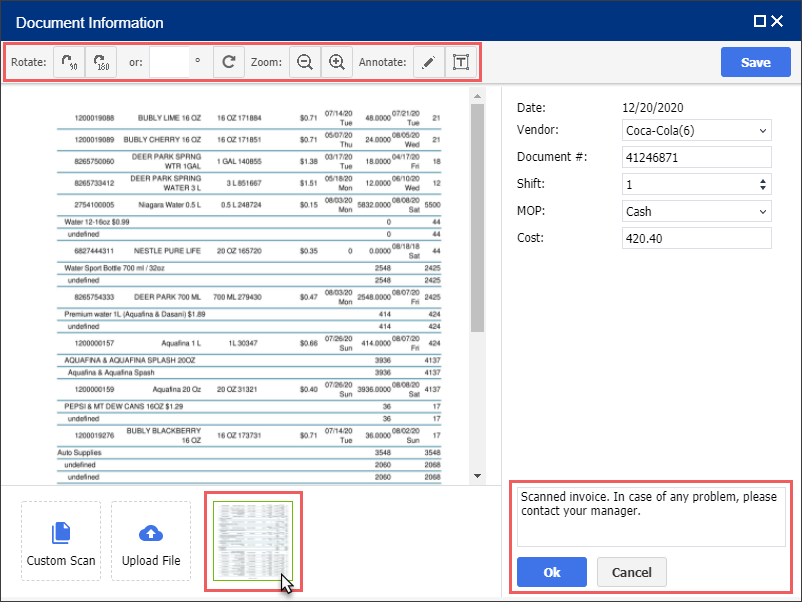
- (Optional) Click the image and edit it using the toolbar above the image preview. You can do the following:
- Rotate the image.
- Zoom the image in and out.
- Add a text right on the image. To do this, click the
 icon, click where you want to place the text on the image, enter the text and press Enter on the keyboard. If necessary, drag the comment to correct its location.
 - To draw freehand lines on the image, click the
 icon and start drawing.
 - (Optional) If you want to add more images, repeat steps 2-10.
- Click Save.
Result: The invoice is sent to the Operator for processing. You can view the status of the invoice at any moment. For more information, see Monitoring the Status of Invoices and Shift Reports.

The workflow in Docs Scanner is flexible. The procedure described above is a recommended one, but you can adjust it. For example, you can upload several images first and then edit them one by one; or you can provide the invoice information (vendor, number, MOP and so on) after adding images.


