We provide fuel monitoring data support for the following ATG brands and models:
- Franklin EVO-400
- Franklin EVO-550
- Pneumercator TMS-3000
- Site Sentinel TS-504
- Veeder Root TLS-350
- Veeder Root TLS-250
- Veeder Root TLS-200
ATG auto discovery
The DC Box detects compatible ATG devices connected through the serial port or local network and automatically sets up the connection for fast integration. ATG auto discovery starts during DC Box activation and works in the background.
If the ATG device is detected but inventory readings are not received, or if no ATG devices are found, you can manually configure the connection settings to resolve the issues.
Manual ATG setup
If the DC Box is unable to automatically configure the ATG connection during activation, you can manually set up the connection using the DC Box activation wizard. Simply follow the on-screen instructions to enter the necessary details, such as the device model, access credentials, and network parameters. The wizard will guide you step-by-step.
If the ATG device is detected but inventory readings are not received, all discovered information will be saved for future use and automatically populated in the activation wizard fields for easier manual configuration. The DC Box will display an error message detailing the issue and highlight the relevant fields that require attention.
- Choose the ATG device model and specify whether the connection is made via the local network (IP) or through the RS-232 serial communications port (Serial).
- If the local network connection is selected, provide the following information:
- IP address of the ATG device in the local network.
- Network port (TCP) of the ATG device.
- Password used to access ATG device data.
- If needed, expand the Advanced settings section and change the default subnet mask in the Network mask field.
- If the serial port connection is selected, provide the following information (refer to ATG device manual for details):
- Baud Rate: The number of bits transmitted per second.
- Data Bits: The number of bits that are used to represent each character in the transmission.
- Parity Check: Error-checking mechanism used to ensure data integrity during transmission.
- Stop Bits: Stop bits signal the end of a transmitted data packet.
- Click the Test Connection button to check the correctness of ATG connection settings and save the configuration. If an issue occurs, the wizard will display an error message explaining the problem and highlight the fields that need to be addressed.
If you are unsure about the ATG configuration at this moment, you can skip ATG setup by clicking the Do not connect ATG button and complete the configuration later. All previously configured parameters will be saved, allowing you to resume the configuration from where you left off.
You can also configure ATG connection settings under station options in CStoreOffice®.
Checking ATG connection status
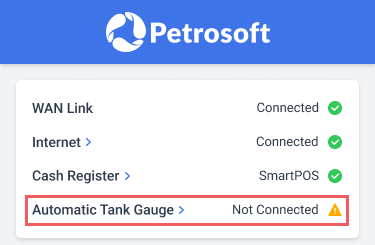
The current state of the ATG device is shown as an icon next to the Automated Tank Gauge.
- ATG device model: The ATG device has been successfully connected, and the system is now receiving fuel inventory readings from it.
- "Not Connected": The ATG is missing or the automatic discovery failed for any reason. Try to configure the device manually.
- Rotating indicator: The ATG auto discovery is currently in progress.


