This page contains instructions for location or field technicians.
- Mobile device with Wi-Fi (smartphone, tablet, laptop). In this case, move to step 2.
- A computer or laptop with the Ethernet port. In this case, move to step 3.
- Connect to the DC-420 Network in the following way and then move to step 4:
- Open up the camera application on your phone, as if to take a new picture.
- Pan the camera view over the QR code, located on the top of the DC Box.
-
Accept the prompt that has appeared on your phone to automatically connect to the DC Box.
In case you could not connect to the DC-420 Network following the steps a-c described above, do the following:
Press the power button twice, find the DC-420 Network on the mobile device and connect to it using the password from the sticker or scan the QR code located on the top of the DC-420.
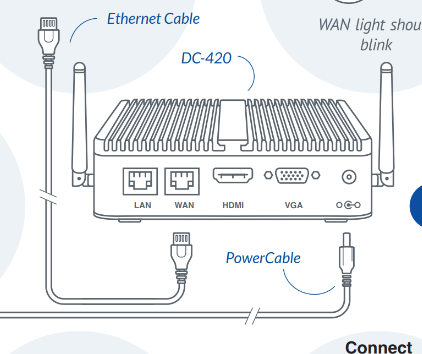
- Connect the computer or laptop to the DC Box LAN port using the Ethernet cable. Make sure the LAN indicator lights are on.
If the DHCP to the computer from the DC Box fails, use the following static configuration on the machine:
- For the DC-420, use the static configuration of 10.20.2.2, netmask 255.255.255.0 and the gateway of 10.20.2.1.
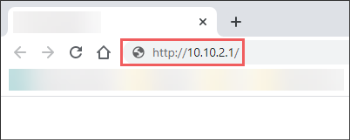
- Open the browser and navigate to the DC Box IP address as it is displayed in the image below.
- Validate the network setting by clicking the Test connection button. Is your connection status online?
- Yes, the network settings are valid. In this case, move to step 7.
- No, the network settings are invalid. In this case, move to step 6.
- Repeat step 5 and enter the valid settings specific for the location. Move to step 5.
-
Navigate to the POS Settings step and click the Test connection button. Is your connection status online?
(Refer to Activation Guide for visual.)
- Yes, POS settings are valid. In this case, move to step 9.
- No, POS settings are invalid. In this case, move to step 8.
-
For ITL CV POS only. Check if the POS IP address matches the settings in the activation wizard.
The POS IP address must be +1 digit higher from the gateway IP address.
Example
Gateway: 192.168.1.3
POS IP: 192.168.1.4 - Make the Petrosoft user credentials on the POS:
- Login: Petrosoft (not the admin user)
- Password: P3tr0s0ft4!2
- Log out and log in with Petrosoft credentials on the POS.
- Log in back as the admin user at the POS.
- Set permissions (share) Import and Export folders with the Petrosoft user and give "Full Control".
- Restart the POS. Wait for 5 minutes.
-
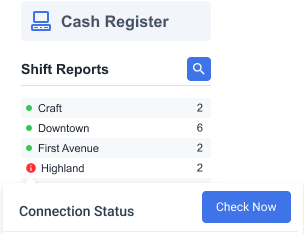
On the home page of CStoreOffice®, hover the cursor over the red connection status icon and click Check Now.

- If the issue persists, repeat step 5. If the issue will persist after it, submit a ticket or contact Support.