


- Assigning cameras to slots
- Update camera settings
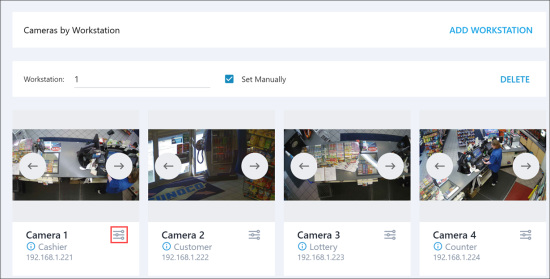
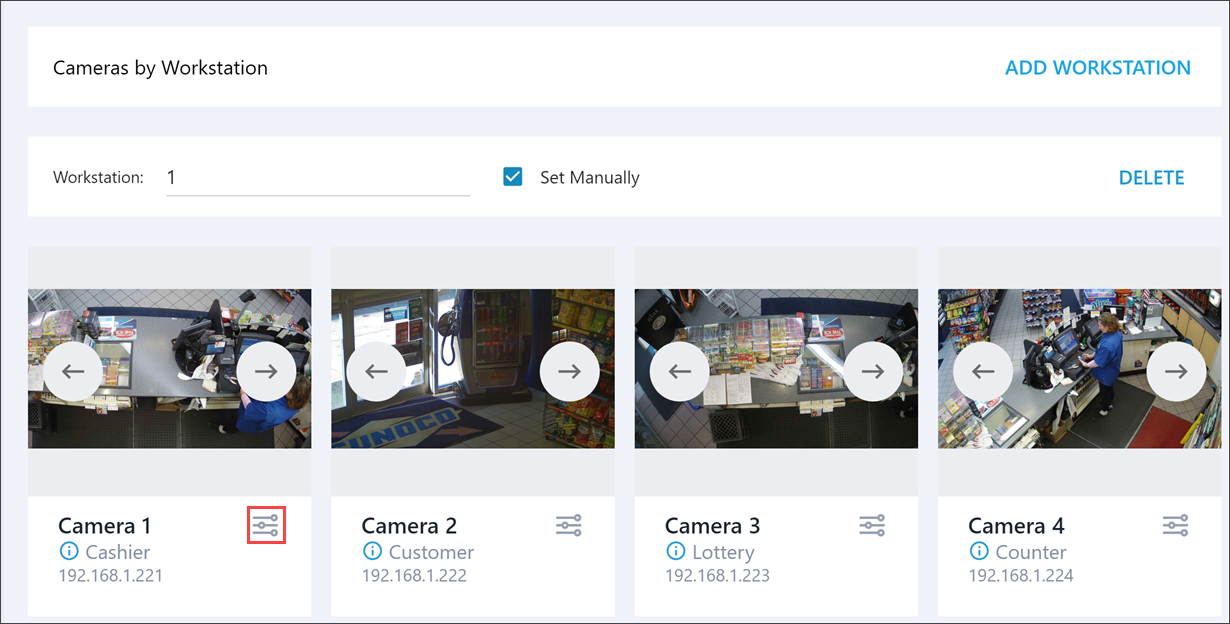
- Add and delete workstations
- Add and delete cameras
Assigning cameras to slots
When you access the location's Cameras section for the first time, Loss Prevention Analytics automatically creates the workstation. The system discovers all compatible cameras in the local network and automatically populates the workstation's camera slots with videos from the first 4 cameras (based on their IP addresses). This default configuration is remembered for the future and is used for the Loss Prevention Analytics Video Journal and the Settings Console.

If there are more than 4 cameras at the location, or if the cameras are assigned incorrectly (for example, the customer-facing camera is set as the cashier desk camera), you can reassign the correct camera to each slot as needed. Click the left and right arrow buttons overlaying the video slot to switch its video source to a different camera. Refer to the IP address displayed below the video to identify the camera currently streaming in the slot.

For example, in the video slot, the video stream from the camera with IP address 192.168.1.225 is displayed. To change the video stream to the camera with IP address 192.168.1.226, click the right button. To change the video stream to the camera with IP address 192.168.1.224, click the left button.
Video streams
For optimal performance and minimized bandwidth usage during real-time video streaming, Loss Prevention Analytics requires that the compatible camera can broadcast at least two simultaneous video streams. While both streams deliver the same video content, they are optimized differently to balance quality and required bandwidth.
- Main stream: A high-quality video stored in the journal for retroactive review and auditing. It provides maximum detail and clarity, though it comes with a significantly larger file size.
- Sub stream: A lower-quality video with reduced detail, requiring significantly less bandwidth, making it ideal for real-time streaming.
The URL for each video stream (sometimes referred to as a channel) is pre-configured by the camera's manufacturer. For details, read the camera's documentation.
Updating camera settings
While Loss Prevention Analytics tries to automatically set up your environment, you can configure a specific camera manually.
- In the Camera Settings section, at the bottom right of the camera slot, click the settings icon. The settings panel for the selected camera will appear on the right.
- In the Camera <#> pane, change the following settings:
- Use Camera for Face detection: Select this option to capture a photo from the camera during an age-restricted transaction. These photos will be shown in the Age Verification Report.
Video from the camera is always recorded regardless of this option and is available in the Video Journal. - IP: Select the IP address of the camera.
By default, all compatible cameras in the local network are discovered automatically. If you do not see the IP address of your camera in the list, select the Set Manually option and type in the IP address in the IP field. - Login: Specify the user name to connect to the camera.
- Password: Specify the password to connect to the camera.
- Main Stream Path: Specify the path to the main video stream relative to the camera's URL. The path should always start with the slash (/). If the main stream is broadcast at the root of the camera's URL, enter
/.
This setting is optional. Loss Prevention Analytics will attempt to automatically determine the optimal configuration based on your camera's model. - Sub Stream Path: Specify the path to the sub video stream relative to the camera's URL. The path should always start with the slash (/). If the sub stream is broadcast at the root of the camera's URL, enter
/.
This setting is optional. Loss Prevention Analytics will attempt to automatically determine the optimal configuration based on your camera's model. -
Example
Hikvision cameras broadcast the sub (real-time) video stream at the URLrtsp://<login>:<password>@<IP>/Streaming/Channels/2. Therefore, you should use/Streaming/Channels/2as the Sub Stream Path. - Manufacturer: Select the camera manufacturer.
By default, the entire video frame is saved as a photo. To focus on a specific area, click Edit Detection Area and adjust the frame by dragging it over the image.
It is recommended to enable this feature for the Customer zone (second camera).
Example
Hikvision cameras broadcast the main (high-quality) video stream at the URL rtsp://<login>:<password>@<IP>. Therefore, you should use / as the Main Stream Path.
- Click Done to save the changes.


Adding and deleting workstations
LPA cameras are grouped by workstations. There can be no more than four cameras in one workstation. If you have more than one workstation set for the location in CStoreOffice®, you can add workstations in the LPA Settings Console.
To add a workstation:
- At the top right of the Camera Settings section, click Add Workstation.

Result: A new workstation is added at the bottom of the section.
- In the Workstation field, specify the name for the new workstation. By default, LPA automatically discovers all workstations registered in CStoreOffice® and displays them in the list. You can also enter the workstation name manually. To do this, select the Set Manually check box and in the Workstation field, enter the workstation name.
- At the top right of the Camera Settings section, click Save Settings.

To delete a workstation from the settings console, to the right of the workstation, click Delete and confirm deletion. Note that cameras added to the workstation are deleted as well.

Adding and Deleting Cameras
You can add and delete cameras from workstations in the settings console. A maximum of 4 cameras can be added to the workstation pointing to different areas at the location:
- Cashier/drawer.
- Customer.
- Lottery box.
- Counter.
To add a camera:
- Under the necessary workstation, click Add Camera.

- In the Camera <#> pane to the right, specify the following settings for the camera:

- IP: Select the IP address of the camera.
By default, all compatible cameras in the local network are discovered automatically. If you do not see the IP address of your camera in the list, select the Set Manually option and type in the IP address in the IP field. - Login: Specify the user name to connect to the camera.
- Password: Specify the password to connect to the camera.
- Main Stream Path: Specify the path to the main video stream relative to the camera's URL. The path should always start with the slash (/). If the main stream is broadcast at the root of the camera's URL, enter
/.
This setting is optional. Loss Prevention Analytics will attempt to automatically determine the optimal configuration based on your camera's model. - Sub Stream Path: Specify the path to the sub video stream relative to the camera's URL. The path should always start with the slash (/). If the sub stream is broadcast at the root of the camera's URL, enter
/.
This setting is optional. Loss Prevention Analytics will attempt to automatically determine the optimal configuration based on your camera's model. -
Example
Hikvision cameras broadcast the sub (real-time) video stream at the URLrtsp://<login>:<password>@<IP>/Streaming/Channels/2. Therefore, you should use/Streaming/Channels/2as the Sub Stream Path. - Manufacturer: Select the camera manufacturer.
Example
Hikvision cameras broadcast the main (high-quality) video stream at the URL rtsp://<login>:<password>@<IP>. Therefore, you should use / as the Main Stream Path.
- To verify the camera's connectivity and provided credentials, click the Test connection link.
- At the top of the Camera pane, click Done to add the camera to the workstation.
To remove a camera, at the bottom right of the camera slot, click the settings icon and at the top of the Camera pane, click Delete. Then confirm the camera deletion.
If you delete the camera, its real-time broadcast will no longer be available, and its video streams will no longer be recorded in the journal.
However, all previously recorded videos will remain in the system.


