


Video record for events are displayed with an offset. For example, if you set the offset to 15 seconds and a sales transaction occurs at 10:30:15 AM, the video capturing the transaction will start 15 seconds earlier, at 10:30:00 AM. You can define the offset duration using the LPA Dashboard. For details, see Configuring General Settings.
Prerequisites
- Loss Prevention Analytics collects information from cash register transaction logs (PJR files). For this reason, you need to have PJR file processing enabled for cash registers. For details, see Enabling PJR Files
- If video is not available for your account, Loss Prevention Analytics displays a placeholder instead of the video.
Using Quick Filters
Loss Prevention Analytics offers a set of presets, or quick filters, for the Video Journal. Quick filters are located in the left pane of the Loss Prevention Analytics window. You can click a specific quick filter to quickly get the necessary report data.
| Preset Name | Preset Filtering Settings |
|---|---|
| All events | Clears all selected presets |
| Bookmarks | Bookmarks - shows all bookmarked events |
| Voids & Cancels | - MOP - Cash - Sale / Alert - Void in Sale - Sale / Alert - Void all Sale Voids data is displayed including taxes as it is taken from the transaction. |
| Refunds | - MOP - Cash - Refunds - Itemized Refunds (item refunds) - Refunds - Non-itemized Refunds (department refunds) |
| No-Sale | Other - No-Sale |
| Discounts | - MOP - Cash - Sale / Alert - Discount |
| Direct Department Sales | - Sale / Alert - Direct Department Sales - Sale / Inside / Outside - Inside Sales |
| Age Restricted Sales
(available only for Verifone CR) |
Alert - Age Verification: - Scanned - Manual - Skipped |
| Cash Control | - Financial - Safe Drop - Financial - Pay Out - Sale / MOP - Cash - Sale / Sum > $100 - Sale / Inside / Outside - Inside - Sales Fuel / Merch Sales - Merchandise |
| Payments Control | - Sale / Sum > $50 - MOP - Credits - Sale / Inside / Outside - Inside Sales - Fuel / Merch Sales - Merchandise |
| FDA Compliance | - MOP - Food Stamps - Sale / Inside / Outside - Inside - Sales Fuel / Merch Sales - Merchandise |
| No Event | No Event - enabled |
For more details on how to apply report filters, see Working with Filters.
Working with the Video Journal
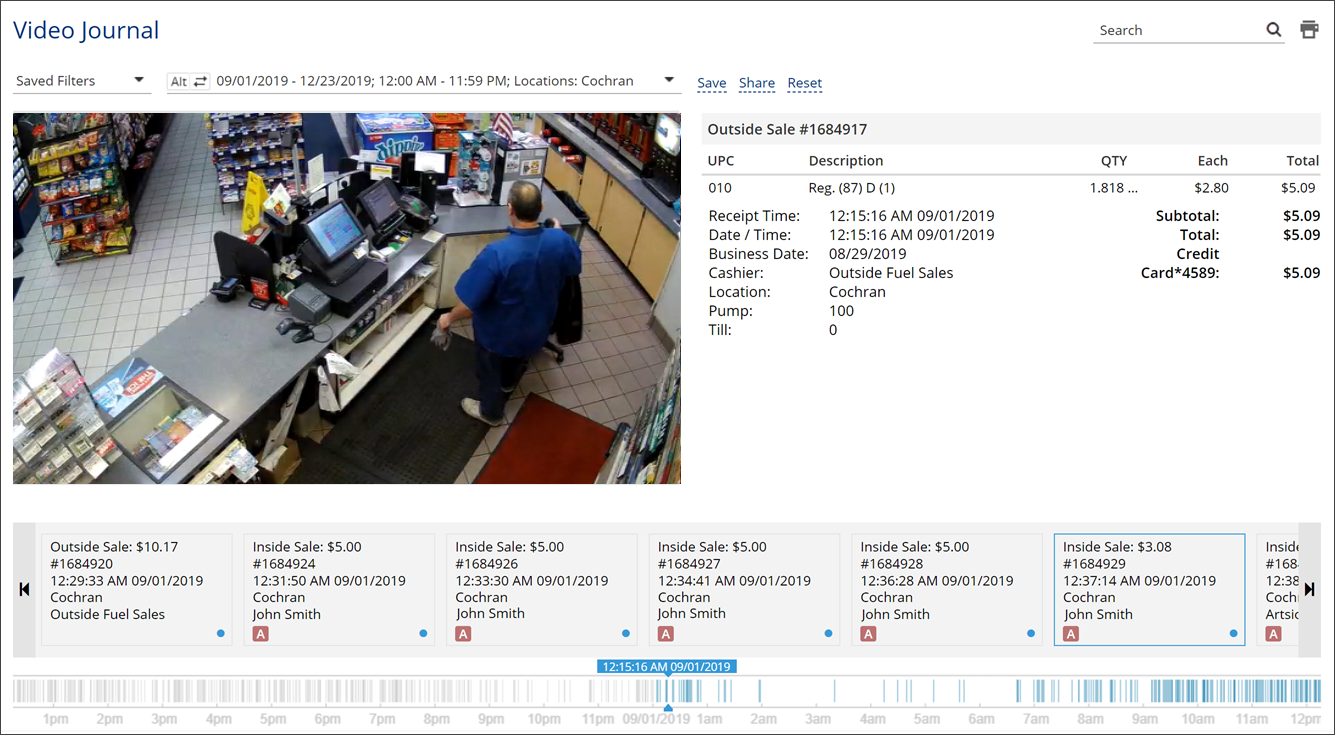
The Video Journal contains the following information on the events:
- Event type: Inside or outside sale, cancel, refund and so on.
- Transaction amount: The amount or the transaction if applicable.
- Event number: The numeric identifier of the transaction.
- Date/Time: The date and time of the transaction.
- Location: The location at which the transaction occurred.
- Employee: The employee who performed the operation.
- Alert: An alert icon if present.
To drill down to event details, you can perform the following operations:
Viewing the Event Details
Events are presented as a list in the timeline at the bottom part of the Video Journal.
- To navigate through the events, use the mouse wheel or click the right and left buttons at the rightmost and leftmost of the timeline.
- To view the transaction details, click it in the timeline.

There are the following transaction details available:
- (for sale event) UPC: The item UPC.
- (for sale event) Description: The item description.
- (for sale event) QTY: The number of items of the same UPC.
- (for sale event) Each: The price of a single item.
- (for sale event) Total: The total for the items with the same UPC.
- (for sale event) Subtotal: The event subtotal.
- (for sale event) Tax: The tax amount (is not displayed when equals 0)
- (for sale event) Fee: The item fee if applicable (is not displayed when equals 0).
- (for sale event) Total: The event total.
- (for sale event) Cash: The cash amount.
- (for sale event) Credit Card: The credit card payment amount and the last 4 digits of the card used.
- Date/Time: The date and time of the event.
- Business Date: The business date of the device, which switches after changing shifts.
- Cashier: Cashier's first and last name.
- Location: The location name.
- Register: The register number.
- Till: The cash drawer identifier.
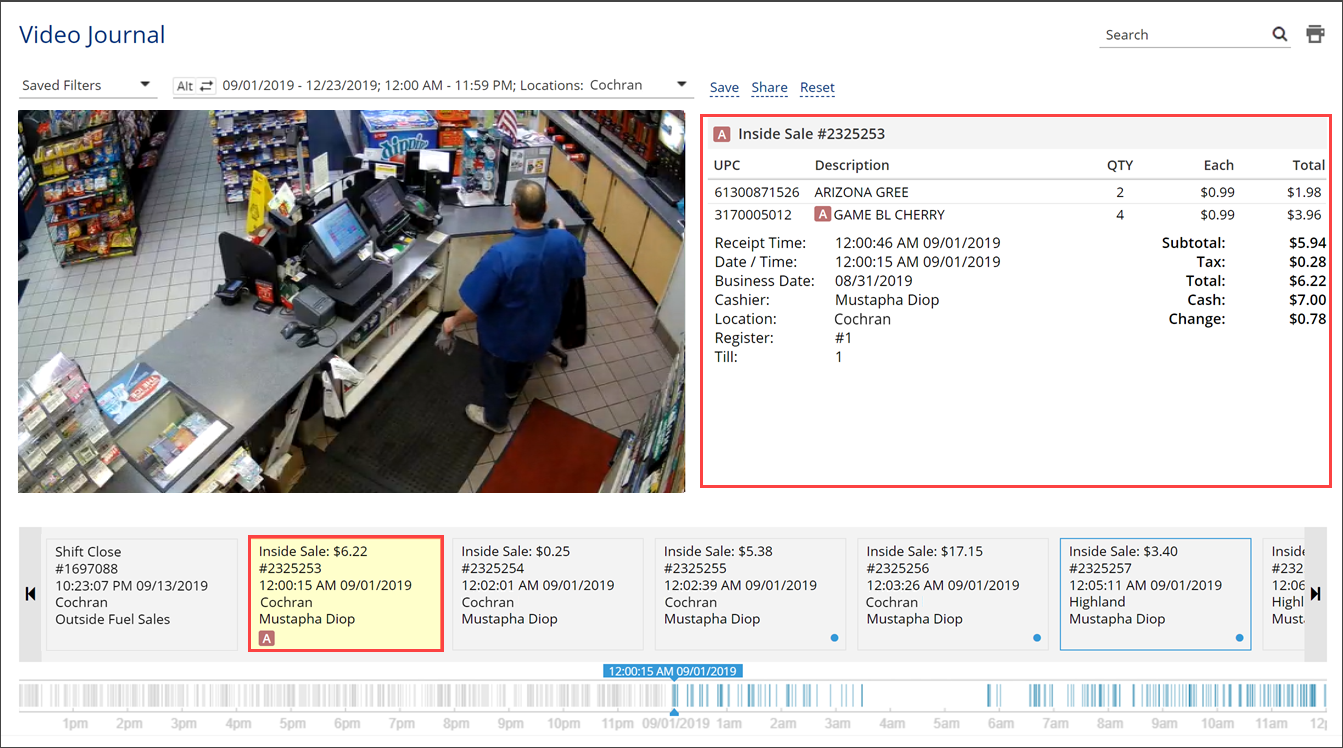
Checking Event Markers
There are the following event markers that require special attention:
- A: Age verification
- C: Cancel (canceling one item)
- D: Discount
- N: No sale
- P: Price Override
- R: Refund
- V: Void (canceling the whole transaction)
- W: Additional information from IBM Watson is available for the event.

To view the alert explanation, hover the cursor over it.
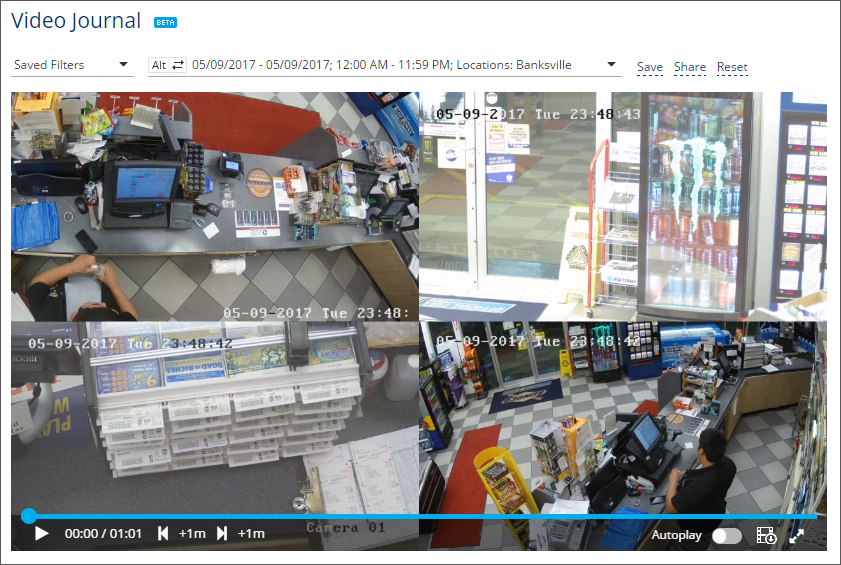
Customizing Video Settings
You can customize the video display settings to meet your needs.
- To view the video in the full screen mode, at the bottom right, click the full screen icon.
- To download a specific video in the MP4 format, click the download icon.
- To select the view from a different angle, hover the cursor over the video and then select the camera you need.
- To increase the timeframe of the selected event, click +1m to add an extra minute before or after the event. It is possible to add up to 20 minutes before and after the event.
When the video for the selected event ends, the video from the same camera for the next event starts playing automatically.
Using Keyboard Shortcuts
You can use the following keyboard shortcuts when working with the Video Journal:
- To enter the full screen mode, press F on the keyboard. To exit the full screen mode, press F or Esc on the keyboard.
- To navigate through the cameras, press 1, 2, 3 or 4 on the keyboard.
- To get back to the dashboard camera view, press Q on the keyboard.
- To pause the video, press SPACE on the keyboard. To start the video after the pause, press SPACE again.
- To select several events for printing, press and hold the CTRL key on the keyboard and then select the necessary events.
- To copy information to the Clipboard, hover the cursor over the information and double-click with the left mouse button.
- To navigate through the events, use the mouse wheel.
- To select a transaction ID for copying, select it by double-clicking with the left mouse button.
![]()
Investigation Tips
- To print a specific event, open it and at the top right of the event, click the print icon. To select several events for printing, use the CTRL key on the keyboard.
- To search for an event by the event number, at the top right of the event, click the search icon and enter the event number.
- To postpone a suspicious transaction/event for further investigation, bookmark it. You can review it later using the Bookmarks filter.


