


After setting up the price book, you can start sales. Some operations are available when the basket queue is empty, some operations are available only if there is at least one item in the basket queue.
Empty-basket state
![]()
1. Basket queue. The basket queue represents a shopping cart with items a customer intends to purchase. Tap an item to select it in the basket queue. Swipe the basket queue up or down to scroll it.
2. Current user name and time and date.
3. Favorites tab. Add your favorite items to the basket queue from this tab. To add an item to this tab, find the item in the Departments tab, tap and hold the item, tap the stars button twice, and tap Save.
4. Departments tab. Add items from selected department to the basket queue from this tab. Tap a department to select it and tap an item to add it to the basket queue. Tap the magnifier icon on the Input box to search for items by the name you enter with the virtual keyboard.
5. Pending tab. View and manage pending orders in this tab. A pending order represents a list of items from the basket queue on hold.
6. History tab. View executed transactions in this tab. You can reprint the receipt for any transaction, but the no sale. To reprint the receipt, tap the transaction in this tab and tap the Print button. Tap the magnifier icon on the Input box to search for transactions. Right to the Input box, tap the ID you want to search by, and enter the ID with the virtual keyboard.
7. To open the help, tap the question mark and tap Help.
8. Scroll bar. Swipe up or down to scroll where the scroll bar appears.
9. Input box. If you tapped the magnifier icon, tap the cross icon on this box to hide the virtual keyboard.
10. Backspace. This is the backspace key for the Input box.
11. Refund button. Tap it to refund the last transaction within 30 seconds after its execution. In the History tab, tap the transaction you want to refund, tap the Refund button, and scan the item you want to refund with the barcode scanner.
12. Drops button. To remove cash from the cash drawer for storing it elsewhere, tap this button, enter the amount with the number pad, tap this button again, and extract the cash.
13. @ / for button. Use it to add specific quantity of an item to the basket queue. Enter quantity with the number pad, tap this button, and scan the item or tap it in the Departments tab or Favorites tab.
14. Pay In button. The pay-in allows you to credit cash to house accounts. Tap this button, select the house account, enter the amount you want to credit with the number pad, and select the payment method (cash, credit card, or check).
15. No Sale button. Tap it to open the cash drawer not for sales purposes.
16. Pay Out button. The pay-out allows you to remove cash from the cash drawer to pay to vendors or for other expenses. To issue a pay-out, enter the amount with the number pad and tap the Pay Out button.
17. Number pad.
18. Tap C to clear the Input box.
19. PLU / SKU button. Use it to add an item to the basket queue by entering the product code. Only numeric codes are supported. Enter the code with the number pad and tap this button.
Item-present state
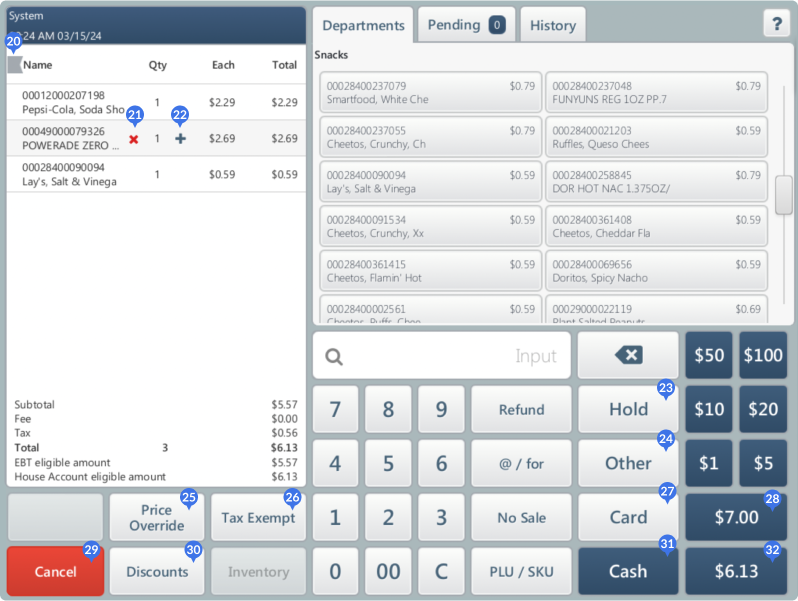
20. Bookmark. Tap it to bookmark a receipt. The transaction will appear bookmarked in the History tab.
21. Red cross icon. Tap it to reduce quantity of the selected item.
22. Green plus icon. Tap it to increase quantity of the selected item.
23. Hold button. Tap it to hold the current basket queue and start working with the next customer. You can find the saved basket queue in the Pending tab.
24. Other button. Tap it to choose other available method of payment (MOP).
25. Price Override button. The price override allows you to sell items at a price different from the price stated on the item. Select the item in the basket queue you want to override the price for, enter a new price with the number pad, and tap the Price Override button.
26. Price Override button. The price override allows you to sell items at a price different from the price stated on the item. Select the item in the basket queue you want to override the price for, enter a new price with the number pad, and tap the Price Override button.
27. Card button. Cards can be used for payment when a PIN pad is connected to SmartPOS.
28. Total due rounded button.
29. Cancel button. Tap it once to remove the last added item from the basket queue. Tap and hold this button to void all items in the basket queue.
30. Discounts button. Apply discounts to specific items or the whole basket queue. Tap this button to apply a discount for the whole basket queue. Select an item and tap this button to apply a discount for the selected item.
31. Cash button. Enter cash amount the customer handed over to complete the transaction. You can enter the amount by tapping one of the buttons with dollar sign in the lower right part of the screen. To enter the amount manually, tap the Cash button, enter the amount with the number pad, and tap the Cash button again.
32. Total due button.


