Working with Pending Cycle Count Tickets
Pending cycle count tickets are the tickets that have been created or uploaded to CStoreOffice® but are not confirmed yet. To view the full list of pending tickets, go to Inventory > Counts > Itemized Inventory.
A pending ticket can belong to one of the following groups:
- Created in CStoreOffice®: These are tickets that you have created manually in CStoreOffice®.
- Uploaded from Handheld Device or File: These are tickets that been uploaded to CStoreOffice® from an external source — a file or handheld device.
You can perform the following operations with pending cycle count tickets:
- Delete a ticket:
- Select the check box next to the ticket you want to delete.
- At the top right of the tickets list, click Delete.

- Merge tickets:
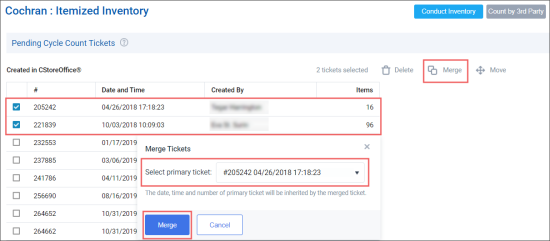
- Select the check boxes next to two or more tickets you want to merge.
- At the top right of the tickets list, click Merge.

Result: The Merge Tickets form opens. - In the Merge Tickets form, select the ticket that you want to assign as the primary ticket while merging.
- At the bottom left of the Merge Tickets form, click the Merge button.
The merged ticket will have the date, time, and number of the selected primary ticket.
- Move a ticket to another location:
- Select the check box next to the ticket
- At the top right of the tickets list, click Move.

Result: The Move Ticket(s) form opens. - In the Move Ticket(s) form, select the station to which you want to move the selected ticket.
- At the bottom right of the Move Ticket(s) form, click the Move button.
Working with Processed Cycle Count Tickets
You can manage processed tickets and see the results of cycle counts and other inventories in the Item Shortage report.
The Item Shortage report allows you to see items inventory adjustments and tickets for the selected period.
Managing processed inventory tickets and cycle count tickets
This training covers the process of managing processed inventory tickets and cycle count tickets.
To open the Item Shortage report, do one of the following:
- Go to Inventory > Counts > Itemized Inventory and in the left menu, under Related Links, click View Inventory Shortages.
- Go to Reports > Store > Inventory > Shortages > Item Shortage.
You can work with the report in the following manner:
- At the top of the report form, select the view mode for the report:
- To show all items, select Processed Items.
- To show the report results only by items quantity of which were adjusted because of ticket processing, select Adjusted Only.
- To switch to the investigation view mode, click Investigation View.
- To show items whose prices were changed, click Price Change Investigation View.
- Click Refresh.
- To perform the advanced filtering, at the top of the form, click Advanced.
- To show report subtotals merchandise by category, expand the necessary category > expand the necessary subcategory.
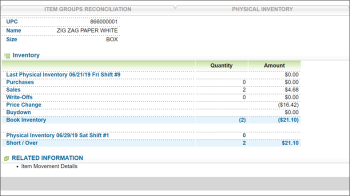
- To see the detailed item data, in the Short column of the Item Shortage Report, click the cost or retail value of this item.
- To see the details on the desired parameter sorted by dates, click the desired entry.
- To see the parameter details on the specific date, click the desired date entry.
For more details on Item Shortage Report options, see Item Shortage Report.


