Working with Tasks
You can perform the following operations with tasks:
Adding a New Task
To add a task to the CStoreOffice® home page:
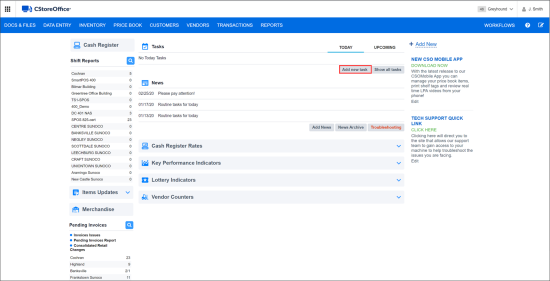
- On the CStoreOffice® home page, in the Tasks section, click Add new task.
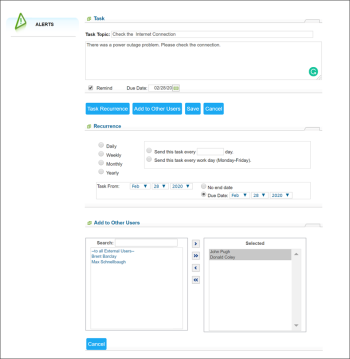
- In the Task Topic field, enter the task title.
- In the field below, enter a detailed description for the task.
- If you want to create a task that repeats with some periodicity, click the Task Recurrence button and specify how often you want the task to repeat.
- If you want to assign the task to other employees, click the Add to Other Users button. In the left box, select the user(s) to whom you want to assign the task and click the arrow icon to move these users to the right box.
- Click Save to save the task.
Result: The task is displayed on the home page in the Tasks section.
You can perform the following activities with published tasks:
- View all tasks: To do this, click Show all tasks under the tasks list.
- View current and upcoming tasks: Use the Today and Upcoming tasks tabs to switch between the tasks lists.
- Mark a task as complete: If the task is assigned to you and you have completed it, open the tasks list and at the top right corner of the task, click the Complete link.
In the Upcoming section, the tasks for the coming week are displayed.
Viewing Tasks added Automatically by the System
In the Tasks section, you can view some system notifications which warn you about some issues and actions to be taken for troubleshooting. Examples of such notifications are listed below:
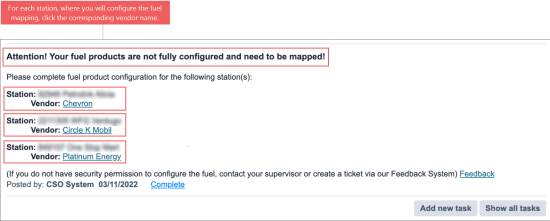
- Attention! Your fuel products are not fully configured for the following station(s): This task is added by the system in case a new fuel product is stated in the fuel EDI invoice and not recognized by the system yet.
 How to troubleshoot the issue with unrecognized fuel products
- Click the vendor name for the station where you will configure fuel mapping.

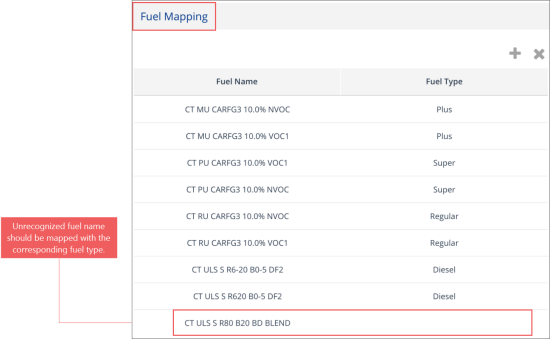
Result: The Fuel Mapping section on the EDI Vendor setup form opens. - In the Fuel Mapping section:
- Find the fuel name which was not recognized by the system. It does not have the fuel type assigned.
- In the Fuel Type list, select the corresponding fuel type for unrecognized fuel.
- Click Update and then click Save.
- Go to Data Entry > Fuel Invoice and reprocess missing EDI invoice.
- After configuring fuel mapping settings for all vendors and stations, click Complete in the task form, to close it.
- Click the vendor name for the station where you will configure fuel mapping.


