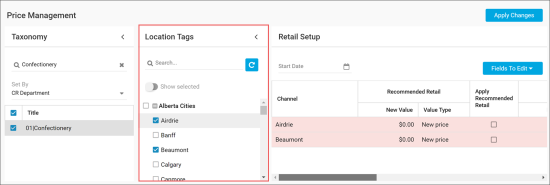
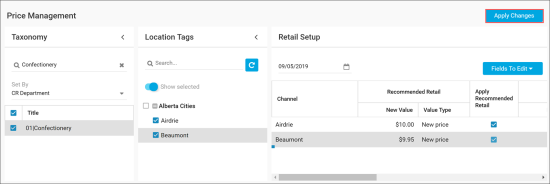
You can use the Price Management module in PIM to update item retail prices and specify cost and vendor settings for locations in bulk.
To manage item prices, you need to perform the following activities:
- Select the item group for which you want to manage prices
- Select locations
- Update prices, cost and vendor settings
- Send updates to locations
Selecting Item Groups
At the first step, you need to select groups of items whose prices and cost data you want to update.
To select the item group:
- Go to Price Management.
- In the Taxonomy section, from the Set By list, select the taxonomy object by which items must be grouped:
- Category
- Price Group
- Promo Group
- NACS Category
- GPC Category
- Item Tags
- CR Department
To quickly find the necessary item group, in the search field at the top of the Set By list, enter the group name or a part of it. Item groups in the list below will be filtered by the entered name.
Selecting Locations
You need to specify for which locations you want to update item prices. The Price Management module allows you to update item data for locations by location tags.
To select locations:
- In the Location Tags section, expand the tags tree.
- Select check boxes next to one or more tags assigned to the necessary locations.
To facilitate work with location tags, you can do the following:
- To quickly find the necessary location tag, in the search field at the top of the tags list, enter the tag name or a part of it. Location tags in the list below will be filtered by the entered name.
- To filter out only selected location tags, set the Show selected toggle to the On position.
Updating Prices, Cost and Vendor Settings
Once the item groups and location tags are selected, you can update the item prices in bulk.
To update the item prices, cost and vendor settings:
- To the right of the Retail Setup section, click Fields to Edit and select item attributes that you want to update.
- In the channels list, for each channel, specify values of the selected attributes:
- Recommended Retail: Specify the purchase price recommended by the account owner.
- Apply Recommended Retail: Enable this option if you want to forbid the recommended retail price change at the locations.
- Min Retail: Specify the least possible retail price value for the locations.
- Max Retail: Specify the greatest possible retail price value for the locations.
- Vendor: From the list, select the vendor from whom the items in the group must be purchased in the locations.
- Primary vendor: Enable this option if the selected vendor must be primary for the locations.
- Negotiated Cost: Specify the originally agreed price with the vendor.
- At the top of the Retail Setup section, in the Start Date field, specify the date when the updates must take effect.
- At the top right of the Price Management form, click Apply Changes.
Sending Updates to Locations
After you update item prices and costs, the head office manager needs to approve these changes in the Outgoing module of PIM. After that, the changes are sent to branch office locations. For more details, see Updates Manager.


