Every day you need to review pending shifts to verify the information for accuracy. At this step, you will review, accept the data from the cash register and push it into CStoreOffice®.
Reviewing the Shift
Even though the Accept shifts automatically option is enabled for the station, you still need to look at the shifts. Take the shift report or the Daily Close Report from the cash register and compare it to the Shift Report in CStoreOffice®. Verify your numbers.
Use the Station: Cash Register: Reports form to compare the EOD register print out to what was captured in CStoreOffice®. To review the shift:
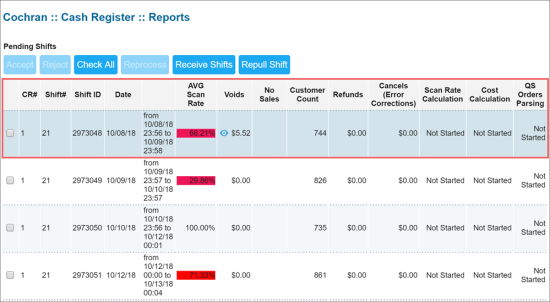
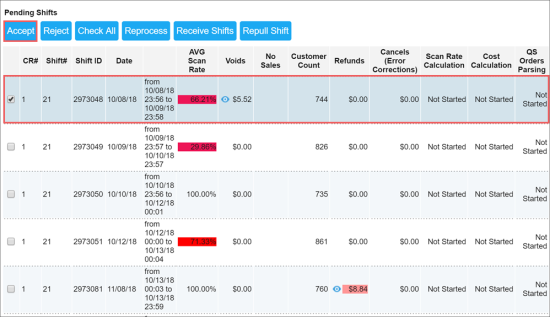
- In the Pending Shifts section, review the shift line: shift date, AVG Scan Rate (shows the percent of items scanned in all departments), Voids, No Sales Transactions and other information in the line.
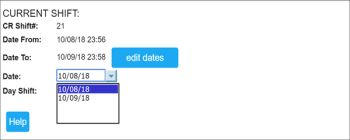
- Below the shifts list, the date information about the current shift is displayed. By default, the date is equal to the date when the shift started. In most cases, the date does not need to be changed.
However, in some cases you may need to change the date. For example, if the shift started on January 31st at 11:00 PM and ran until 10:59 PM on February 1st, there will be only one hour of transactions on January 31st and 23 hours of transactions on February 1st. In this case, you need to change the date to February 1st to reflect accurate reporting.
To change the date, from the date list, select the necessary date.
The edit dates button which allows you to edit the time of the shift is available only for the users with the system role.
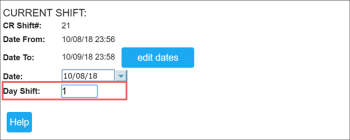
The Day Shift field under Current Shift may be marked pink. In the Day Shift field, enter the correct shift number associated with the pending shift you are accepting. For example, if you are closing a day with one 24-hour shift, you need to enter '1' in the Day Shift field. If you have more than one shift and this is the 2nd shift of the day, enter '2' in this field.
- In the Payroll Data section, you can log hours to track when employees log in and out.
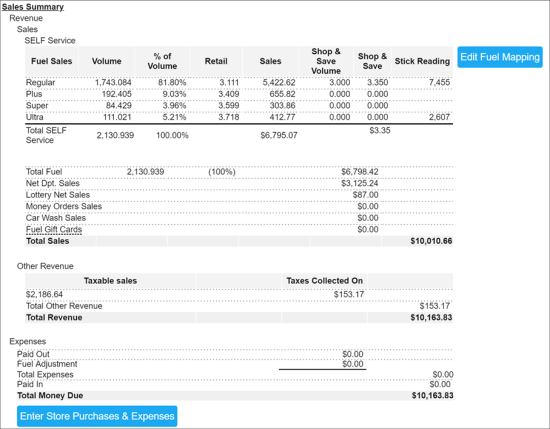
- In the Sales Summary section, check the fuel sales. The fuel sales are listed by grade providing the total sales for the shift.
- In the Custom Income section under the fuel sales information, check the total sums.
- In the Other Revenue section, taxable sales are listed and followed by the Expenses section. In these sections, you can see paid outs as well as fuel adjustments, and total money due.
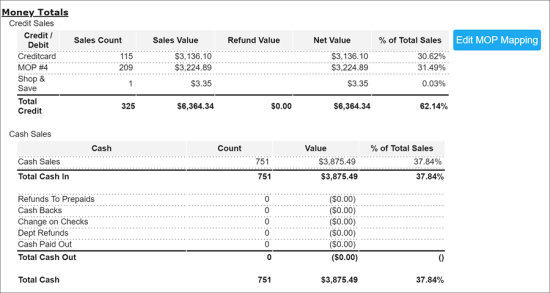
- In the Money Totals section, check the credit sales followed by cash sales that were brought in, and all the cash paid out.
- In the Coupons and Food Stamps section, check information about coupons or food stamps utilized during the shift.
- The House Accounts section provides information about an in-house line of credit you are extending to customers.
At the cash register, you may have just one House Account button that you press to take sales for any house account. In this case, these transactions will come into CStoreOffice® as one lump sum. If you want to itemize the transactions out, click Edit House Accounts. - The Short/Over section displays the difference between the sales reflected in the Cash Register Report and information in CStoreOffice®. This section can contain the following values:
- 0: Every transaction that rang up at the cash register was brought over to the store.
- Any value other than 0: This can be due to a fuel deposit. In the case of a fuel deposit, you will see an overage on the current shift and a shortage on the next shift. It can also be a mapping issue, especially if you are a new customer. At the cash register, you rang up the sale as Credit Card as your MOP, but it wasn’t mapped correctly in CStoreOffice®, and the system doesn’t know where to put that money, therefore creating an overage. In this case, you need to submit a ticket to the Petrosoft Support Team with the subject like: Sales coming in but not matching MOP.
- The NRGT section is the ongoing odometer for the cash register. It’s the ongoing tabulation of all cash register transactions.
- The Miscellaneous Summary section is for your reference. It does not affect the cash balancing.
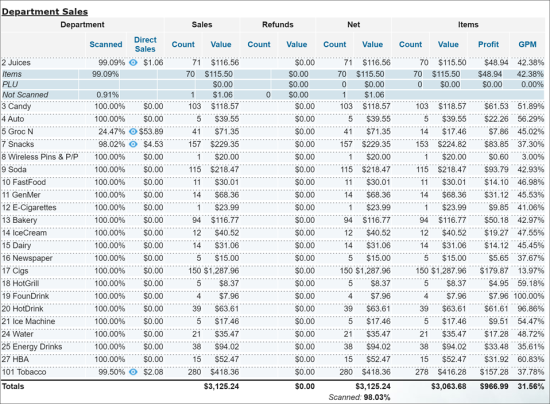
- In the Department Sales section, click the necessary category to expand it and see the item level information. In this section, the AVG Scan Rate is listed by department. You may want to pay attention to this section if you are a new customer and want to make sure the fields were mapped correctly.
- In the Price Change Report section, you can see the list of promotions. To view detailed information on a specific promotion, click it in the list.
- In the Lottery Sales section, you can see lottery sales for the shift: online ticket sales, scratch offs, and money paid out, displaying the total sales.
Accepting the Shift
Once you have reviewed the shift, you must accept it. Even though the Auto Accept Shifts option is enabled for the station, we strongly recommend that you review the shift before accepting it.
The accepting changes feature is permission-based. For more information, see Permissions for Accepting and Rejecting Shifts.
To accept the shift:
- In the Pending Shifts list, select the check box next to the shift and at the top of the list, click Accept.
- Scroll down and make sure that the shift has moved from the Pending Shifts list to the Accepted Shifts list.
To look at a shift beyond the 7-day period:
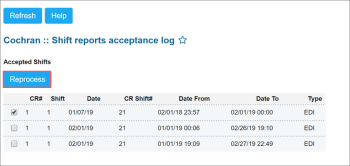
- Scroll down and in the Related Information section, click Shift reports acceptance log.
- Select the date range for the shift you are looking for and click Refresh.
- Select the check box next to the shift that you want to pull back to the Accepted Shifts list and click Reprocess. This operation does not change any shift data. It simply moves the shift to the Accepted Shifts list so that you can view its data.
At the top of the Accepted Shifts list, you can see the Undo button. Do not click this button: you will lose all manual changes that you have made to the shift.
What You Do Next
Once this step is complete:
- At the top left corner of the screen, click the arrow icon to pull down the Workflow menu.
- Click the step to mark it as complete.
- Move on to the next step.
If shifts are not coming into CStoreOffice® correctly, contact the Petrosoft Support Team. To do this, at the top right corner of the CStoreOffice® home page, click the ticket icon.
