


Choose a convenient spot with enough space for the SmartPOS unit and its accessories. The picture demonstrates a sample equipment arrangement after installation.

Make sure there is a power outlet and internet connection nearby.
Connecting cash drawer and receipt printer

Remove the cash drawer from the box and connect the provided RJ11 cable to the port on the drawer's bottom.
Unpack the receipt printer box and connect the included power and USB cables to it. Place the printer next to the cash drawer and attach the other end of the RJ11 cable to the designated port on the printer's back.
Insert the included sample roll of thermal paper into the printer's slot.
Connecting SmartPOS unit
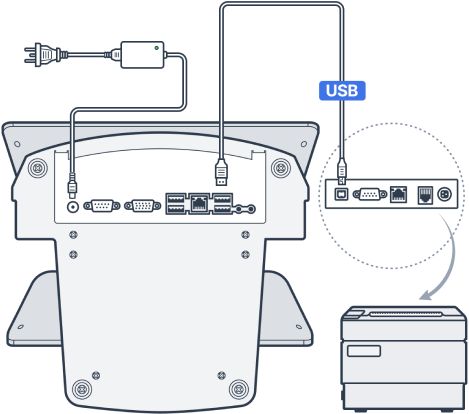
Unbox the SmartPOS unit and connect the provided power cable to it. Connect the other end of the USB cable from the receipt printer to any available USB port on the bottom of the SmartPOS unit.
Do not connect the receipt printer or any other device to the front USB ports of the SmartPOS unit.
Connecting barcode scanner
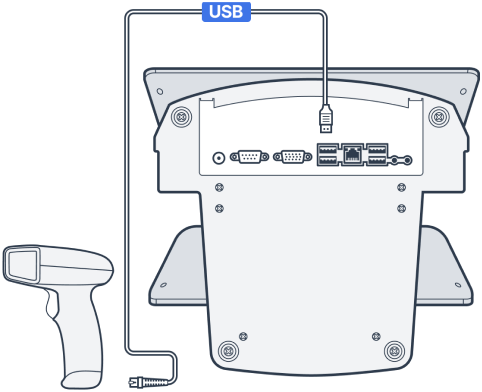
Unpack the barcode scanner box and connect the included USB cable to both the scanner and an available USB port on the bottom of the SmartPOS unit.
Do not connect the scanner or any other device to the front USB ports of the SmartPOS unit.
Finalizing the setup

Connect the provided Ethernet cable to the network port on the bottom of the SmartPOS unit and the other end to your network router or switch.
Place the SmartPOS unit securely on top of the cash drawer.
Plug the power cables from the SmartPOS unit and receipt printer into the surge protector, then connect the surge protector to a power outlet.
Turning on SmartPOS
Power on the SmartPOS by pressing its front-facing power button. The system may initiate an update process.
Once the update is complete, the SmartPOS will reboot, displaying the login screen.


